Do you want to create a quiz in WordPress?
No matter whether you’re testing knowledge or creating viral content like Buzzfeed, quizzes can get more engagement on your site. You can even use them to collect feedback and ideas from your customers, so you can improve their experience.
In this article, we will show you how to easily create a quiz in WordPress.
Why Add Quizzes to Your WordPress Site?
Quizzes are fun and engaging. Since they’re so interactive, users find them more rewarding than other types of form.
Marketers have been using quizzes to generate leads since the very early days of the internet. For example, you might ask for the visitor’s email address so you can send them their quiz results, or ask them to sign up for your email newsletter.
They’re also a great way to get more social shares by encouraging visitors to post their results.
BuzzFeed is probably the most popular example of viral quizzes.

If you sell online courses, then quizzes are an important way to test the student’s knowledge and reinforce learning. Since these quizzes are automated, they’re also an easy way to improve the student experience.
If you run an online store, then you might even create a short quiz that asks the shopper for some information and then suggests a product or service based on their answers.

This is much more engaging than asking them to read through product descriptions and could get you some extra sales.
Having said that, let’s go ahead and see how to easily create a quiz in WordPress.
Creating a WordPress Quiz with Formidable Forms
For this guide, we’ll be using the Formidable Forms plugin. It is one of the best WordPress quiz plugins on the market and allows you to create advanced quizzes using a simple drag-and-drop builder.
Formidable Forms is also one of the best WordPress form builder plugins. This means that once it’s set up on your website, you can use it to build all kinds of forms including contact forms, registration forms, booking forms, and more.
With that being said, let’s see how you can create a WordPress quiz using Formidable Forms.
Step 1: Install the Formidable Forms and Quiz Maker Addon
To create a quiz, you’ll need to use the Formidable Forms Business plan, as it includes the Quiz Maker addon.
The first thing you need to do is install and activate the Formidable Forms plugin. For detailed instructions, see our guide on how to install a WordPress plugin.
Upon activation, you’ll also need to install Formidable Forms Lite. This free plugin provides the core foundation for the premium plugin’s more advanced features.
Once you’ve done that, go to the Formidable Forms » Global Settings page in your dashboard and select ‘Click to enter a license key manually.’
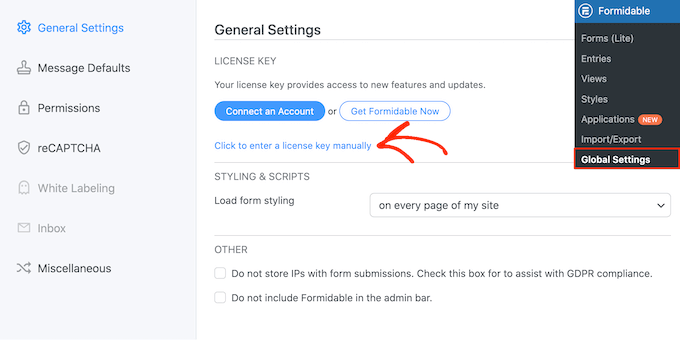
You can find the license key under your account on the Formidable Forms website. After entering this information, go ahead and click the ‘Save License’ button.
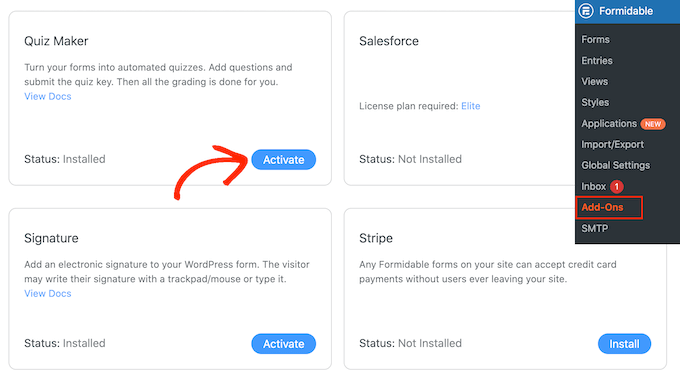
Next, you will need to install the Quiz Maker addon by going to Formidable » Add-Ons. On this screen, find the Quiz Maker addon and click on its Install button.
After a few moments, Formidable Forms will mark the Quiz addon as ‘Active.’
Step 2: Create a WordPress Quiz with Formidable Quiz Maker
Now you’ve installed the Formidable Forms Quiz Maker, you’re ready to create your first WordPress quiz.
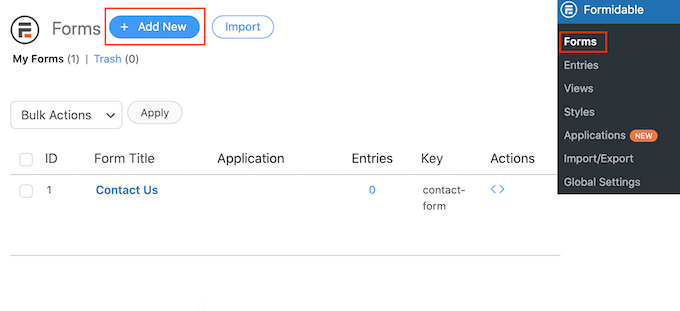
To get started, go to Formidable » Forms and then click the ‘Add New’ button.
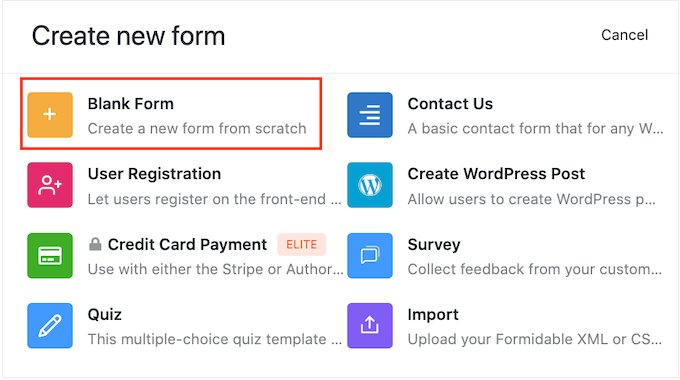
This opens a popup showing all of the plugin’s ready-made templates, including templates that you can use to create a mortgage calculator and a booking form.
In this guide, we’ll be starting from scratch so click on the ‘Blank Form.’
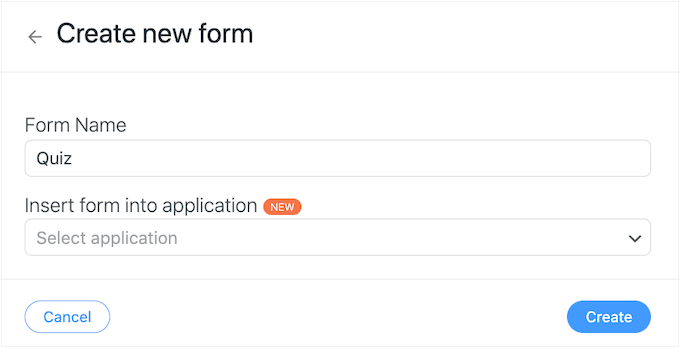
Once you’ve done that, type a title into the ‘Form Name’ field and enter an optional description. This information is just for your reference so you can use anything you want.
Then, simply click on the ‘Create’ button.
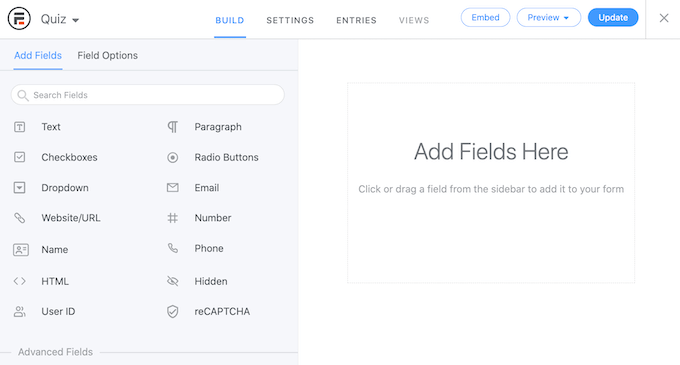
This will open the template in the Formidable Forms editor.
To the right is a live preview, and on the left-hand side is a menu with all the fields you can drag and drop into your quiz.
You can create quizzes for lots of different purposes, including getting customer feedback, performing market research on your WordPress blog, testing knowledge, and more.
You may need different types of fields depending on the kind of quiz you’re creating. As an example, we’ll show you how to create a simple quiz that tests the visitor’s knowledge. We’ll be creating different kinds of questions, including multiple choice.
To add a field to your quiz, simply drag it from the left-hand menu and then drop it onto the live preview. Let’s start by adding a ‘Text’ field.
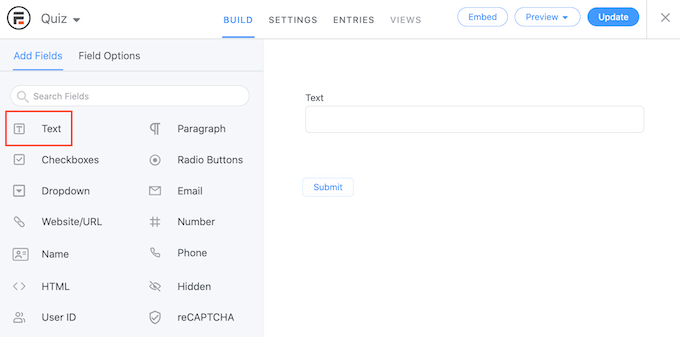
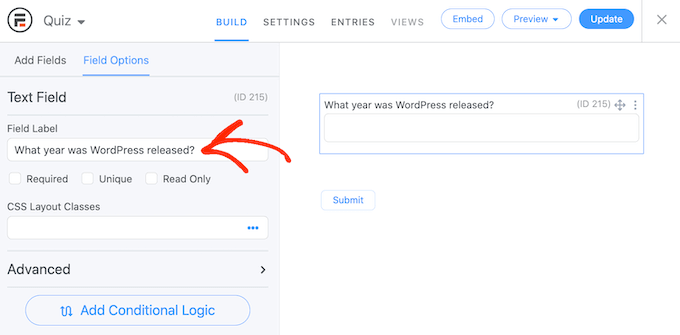
After that, click to select your new ‘Text’ field in the live editor.
You can then go ahead and type your question into the ‘Field Label.’
Next, we’re going to create a multiple choice question.
Simply drag a ‘Dropdown’ field onto the form.
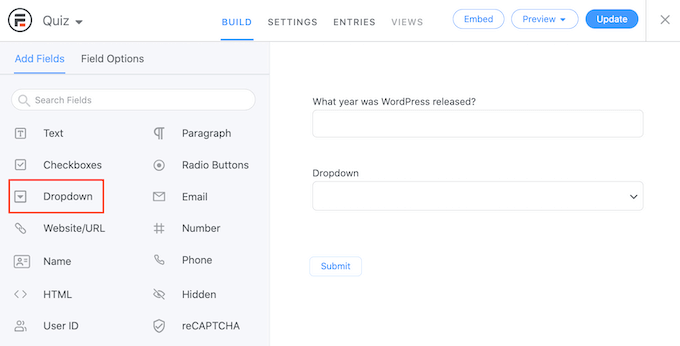
Once again, click the ‘Dropdown’ field in the preview to the right and then type your question into the ‘Field Label.’
You can now type the possible answers into the ‘Dropdown Options’ section.
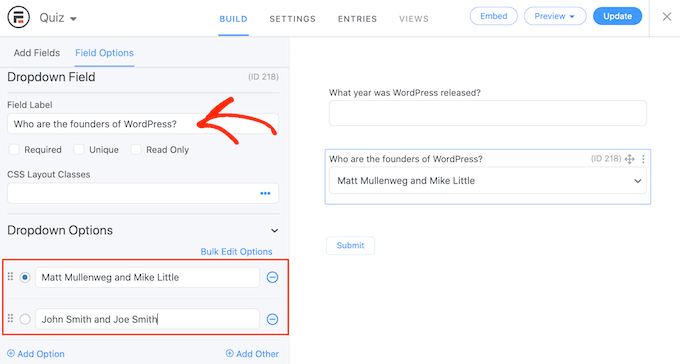
To add more answers to your multiple choice question, simply click on the ‘Add Option’ button. You can repeat these steps to add more questions to your quiz.
When you’re happy with how the quiz looks, it’s time to configure the correct answers and how to show the user’s score.
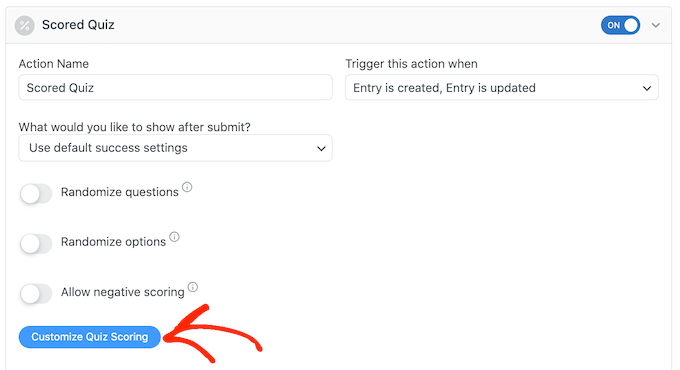
To do this, click on the ‘Settings’ tab and then select ‘Actions & Notifications.’ You can now click on ‘Scored quiz.’

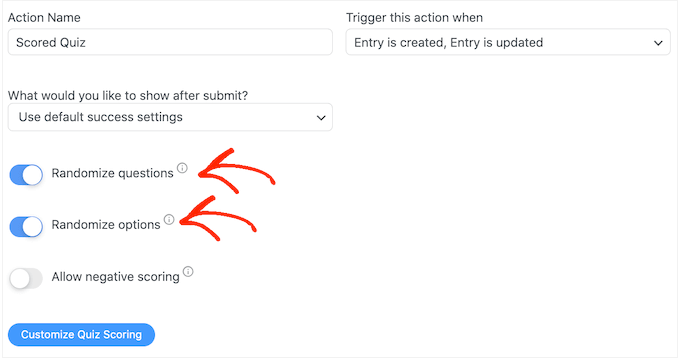
If you scroll to the new ‘Scored Quiz’ section, then you’ll see that this action already has some default settings.
Formidable Forms can randomize the questions and answers, which will make it more difficult for people to cheat.
By default, these settings are disabled but you may want to enable them by clicking on the ‘Randomize questions’ and ‘Randomize options’ toggles.
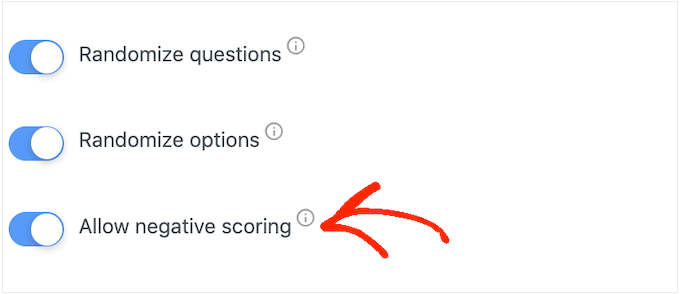
Formidable Forms awards one point for every right answer. However, if you enable advanced scoring then you can take points away for wrong answers.
We’ll be covering advanced scoring shortly, but if you plan to deduct points then you can click to activate the ‘Allow negative scoring’ toggle.
Next, let’s set the correct answers so that Formidable Forms can score visitors automatically.
To do this, go ahead and click on the ‘Customize Quiz Scoring’ button.
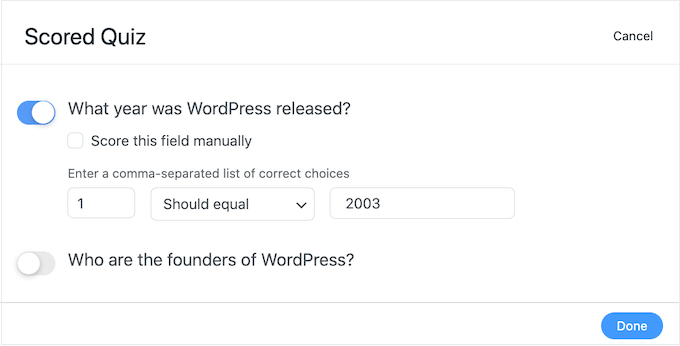
To add the correct answer, simply click on the toggle next to each question.
For text questions, simply type the correct answer into the field. You can also use the dropdown to specify whether the user’s answer should include this exact text, some of the text, or none of the text.
For multiple choice questions, click on ‘Add Correct Answers’ to open a menu showing all the possible options.
You can now check the box next to each correct answer.
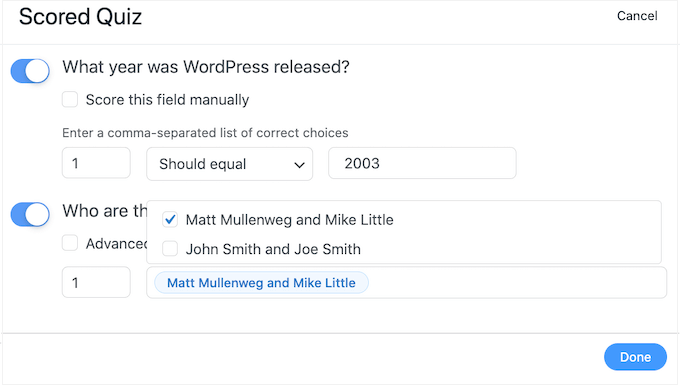
By default, each correct answer is worth 1 point. To award more points, simply type a different number into the ‘Max score’ box.
Sometimes you may want to assign a unique score to the different answers in a multiple choice question.
To do this, select ‘Advanced scoring’ and then type in the score for each answer.
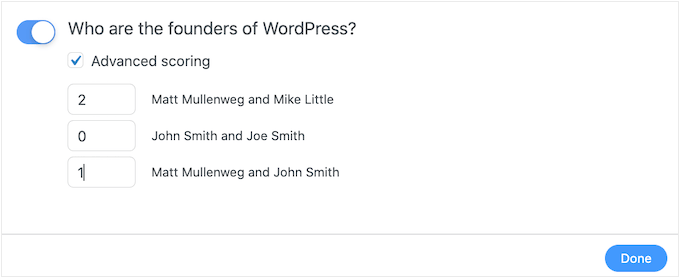
Once you’ve set all of the correct answers, click on ‘Done’ to save your changes.
After that, you can set the action that Formidable Forms will perform every time someone submits a quiz. Simply open the following dropdown to see the different options: ‘What would you like to do after submit?’
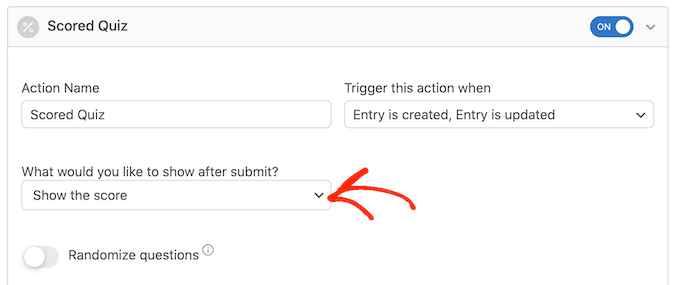
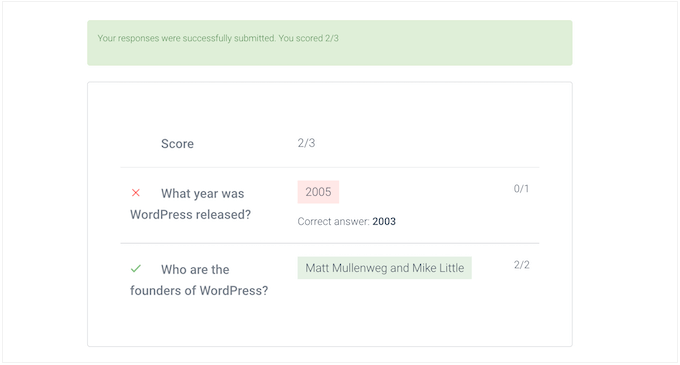
If you choose ‘Show the score,’ then Formidable Forms will display a standard message with the visitor’s score.
You can see an example of this in the following image.

If you select ‘Show user’s answers,’ then Formidable Forms will show the user’s score plus their answers.
This can help reinforce learning by encouraging visitors to review their answers and think about which ones they may have answered wrong.

There is also ‘Show correct answers’ that shows users which questions they got right.
If they got a question wrong, then Formidable Forms will show the right answer. This can help students learn from their mistakes.
However, it isn’t a good option if learners have the option to retake the quiz as this could lead to cheating.
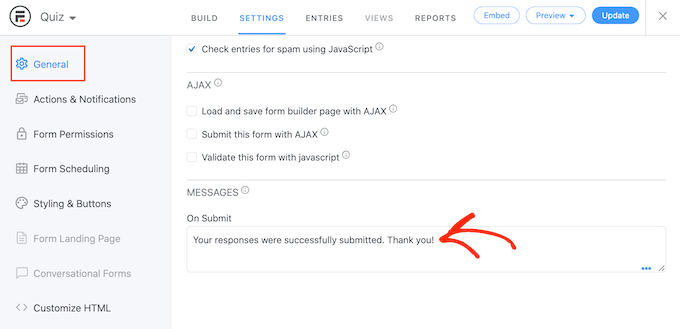
The final option is ‘Use default success settings,’ which shows a message that reads, ‘Your responses were successfully submitted. Thank you!’
You’ll typically want to change this message to include the user’s score. To do this, click on ‘General’ and customize the message in the ‘On Submit’ box.
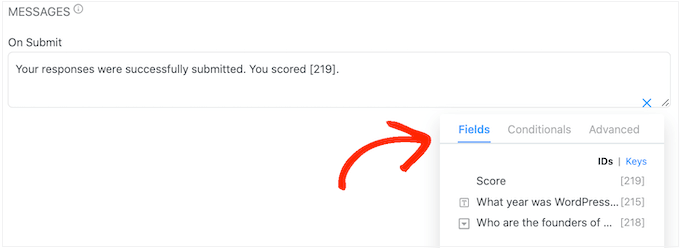
To show the user’s score, simply add the [219] key. A ‘key’ is a dynamic value you can use to customize messages to each user.
For example, you might type in: ‘Your responses were successfully submitted. You scored [219].’ The [219] will automatically be replaced with their score.

There are more keys that can help you create a more personalized message.
To take a look at the different keys, simply click on the ‘Keys’ tab in the little popup.
After that, click the ‘Update’ button to store your changes. You’ve now successfully created your first quiz.
Step 3: Adding Your Quiz to Your WordPress Site
You can now add your quiz to any post or page, or any widget-ready area of your WordPress theme. In our example, we’ll add the quiz to a page, but the steps will be similar when adding the quiz to other areas of your WordPress site.
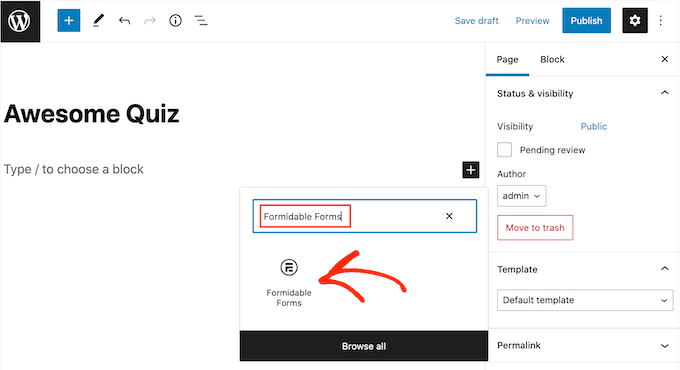
To start, go to Pages » Add New in your WordPress admin area. Once inside the content editor, click on the ‘+’ button to add a new block.
In the popup that appears, type ‘Formidable Forms’ to find the right one, and then add the block to your post.
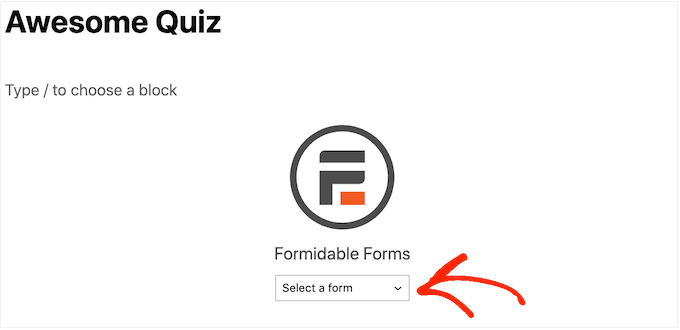
After that, simply open the ‘Select a form’ dropdown.
Then, choose whichever quiz you have already created, and now WordPress will load the quiz automatically.
Now you can add any other content to the page, including any categories and tags or customized permalinks that you want to use.
When you’re ready, either publish or update the page. Your WordPress quiz is now live and users can start answering questions.
We hope this article helped you add a quiz to your WordPress site. You may also want to see our guide on how to run a giveaway in WordPress and our expert pick of the best LMS plugins.
If you liked this article, then please subscribe to our YouTube Channel for WordPress video tutorials. You can also find us on Twitter and Facebook.
The post How to Easily Create a Quiz in WordPress first appeared on WPBeginner.
Leave A Comment
You must be logged in to post a comment.