Are you looking for the easiest way to fix the ‘DNS server not responding’ error in WordPress?
You can get the DNS not responding error on your own WordPress website, or third-party sites for a large number of reasons.
In this article, we’ll show you how to easily troubleshoot and fix the ‘DNS server not responding’ error in WordPress.
What is the ‘DNS Server Not Responding’ Error in WordPress?
The ‘DNS server not responding’ error is one of the most common WordPress errors that users can come across.
This error prevents you from visiting your own website which makes it difficult to troubleshoot. Many beginners aren’t sure if it is just them or everyone else seeing this error.
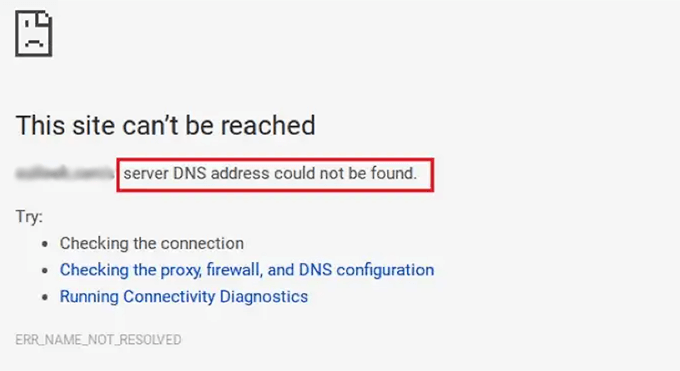
The ‘DNS server not responding’ error means that your browser was unable to establish a connection with the servers that are hosting the website.
This error usually occurs when there is an unavailable DNS provider, firewall issues, network connectivity problems, or when there is an issue in your internet modem or router.
That being said, let’s take a look at multiple ways to easily troubleshoot and fix the ‘DNS server not responding’ error on your website.
1. Check Your Internet Connection
You might get the ‘DNS server not responding’ error because your internet connection has been disconnected. So to start, you need to make sure that you’re currently connected to the internet.
If your internet is connected, but the error is still present, then you can restart your internet connection by switching your computer on and off.
Or you can simply disconnect your router from its power supply and then wait at least a minute before reconnecting it.
After that, try visiting your WordPress blog to see if the error’s gone.
2. Try Switching to Another Web Browser or Incognito Mode
Sometimes this error occurs because there is an issue in your default web browser.
You can simply try to solve the ‘DNS server not responding’ error by visiting your WordPress site using another browser like Mozilla Firefox or Microsoft Edge.
For example, if you use Google Chrome and the browser is showing the ‘DNS server not responding’ error, try accessing your website using Mozilla Firefox.
You could also try opening the page in a private tab, such as using Chrome’s Incognito mode.
If you are able to access the website in the other browser that means the problem is with your default web browser.
In that case, you can clear the browser cache to see if that fixes the issue. If that doesn’t solve the problem, then you can try reinstalling the browser.
3. Disable Your Firewall or Antivirus
Firewall and Antivirus programs protect your computer from malicious software.
However, sometimes these programs can also block trustworthy sites due to strict settings or an issue within the program itself.
To check if you’re getting the ‘DNS server not responding’ error due to these software, you need to temporarily deactivate your firewall and antivirus programs.
If you’re using Windows, then you can easily disable firewall and antivirus programs by selecting the Settings app from the Start menu.
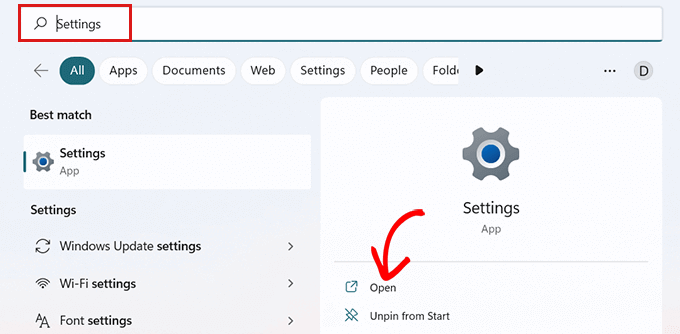
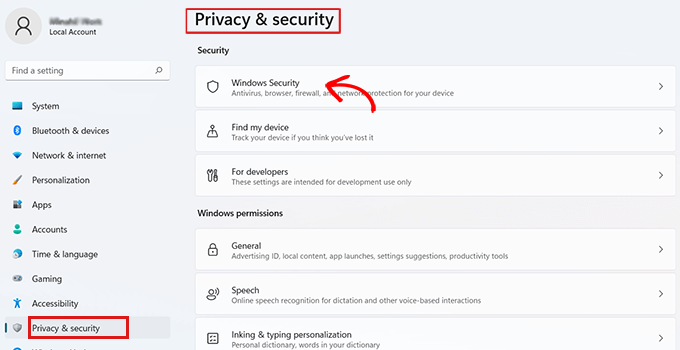
Once you’re on the ‘Settings’ app, click the ‘Privacy and Security’ option from the sidebar.
Now simply choose the ‘Windows Security’ option in the ‘Privacy and Security’ tab.
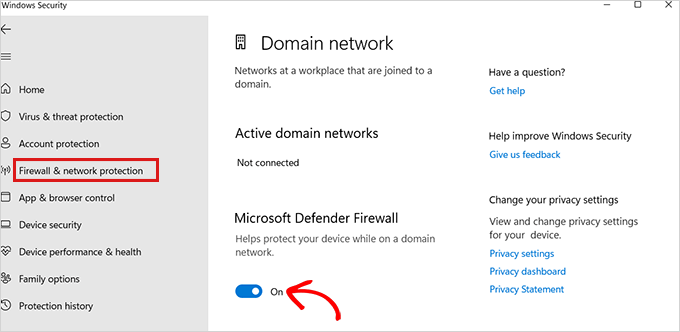
On the ‘Windows Security’ page, you need to select the ‘Virus and Threat Protection’ option from the list.
After that, you need to toggle the switch below the ‘Microsoft Defender Firewall’ option and set it to Off.
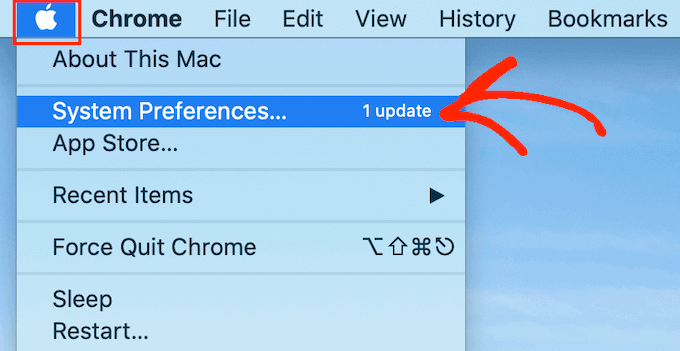
If you’re using a Mac, then simply go to System Preferences » Security and Privacy from the Apple toolbar.
This will take you to the ‘Security and Privacy’ window.
Here simply click the ‘Firewall’ tab and then turn off the firewall.
You have now disabled the antivirus and firewall programs.
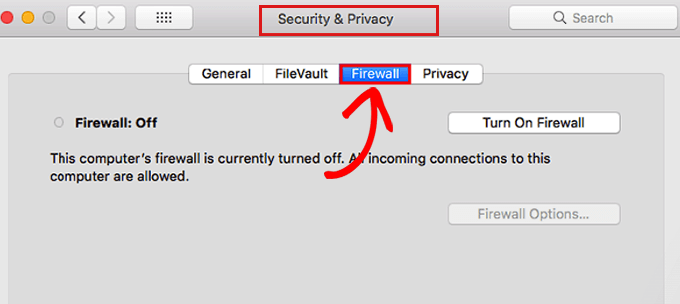
After disabling the firewall, visit your site to see if the error has been resolved.
4. Change the DNS Server Address
Sometimes the ‘DNS server not responding’ error is caused when the DNS server assigned to you by your internet service provider is unavailable or has incorrect information.
In that case, you can solve the problem by switching to a different public DNS server, such as Cloudflare or Google Public DNS which offer DNS address for free.
If you use Windows, go to the Windows Search Box from the taskbar and type ‘ncpa.cpl‘ to access the Network Connections page.
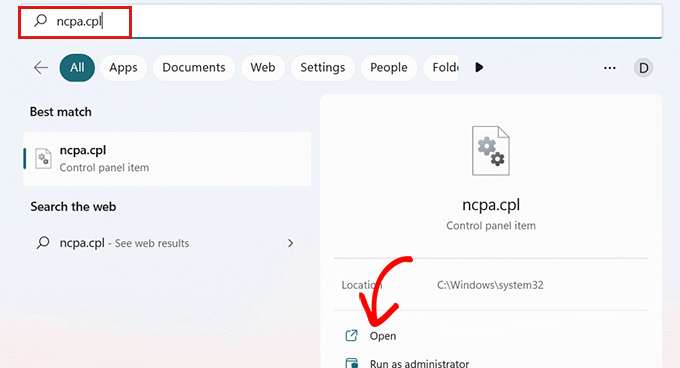
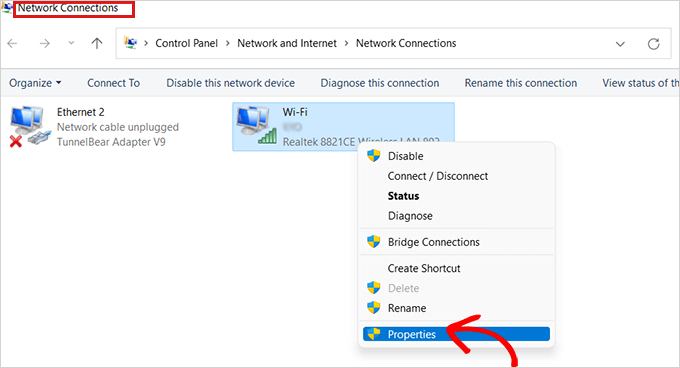
Once you’re on the ‘Network Connections’ page, right-click on the internet connection that you’re currently using.
Next, simply select the ‘Properties’ option from the prompt that opens up.
At this point, you may need to provide an administrator password. If you don’t have those permissions, contact your IT department or computer admin.
After that, you will see the ‘Properties’ window.
Here you have to locate and double-click the ‘Internet Protocol Version 4 (TCP/IPv4)’ option from the list which will open up a new window.
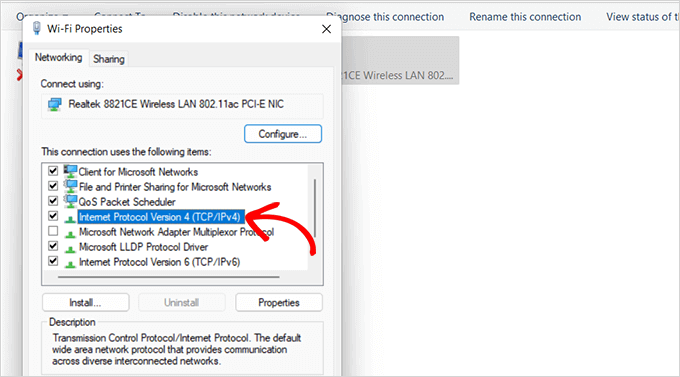
Once here, simply check the ‘Obtain an IP address automatically’ box and then check the ‘Use the following DNS server addresses’ box.
After that, you need to type the DNS address you obtained from the public DNS servers and click the ‘OK’ button at the bottom.
For example: Cloudflare public DNS is 1.1.1.1 vs Google public DNS is 8.8.8.8 and 8.8.4.4.
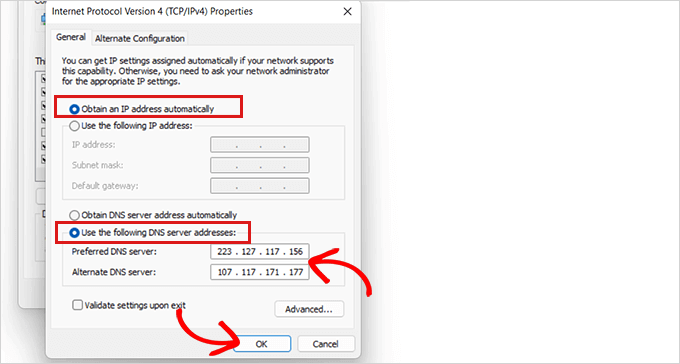
Now restart your computer and visit your site to see if the error is resolved.
If you’re a Mac user, simply select the Apple icon in the toolbar and click the ‘System Preferences option.
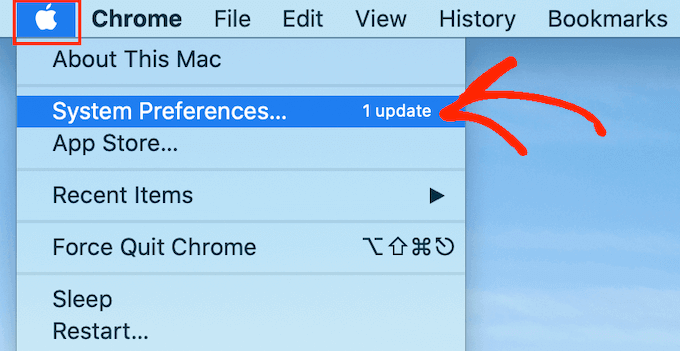
In the popup that appears, select ‘Network’ and then click on the ‘Advanced’ button.
After that, simply open the ‘DNS’ tab. Here you will find a ‘+’ button at the bottom-left corner.
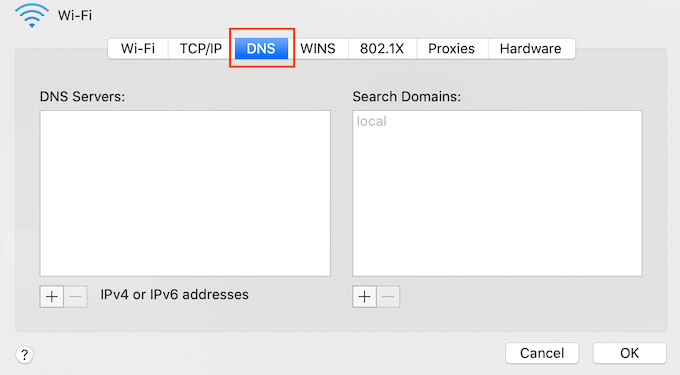
Clicking it will add a new DNS server with the address 0.0.0.0.
Now go ahead and type the numbers for the public DNS server you want to use.
For example: Cloudflare public DNS is 1.1.1.1 vs Google public DNS is 8.8.8.8 and 8.8.4.4.
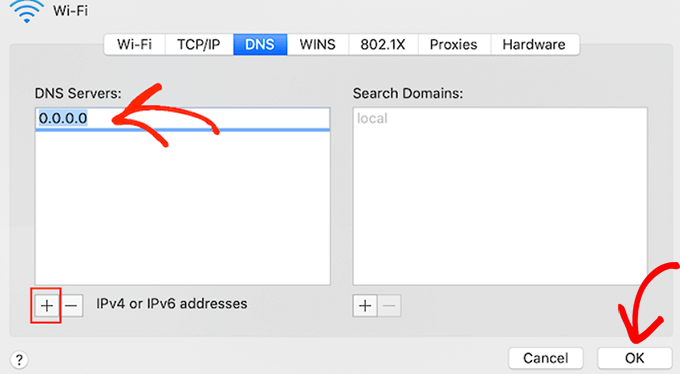
After that, simply click on the ‘OK’ button which will take you back to the previous popup.
Here, simply click the ‘Apply’ button to save your changes.
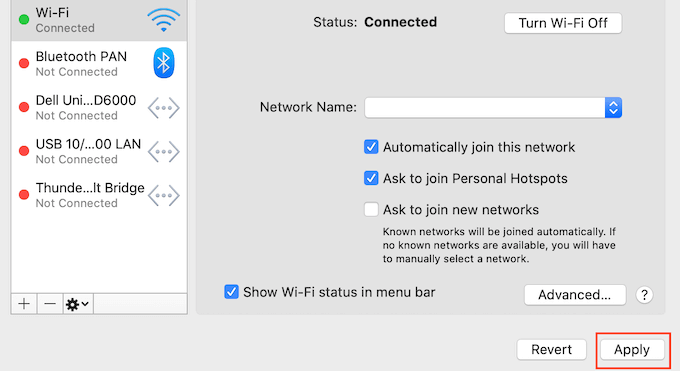
Now, you need to visit your site to check if the error has been removed.
5. Flush Your DNS Cache
Just like your browser, the computer also stores all the IP addresses of the websites that you visit so it won’t have to look up the same IP address twice.
However, DNS cache information can get outdated which can cause the ‘DNS server not responding’ error on your site.
This can happen when you have moved your site to a new domain name or when you’ve moved your site to a new WordPress host.
Flushing your DNS cache can remove the ‘DNS server not responding’ error. All you need to do is check out our guide on how to clear your DNS cache on Mac, Windows, and Google Chrome for more instructions.
We hope this article helped you learn how to easily fix the ‘DNS server not responding error’ in WordPress. You may also want to check out our ultimate security guide for WordPress and the best email marketing for small businesses.
If you liked this article, then please subscribe to our YouTube Channel for WordPress video tutorials. You can also find us on Twitter and Facebook.
The post How to Fix DNS Server Not Responding Error in WordPress (5 Ways) first appeared on WPBeginner.
Leave A Comment
You must be logged in to post a comment.