Do you want to add social share buttons in WordPress?
People spend most of their time on different social media platforms across the internet, so sharing your content on these platforms can help you build user engagement and attract new visitors to your website. The simplest way to do this is by adding social sharing buttons to WordPress posts and pages.
In this article, we will show you how to easily add social share buttons and display share counts on your WordPress website.
Why Add Social Share Buttons in WordPress?
Social networking is one of the most popular online activities today. That’s why social media marketing is now a crucial part of any small business’s growth strategy.
If you want to reach more potential customers, then social media platforms are highly effective channels to communicate with new people.
The problem is that when you share your content on your social media profiles, it only reaches a limited number of your followers.
However, by adding social sharing buttons, you can encourage visitors to share your content on their social media handles. This allows your content to be seen by their friends and followers, who can then add comments, like, and re-share it.
In this way, social share buttons can help drive more traffic to your site, improve your social credibility, generate more leads, and boost engagement.
Having said that, let’s see how to easily add social share buttons in WordPress. You can use the quick links below to jump to different parts of our tutorial:
How to Add Social Share Buttons in WordPress Posts and Pages
First, you need to install and activate the Social Snap plugin. For detailed instructions, you can see our beginner’s guide on how to install a WordPress plugin.
Upon activation, visit the Social Snap » Settings page from the WordPress admin sidebar and expand the ‘Social Sharing’ tab from the left column.
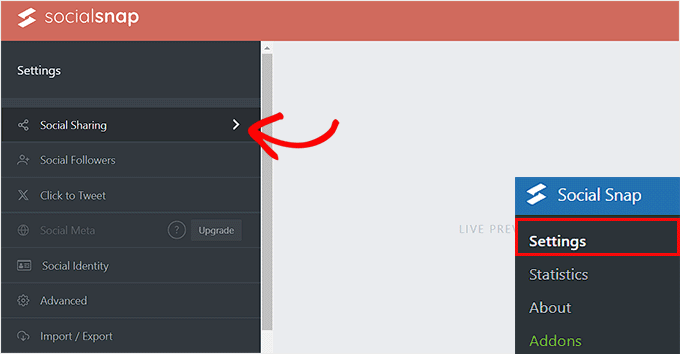
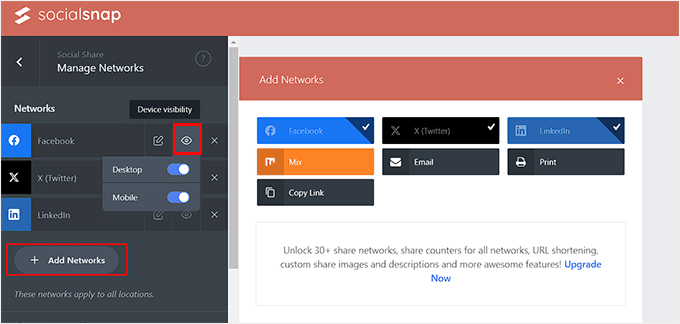
This will open new settings in the sidebar where you must select the ‘Manage Networks’ tab.
Next, click the ‘+ Add Networks’ button to add a social media network of your choice from the prompt, such as Facebook, Twitter, LinkedIn, and email.
You can also configure the button visibility for different devices by hovering your mouse over the eye icon and toggling the mobile switch to ‘On’. Once you do that, the social sharing buttons will also be displayed to users who are visiting your website on mobile devices.
After that, exit the ‘Manage Networks’ tab.
This will take you to the general settings page, where you can select if you want to add a floating bar or inline buttons for social sharing icons.
Add Social Share Inline Buttons
Social share inline buttons will be displayed at the top or bottom of your posts and pages.
To add them to your site, just click on the ‘Inline Buttons’ tab to expand it.
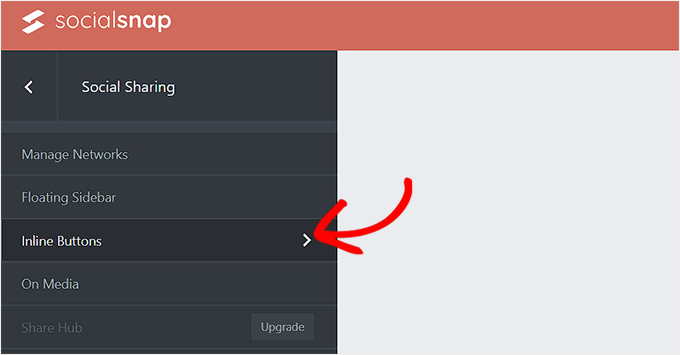
This will open new settings in the left column with a preview for the social share buttons on the right side of the screen.
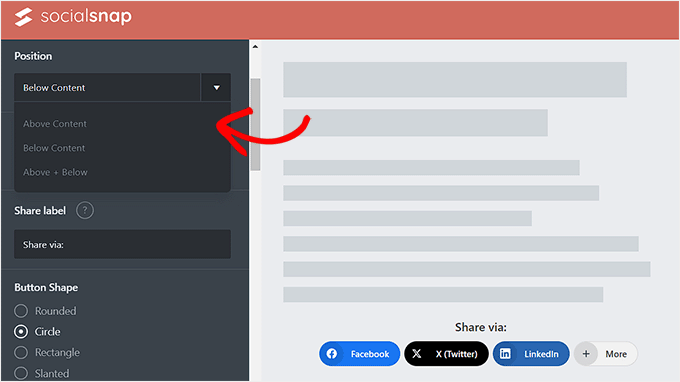
From here, you can configure the buttons’ position. You can choose the ‘Below Content’ option to display buttons at the bottom of the content and the ‘Above Content’ option to showcase buttons at the top of the page.
You can also customize your button’s alignment and the share label, shape, and size from here.
Next, scroll down to the ‘Button Labels’ section, where you can decide if you want to display the social media platform’s name, share counts, or both.
After that, you must scroll down to the ‘Display On’ section. Here, you can check the ‘Posts’ box if you only want to display the social share buttons on your posts. You can also check the ‘Pages’ button to show social share buttons on your About Us, Contact Us, or Archives pages.
Additionally, you can check the ‘Home’ option if you only want to display the social sharing buttons on your home page.
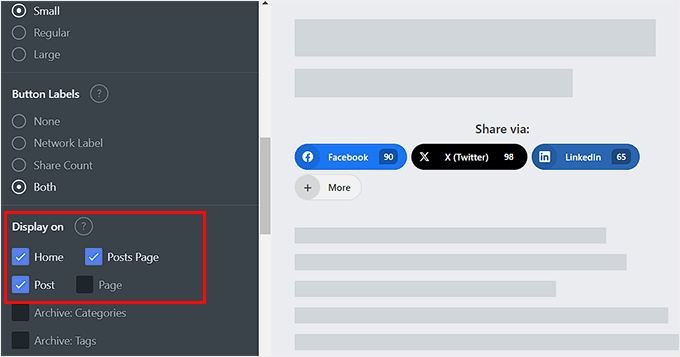
Once you are done, don’t forget to click the ‘Save Changes’ button at the bottom to store your settings.
You can now visit your WordPress website to view the social share buttons in action.

Add Social Sharing Floating Bar
If you decide to add a floating bar, then your social share buttons will be displayed on the side of your WordPress posts or pages.
To do this, simply open the ‘Floating Sidebar’ tab.
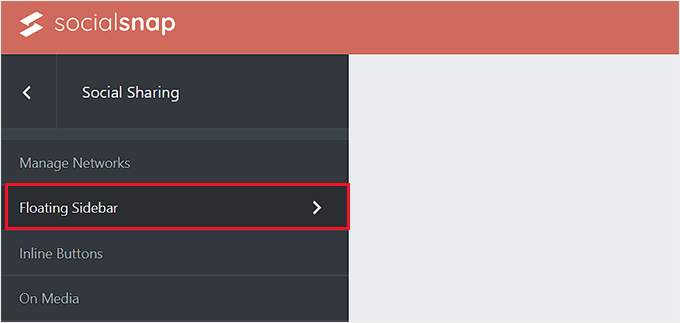
This will open some new settings in the left column, from where you can configure the position, size, and shape of your floating bar icons.
Once you do that, scroll down to the ‘Display On’ section and select the pages where you want to display the social share buttons.
For example, if you want to display the social sharing floating bar only on your blog posts, then you can select the ‘Post’ option.
Similarly, if you want to display the floating bar on your website’s home page as well, then you can choose the ‘Home’ option.
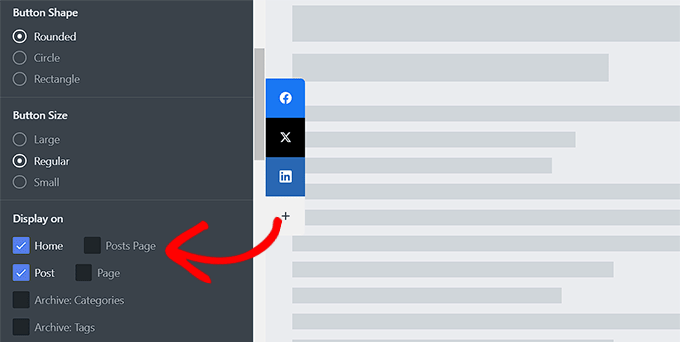
Finally, click the ‘Save Changes’ button to store your settings.
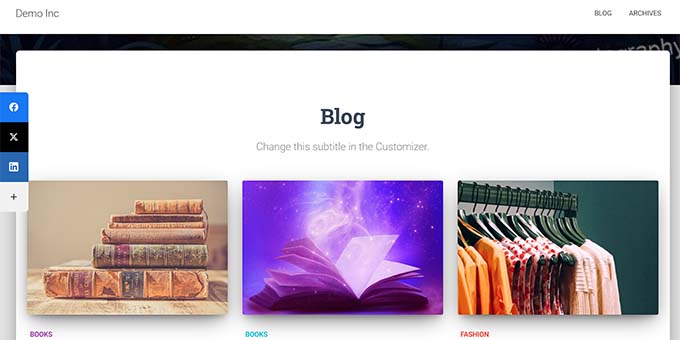
You can now visit your WordPress blog to view the social sharing floating bar in action.
How to Add Social Share Buttons in WordPress Images
If you have a photography website, then you can even add social share buttons to your images with the help of the Social Snap plugin.
This will allow users to share your images on their social handles and help bring more traffic to your site.
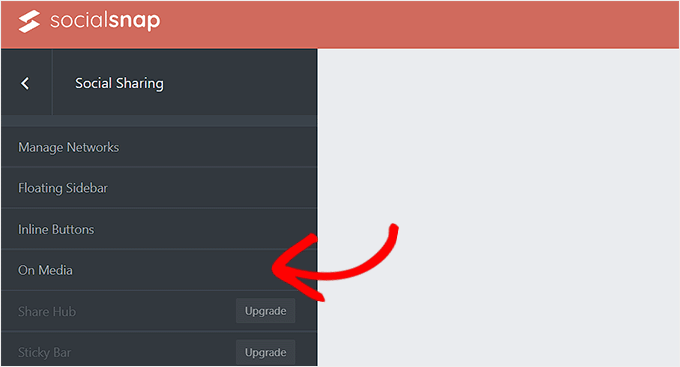
First, you will have to visit the Social Snap » Settings page from the WordPress dashboard and click on the ‘On Media’ tab to open it.
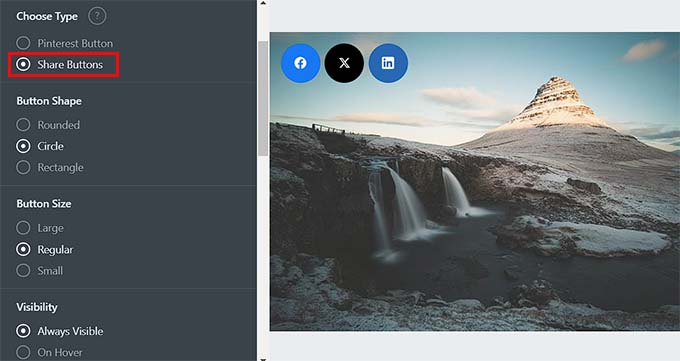
Once you are there, choose your button type. You can add all your social share buttons at the top of the images or add a Pinterest button.
After that, you can also select the button’s size, shape, visibility, and position.
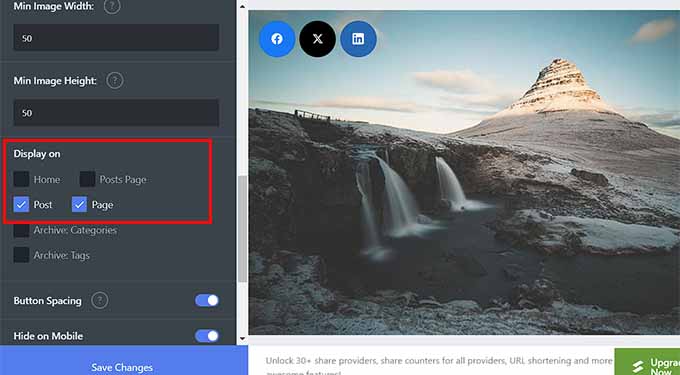
Then, you can add the minimum height and width for an image. This means that the share buttons will not be displayed in an image on your website that is under the minimum height and width limit.
Next, you must scroll down to the ‘Display On’ section and check the options for the pages or posts where you want to display social share buttons on your images.
You can then also toggle the ‘Hide on Mobile’ switch to ‘On’ if you don’t want to display share buttons for images on mobile devices.
Finally, click the ‘Save Changes’ button to store your settings.
Now, simply visit your WordPress site to view the social sharing buttons in images.

How to Display Social Share Counts in WordPress
If you also want to display the share counts next to the social share buttons, then you must visit the Social Snap » Settings page and expand the ‘Manage Networks’ tab from the left column.
After that, scroll down to the ‘Facebook Share Count Provider’ section, where you can select any of the two sources.
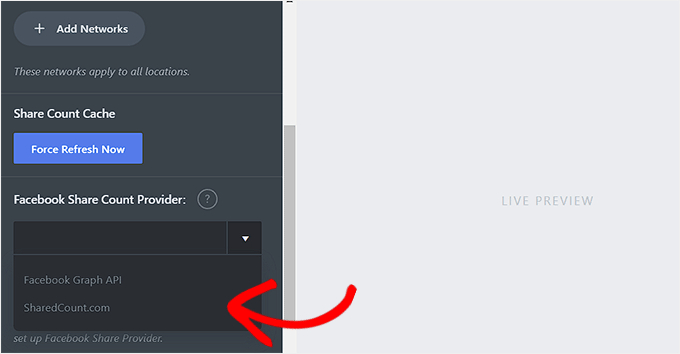
However, we recommend selecting the ‘SharedCount.com’ option. Then, the counts will be retrieved from the SharedCount service API. It allows the plugin to fetch all counts with only 2 API calls, which is best for WordPress performance.
If you choose the ‘Facebook Graph API’ option, then share counts are retrieved from the Facebook API, which can slow down your site.
You can easily get the SharedCount API by signing up for a free account on the SharedCount.com website.
To do this, you will have to provide an email address and password and then click the ‘Create Account’ button.
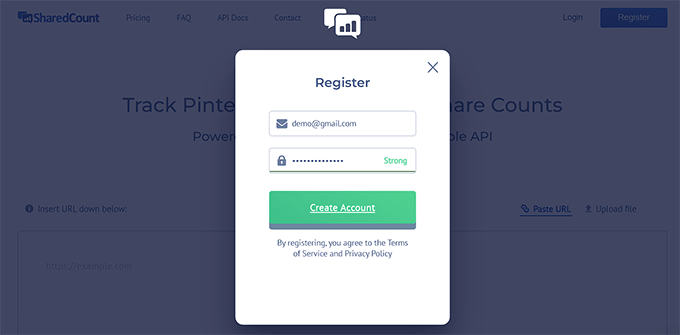
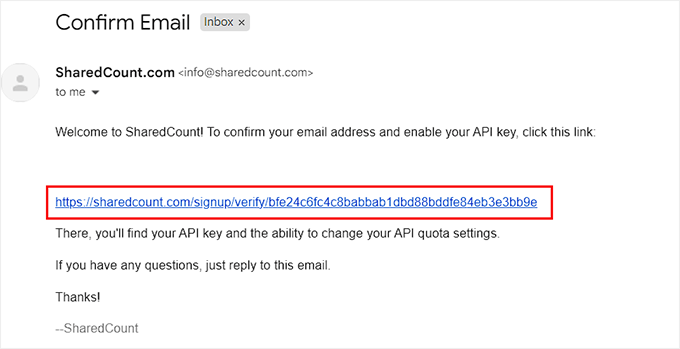
The website will now send a confirmation link to your email address.
Go ahead and click on the link to verify your account.
Now, you must log in to your SharedCount account again and visit the ‘Settings’ page from the dropdown menu in the top right corner of the screen.
This will take you to a new page where you will see your SharedCount API key.
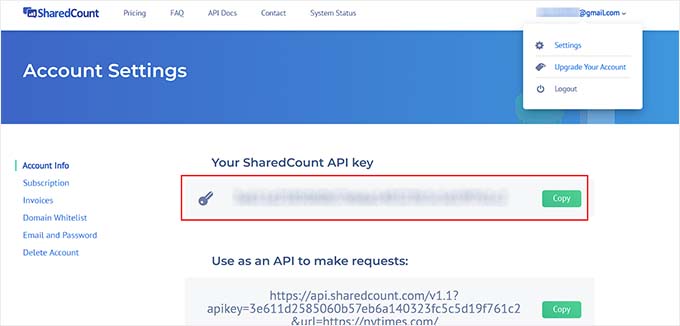
You need to copy this key and go back to your plugin’s settings page on your WordPress site.
Now, go ahead and paste the API key in the ‘SharedCount API Key’ field.
After that, click the ‘Save Changes’ button to store your settings.
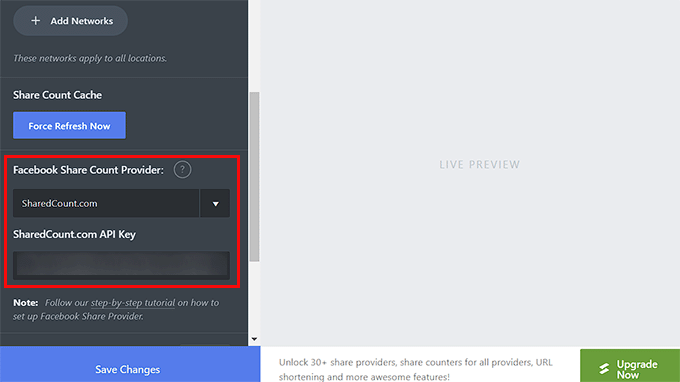
You can then enter this API key again for your Twitter share count. After that, click the ‘Save Changes’ button to store your settings.
You can now visit your website to see the social sharing buttons with the share count for each blog post.

How to Add Social Share Buttons on Custom Landing Pages
If you want to build custom landing pages for your website with social sharing buttons, then you can easily do that using SeedProd.
It is the best WordPress page builder on the market that comes with a drag-and-drop builder, 300+ premade templates, and advanced blocks to create amazing landing pages with social sharing buttons.
First, you need to install and activate the SeedProd plugin. For detailed instructions, see our step-by-step guide on how to install a WordPress plugin.
Note: SeedProd also has a free plan that you can use for this tutorial. However, upgrading to the paid plan will unlock more features.
Upon activation, visit the SeedProd » Landing Pages section from the WordPress dashboard and click the ‘Add New Landing Page’ button.
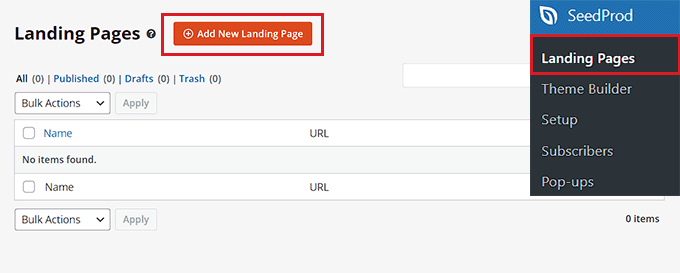
This will take you to the ‘Choose a New Page Template’ screen, where you will see numerous premade templates to choose from.
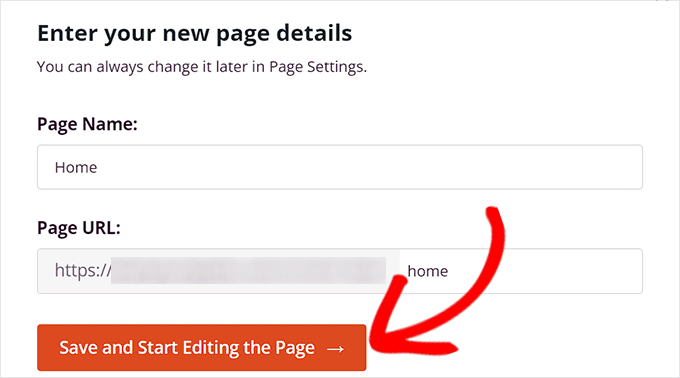
Once you make your choice, you will be asked to enter a name for the landing page that you are about to create.
Upon entering this information, just click the ‘Save and Start Editing the Page’ button to continue.
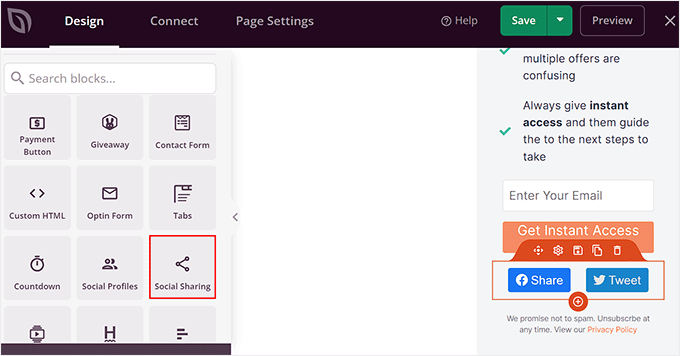
This will launch SeedProd’s drag and drop builder, where you will see a list of blocks in the left column with a page preview on the right.
You can now drag and drop different blocks to build your page. For more details, see our tutorial on how to create a landing page in WordPress.
After that, simply find and and add the Social Sharing block from the left column to your preferred place on the page.
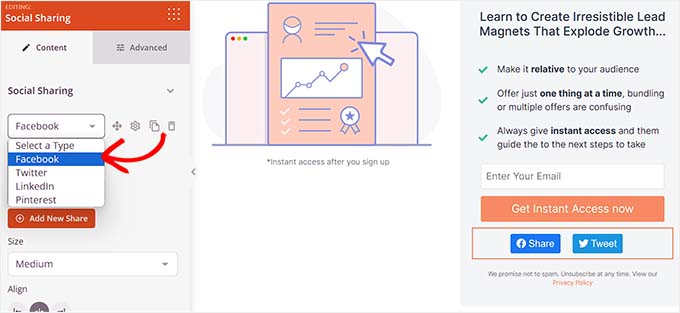
Next, you need to click on the block again to open its settings in the sidebar. From here, you can choose the social media platform with the button you want to add from the dropdown menu.
You can also add a new social sharing button by clicking the ‘+ Add New Share’ button in the column.
After that, you can also configure the button’s size and alignment.
You can even switch to the ‘Advanced’ tab at the top to change the spacing, pick the device visibility, add custom CSS, and use animation effects.
Once you are done, simply click the ‘Save and ‘Publish’ button at the top to store your settings.
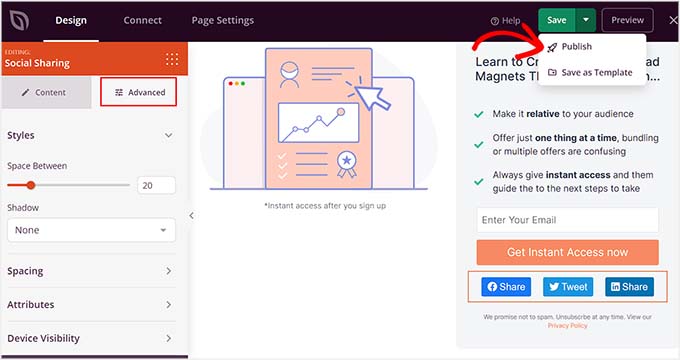
Now, just visit the custom landing page to see the social sharing buttons in action.
This is what the page looked like on our demo website.

Bonus: Add a WhatsApp Share Button in WordPress
Apart from social media platforms, you can also add a WhatsApp share button on your WordPress site. WhatsApp is an instant messaging app that allows people all over the world to contact each other.
By adding a WhatsApp share button, you will enable users to share your site content with their contacts, including friends, family, and colleagues. This can boost user engagement, enhance content visibility, and help you expand your brand reach.
You can easily add a WhatsApp share button in WordPress with the Sassy Social Share plugin.
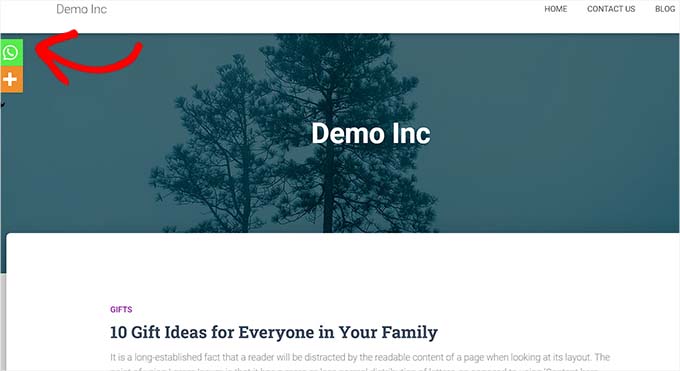
For more information, just see our tutorial on how to add a WhatsApp chatbox and share buttons in WordPress.
We hope this article helped you learn how to add social share buttons in WordPress. You may also want to learn how to add social media icons to WordPress menus and our top picks for the best WordPress social media plugins to grow your following.
If you liked this article, then please subscribe to our YouTube Channel for WordPress video tutorials. You can also find us on Twitter and Facebook.
Leave A Comment
You must be logged in to post a comment.