Are you looking for the best way to add your business address in WordPress?
You can add the address on your contact page or sidebar widget to provide an easy way for users to approach you. This improves customer trust and boosts your SEO.
In this article, we will show you how to properly add your business address in WordPress, step by step.
When and Why You Need a Business Address in WordPress
Usually, most business websites add their address on their contact page using a contact form plugin like WPForms.
This works fine for most websites and online businesses. However, when you have a physical business or store, then it is a good idea to add your address in a search engine-optimized format.
This way, your business will be listed correctly in local search results and help you attract more customers.
You can also add other information like maps, directions, phone numbers, and business hours. This allows users to visit your physical store easily and builds trust with them.
Plus, making it easy for people to find your contact information creates a better user experience.
Having said that, let’s see how to add your business address in WordPress in an SEO-friendly way. We have covered two methods in this article, and you can use the links below to jump to the one of your choice:
Method 1: Add Your Business Address With All in One SEO (Recommended)
If you are looking for an easy way to add your business address, then this method is for you.
All in One SEO for WordPress is the best SEO plugin on the market that comes with a local SEO feature. It lets you add your business information, including address, phone number, email, business hours, maps, and payment methods, to your website in an SEO-friendly way.
First, you need to install and activate the All in One SEO plugin. For detailed instructions, see our tutorial on how to install a WordPress plugin.
Note: AIOSEO has a free plan. However, you will need the Plus plan to unlock the Local SEO feature.
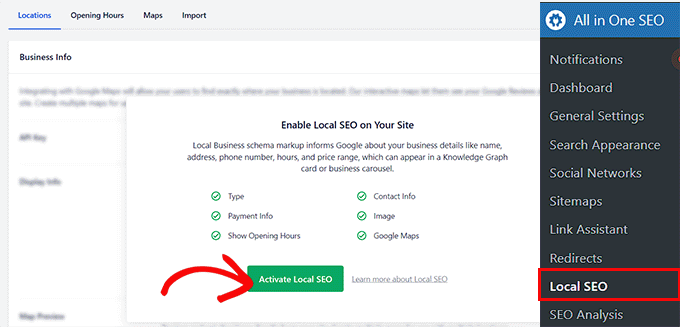
Upon activation, you must visit the AIOSEO » Local SEO page from the WordPress dashboard and click the ‘Activate Local SEO’ button.
Your page will now be reloaded, and you will be able to access all the settings.
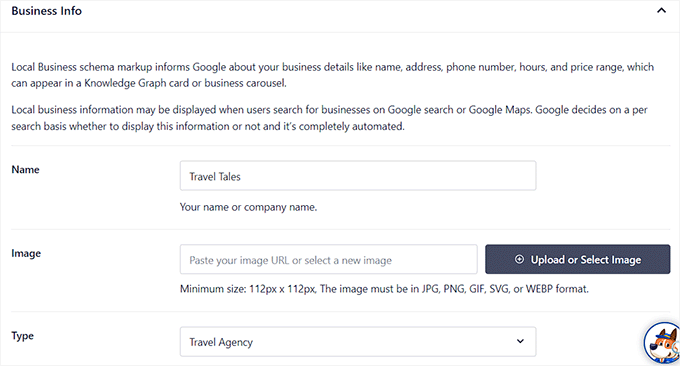
Here, scroll down to the ‘Business Info’ section, where you can start by adding a name and image for your business. After that, you can also select your business type from the dropdown menu.
For example, if you have a travel business, then you can select the ‘Travel Agency’ option.
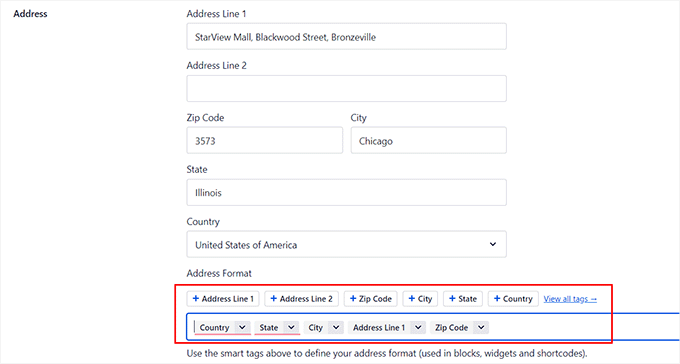
Next, you can add your physical store’s address, including the zip code, city, state, and country.
Once you do that, you can also configure the address format using tags. For example, if you want to display your country and city before the address of your store, then you must add the country and city tags before the other ones.
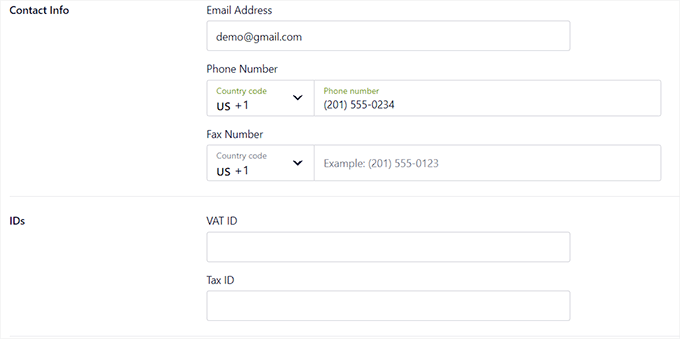
After that, you can scroll down to the ‘Contact Info’ section and add the email address and phone number for your business.
You can also type in other information like VAT and Tax IDs, currencies and accepted payment methods, and more. Once you are done, go ahead and click the ‘Save Changes’ button to store your settings.
Now, scroll back to the top and switch to the ‘Business Hours’ tab.
Here, you can start by adding labels to show customers when your store is closed or if it’s open 24 hours.
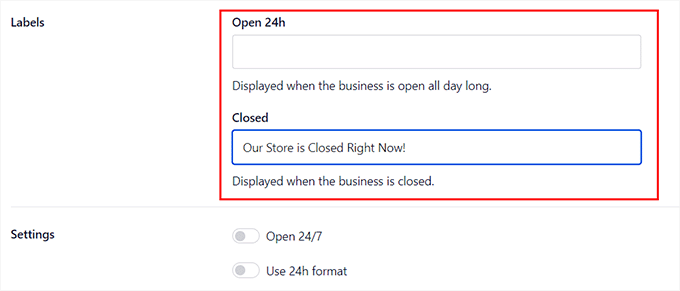
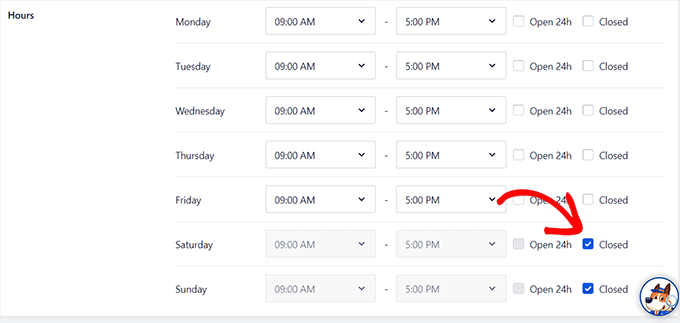
Next, you can add your physical store’s open times from Monday to Sunday.
If your store is closed on the weekends, then you must check the ‘Closed’ box next to these days. Once you are done, click the ‘Save Changes’ button to store your settings.
For more details, see our guide on how to add business hours in WordPress.
If you also want to add a map that can help visitors reach your store, then you have to switch to the ‘Maps’ tab. You will now need a Google API key to add this functionality.
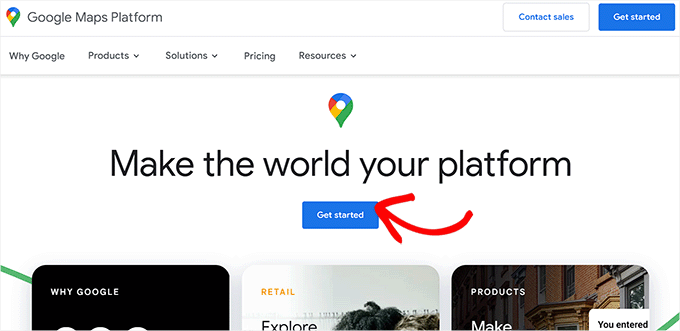
To get the key, visit the Google Maps Platform and click the ‘Get Started’ button.
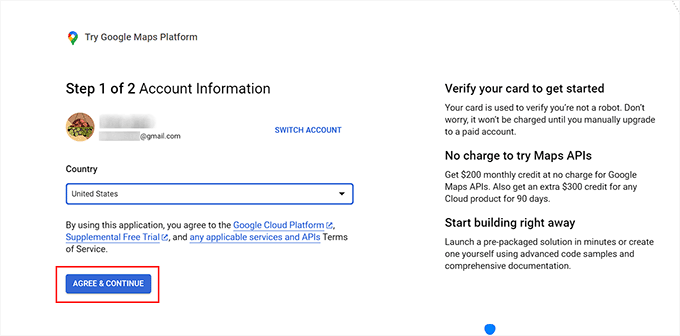
This will open a new tab, where you must add your country from the dropdown menu.
After that, click the ‘Agree and Continue’ button.
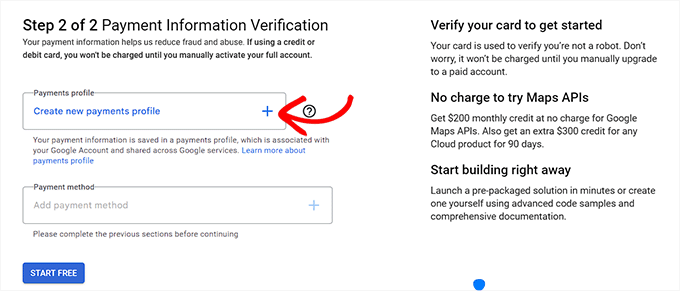
Now, in the next step, you must add your payment information and profile. Keep in mind that your card won’t be charged until you upgrade to a paid account manually.
To add your information, click the ‘+’ button in the payment profile field.
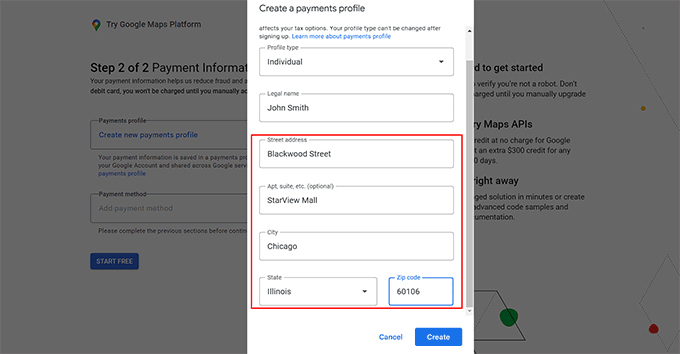
This will open a new prompt, where you must add your name and business address.
After that, click the ‘Create’ button.
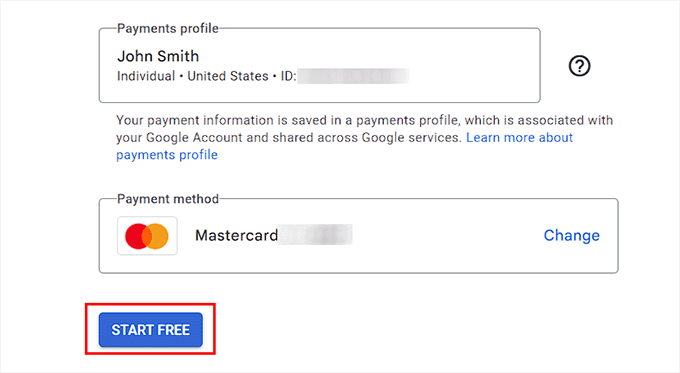
Next, click the ‘+’ button in the ‘Payment Method’ field to add your card details.
Once that is done, click the ‘Start Free’ button.
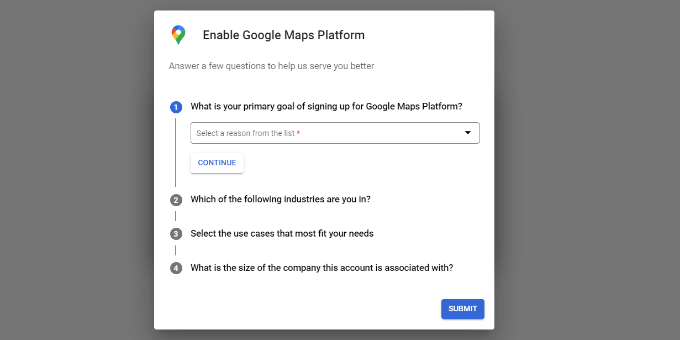
You will now see a popup on the screen asking you some questions about your organization, including your primary goal for using the platform, company size, and the industry you are in.
Simply answer these questions and click the ‘Submit’ button.
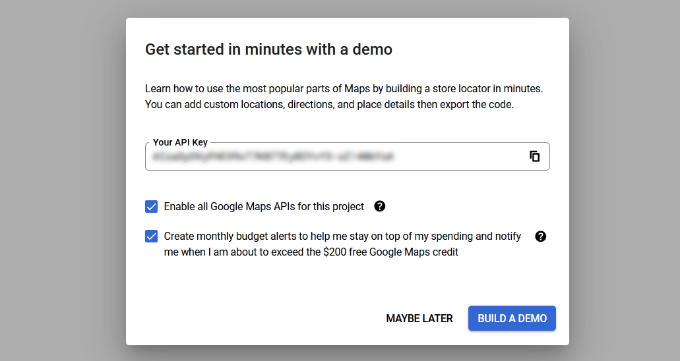
Your Google Maps API key will now be created and displayed on the page.
Go ahead and copy this key.
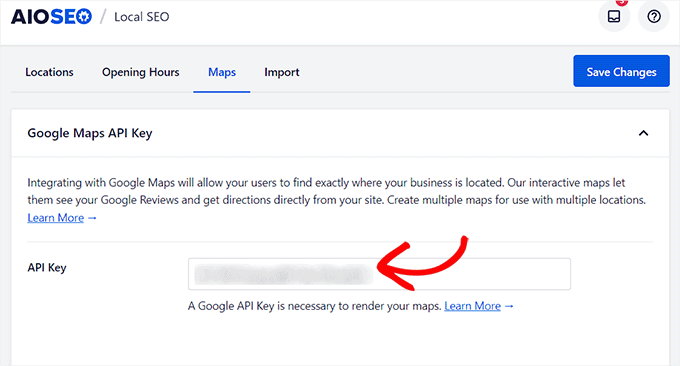
Now, visit your WordPress dashboard and paste the key next to the ‘API Key’ option.
After that, click the ‘Save Changes’ button. For more information, you can see our tutorial on how to add Google Maps in WordPress.
Now that you have added your business address along with other information, open the page where you want to display it in the block editor.
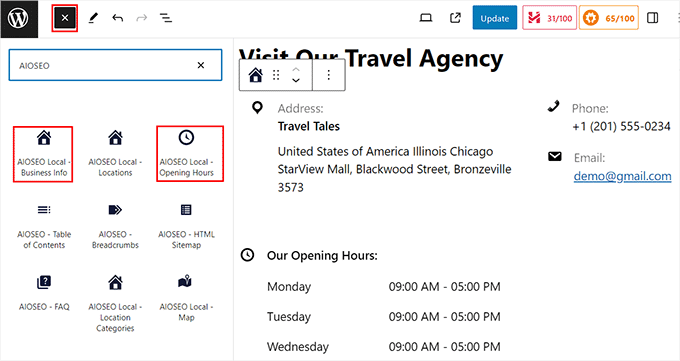
Here, you need to click the add block (+) button in the top left corner and drag and drop the AIOSEO Local – Business Info and AIOSEO Local – Business Hours blocks.
If you have added a map as well, then you can add the AIOSEO Local – Map block.
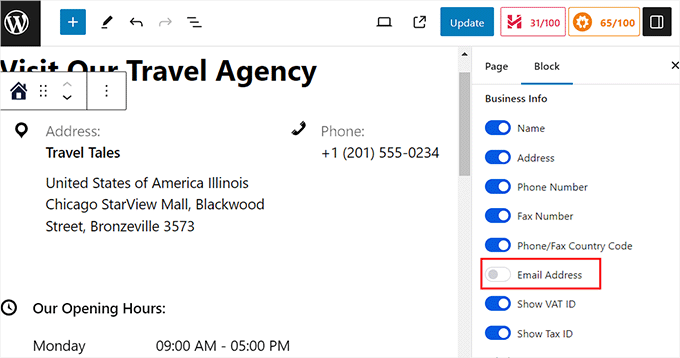
Once you do that, you can click on the blocks to configure their settings in the panel on the right.
For example, if you don’t want to display your business email address, then you can simply toggle the ‘Email Address’ switch to ‘OFF’. You can do the same for the days in the business hours block.
Finally, click the ‘Update’ or ‘Publish’ button to store your settings.
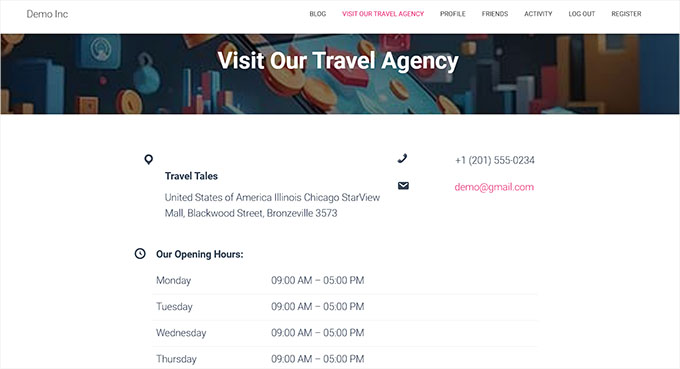
You can now visit your WordPress site to see the business address displayed properly.
Method 2: Add a Business Address in WordPress With a Free Plugin
If you are looking for a free solution, then this method is for you.
First, you need to install and activate the Five Star Business Profile plugin. For more details, see our step-by-step guide on how to install a WordPress plugin.
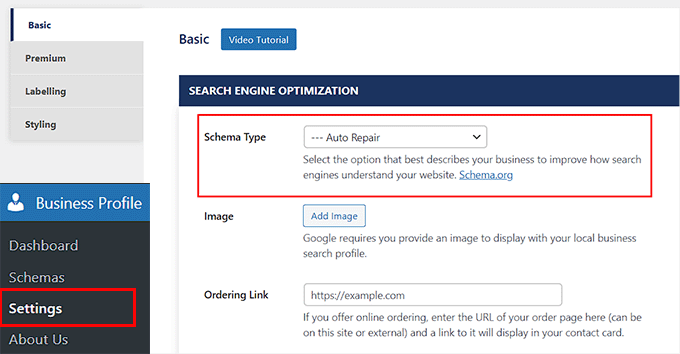
Upon activation, head over to the Business Profile » Settings page from the WordPress admin sidebar. Here, you can start by selecting the schema type that best describes your business from the dropdown menu.
For instance, if you run an auto repair shop, then you can select that option. The plugin will then create schema according to it. You can also add an image for your physical store and a URL if you allow online ordering on your site.
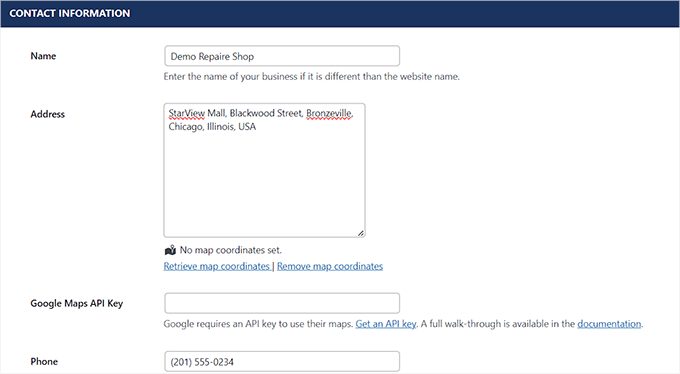
Next, scroll down and add a name, address, phone number, WhatsApp number, and email address into the different fields.
After that, you can also add the location using Google Maps.
To do this, you must visit the Google Maps Platform and click the ‘Get Started’ button.
You will then be taken to a new screen, where you must select your country and click the ‘Agree and Continue’ button.

This will take you to the next step. Here, click the ‘+’ button in the ‘Payment Profile’ field.
A prompt will now open up, where you can add your business or store’s location and then click ‘Create’.

After that, add your card details by clicking the ‘+’ button in the ‘Payment Method’ field.
Once you do that, click the ‘Start Free’ button.

Google Maps will now ask you some questions about your store or business like your industry, use case, and company size.
Go ahead and enter these details. Then, click the ‘Submit’ button.

Once you do that, a popup will appear on the screen, where the Google Maps API key will be displayed.
Simply copy this key and paste it into the ‘Google Maps API Key’ field in your WordPress dashboard.

Now that this is done, scroll down to the ‘Schedule’ section.
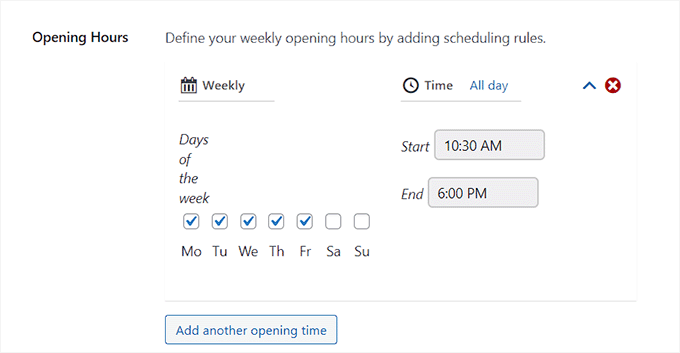
Here, click the ‘Add another opening time’ button.
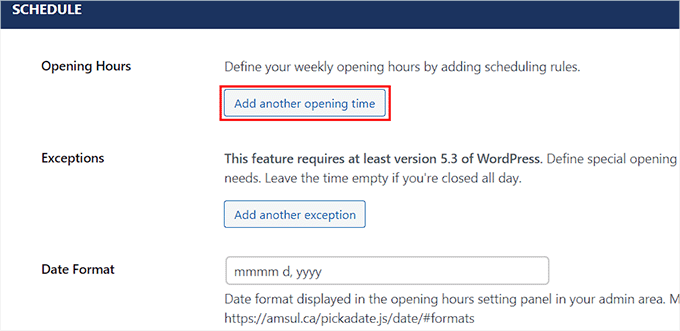
This will expand the tab, and you can check the boxes for all the days that your shop is open. After that, you must click the ‘Set a time slot?’ link.
This will expand the time settings, and you can add your business hours. Then, you can also change the date and time format according to your liking.
Once you are done, go ahead and click the ‘Save Changes’ button to store your settings.
Now, open the page or post where you want to add your business address.
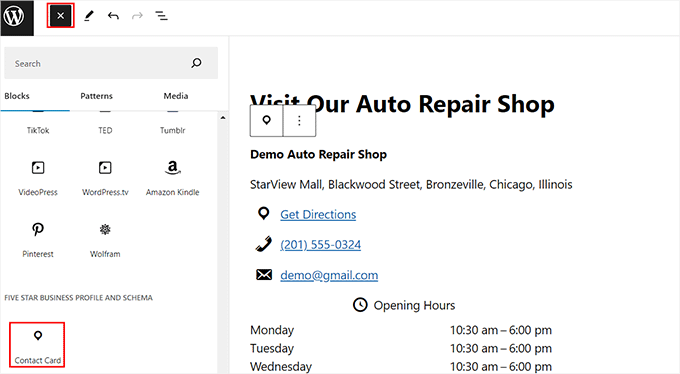
Once you are there, simply click the add block (+) button to open the block menu. From here, drag and drop the Contact Card block.
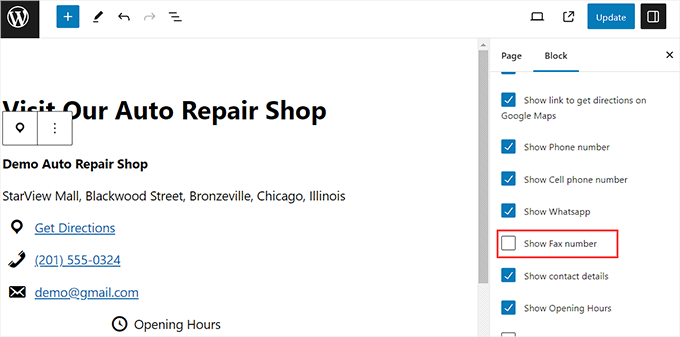
Next, open the block panel on the right. From here, you can uncheck the boxes for all the information that you do not want to display on your contact card.
For instance, if you want to hide your fax number, then you can simply uncheck that option.
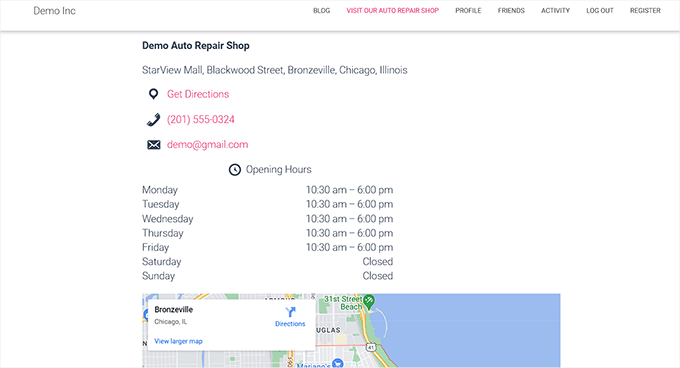
Finally, click the ‘Update’ or ‘Publish’ button at the top to store your settings.
Now, just visit your WordPress website to view the business address and details.
Bonus: Add Multiple Locations Schema in WordPress
If you have multiple physical stores and branches, then you can add local business schema for multiple locations with All in One SEO.
To do this, you must enable the Local SEO feature by visiting the All in One SEO » Local SEO page from the WordPress admin sidebar.
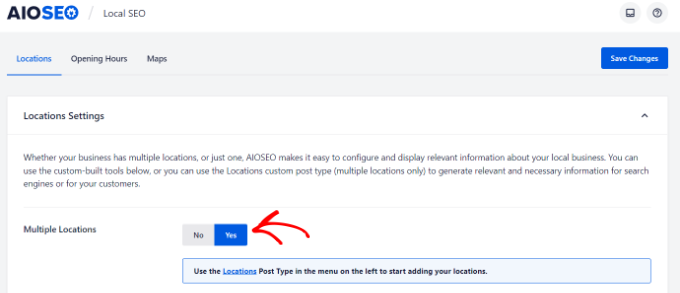
Then, switch to the ‘Locations’ tab and enable the ‘Multiple Locations’ toggle to ‘Yes’.
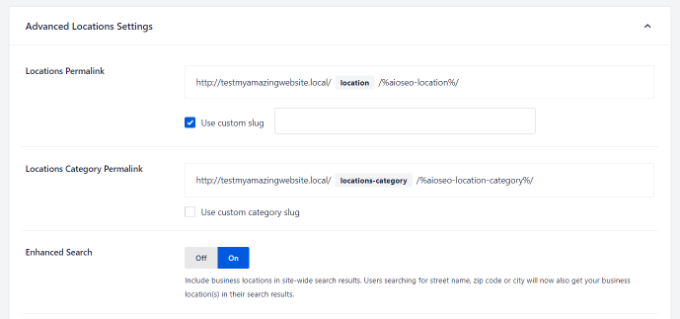
After that, scroll down to the ‘Advanced Settings’ section, where you can see the permalink AIOSEO will use to show your multiple business locations and location categories.
Next, switch the ‘Enhanced Search’ option to ‘On’ to include the locations in the WordPress search results.
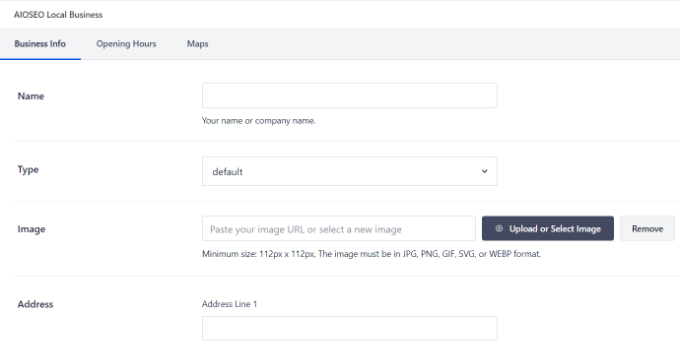
Once you have done that, visit the Locations » Add New page from the WordPress dashboard. This will open the content editor, where you can add a title and description.
Then, scroll down to the ‘AIOSEO’ meta box to add your business name, select a business type (industry), add an image, enter the address for your location, business phone, payment info, the area served, and more.
Finally, click the ‘Publish’ button to store your settings. Now, simply repeat this process to add other locations to your WordPress site.
For more information, you can see our tutorial on how to add multiple locations schema for local businesses in WordPress.
We hope this tutorial helped you learn how to properly add your business address in WordPress. You may also want to see our ultimate SEO guide and our top picks for the best WordPress plugins for business websites.
If you liked this article, then please subscribe to our YouTube Channel for WordPress video tutorials. You can also find us on Twitter and Facebook.
Leave A Comment
You must be logged in to post a comment.