Do you want to learn how to use Full Site Editing in WordPress?
Introduced in WordPress 5.9, Full Site Editing has changed how users can build their websites using WordPress. It’s designed to be flexible and easy to use for beginners.
In this article, we will show you how to use the WordPress Full Site Editor. By the end of this guide, you can easily create a great-looking website with WordPress in no time.
What Is Full Site Editing (FSE) in WordPress?
WordPress Full Site Editing (FSE) is essentially a continuation of the Gutenberg project. It’s a feature that uses the block content editor interface for WordPress.org’s built-in website and theme customization tools.
This means you can use the block content editor not just for creating your page or post content but also for a header, footer, sidebar, and more.
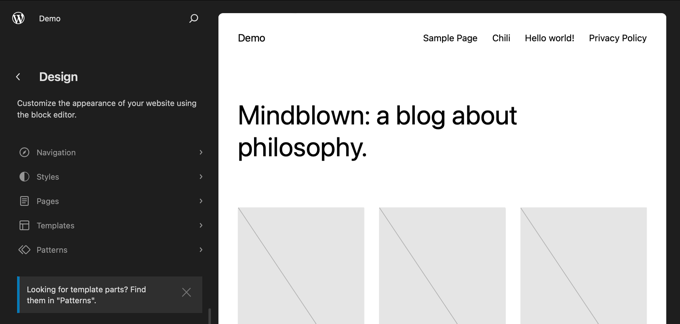
The goal of Full Site Editing is to simplify website building in WordPress. While WordPress is pretty user-friendly, it wasn’t always the easiest to use for beginners.
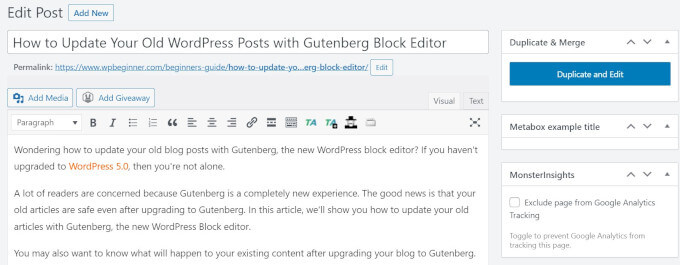
For starters, the previous Classic Editor is quite barebones. When you create a new page, you can’t see what it looks like right away. Instead, you have to switch back and forth between the preview page and the editing interface to see the page’s appearance on the front end.
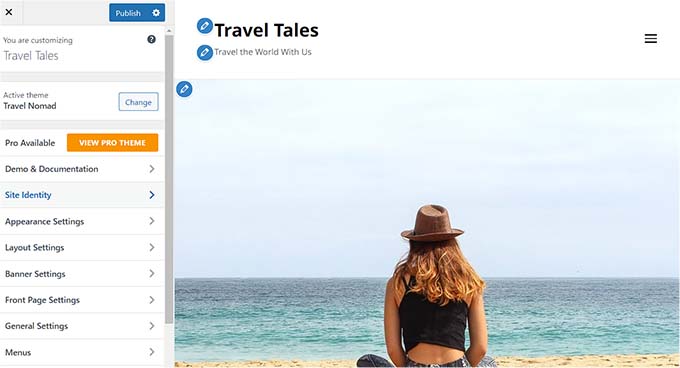
Some people also find the WordPress Theme Customizer limiting as it doesn’t have a drag-and-drop functionality.
In other words, you can’t move and edit elements around exactly how you want to. That’s why many people install a WordPress page builder plugin to get more flexibility in their design.
The Gutenberg project aims to solve these problems by introducing newer, more user-friendly website-building tools, including Full Site Editing.
With FSE, beginners can create their WordPress websites using an easy drag-and-drop block editor and see a live preview as they make changes.
What You Should Know Before Using WordPress Full Site Editing
Before using the WordPress Full Site Editor, you should know that this feature is only available for WordPress block theme users.
If you use a non-block (classic) theme, then you won’t have access to the Full Site Editor. Instead, you’ll have to use the WordPress theme customizer or a supported page builder to make customizations.
If you want to see some block theme inspiration, then go ahead and check out our guide to the best WordPress Full Site Editing themes.
Another thing to remember is that WordPress Full Site Editing works the same way as the Gutenberg block content editor. With that in mind, we recommend reading our guide on how to use the WordPress block editor.
In this guide, we will focus on how to use WordPress Full Site Editing features to edit your web page design, content, and layout. You can use these quick links to skip to a specific topic:
How to Access WordPress Full Site Editing Features
To access the WordPress Full Site Editor, you need to go to your WordPress dashboard and head to Appearance » Editor.
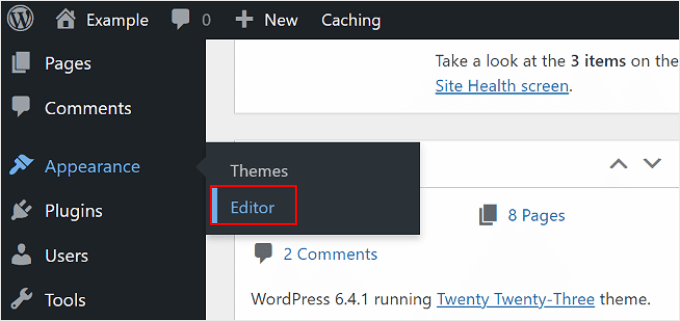
After that, you will land on the WordPress Full Site Editor.
Here’s what the interface looks like:

On the left side, you will find a panel with the main settings. Meanwhile, the right side has a preview of what your website looks like. You can click on that side if you want to edit your website right away.
There are 5 main settings: Navigation, Styles, Pages, Templates, and Patterns. Let’s go through all of them one by one.
The first setting at the top is Navigation, which allows you to edit your block theme’s navigation menu. Go ahead and click on it.
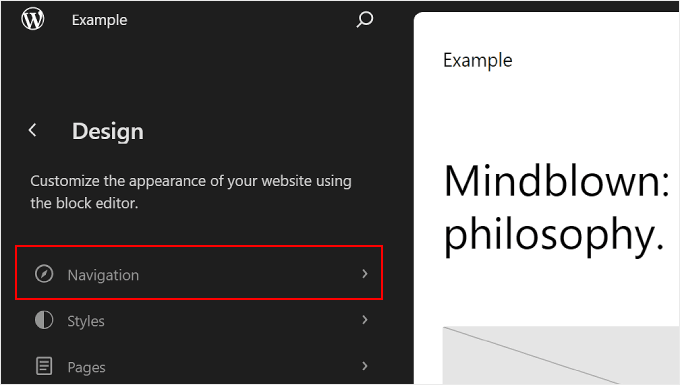
There are several things you can do on this page.
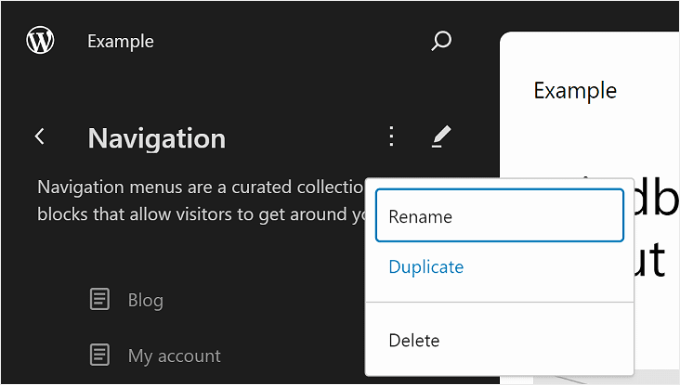
When you click on the three-dot button next to ‘Navigation,’ you can Rename, Duplicate, or Delete the menu.
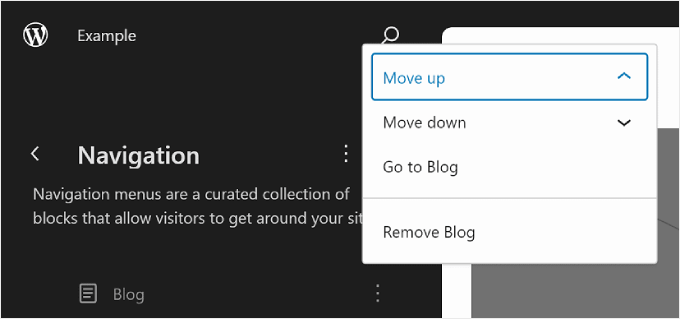
You can also rearrange or remove the page(s) listed in the menu.
To do this, click the three-dot button next to one of the pages. You’ll see options to Move up, Move down, and Remove the page. If you want to edit that specific page, then you can select the ‘Go to …’ button.
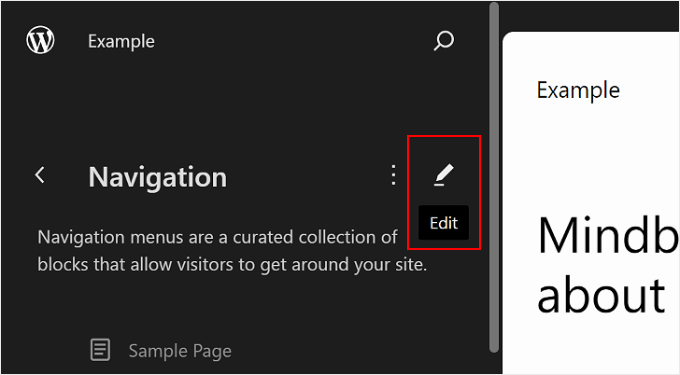
Another thing you can do is customize the menu design and links.
To do that, just click the pencil ‘Edit’ icon to open the block editor.
Now, the editing interface for the navigation menu will appear, which looks like the regular block editor.
Adding, Editing, Removing, and Rearranging Menu Elements
Before we continue, note that the location of your website navigation menu will depend on your theme. It may be at the top, on the side, or hidden, appearing only when you click a certain button.
To add a new page link, you can click the ‘+’ add block button within the menu. Now, simply type in the name of the page, post title, or external URL you want to insert into the navigation menu and select it.
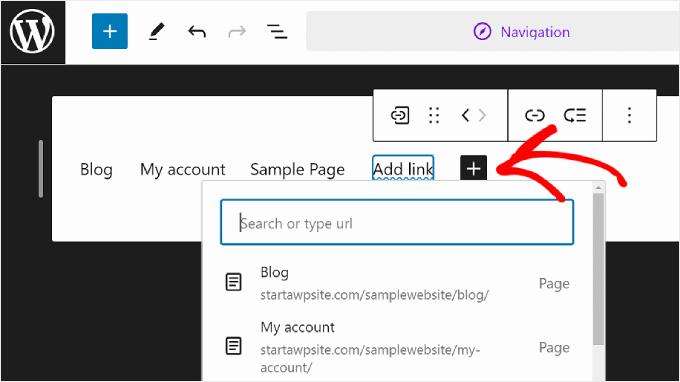
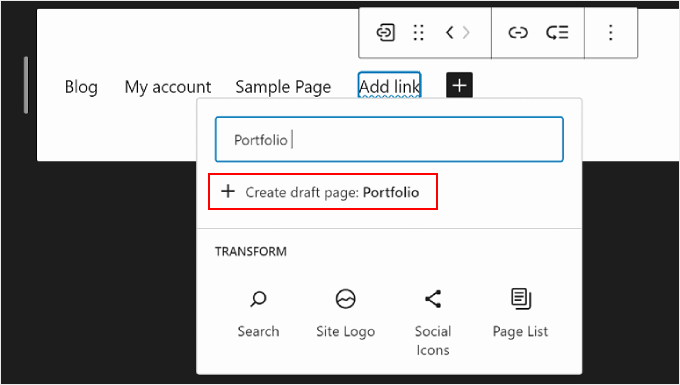
If the page you want to link to has not been created yet, then you can still add a link to the navigation menu.
Just type in the name of the draft page in the search bar and click ‘Create draft page.’ WordPress will then make a page using that name that you can edit later.
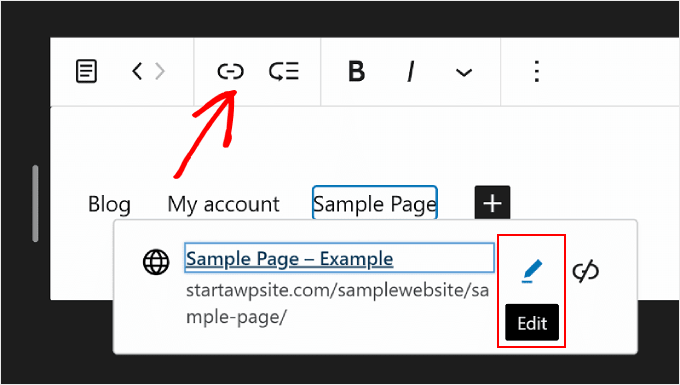
If you want to edit the page’s link, name, and tab settings, simply select the page and click the link icon in the block toolbar.
Once you’ve done that, select the pencil button.
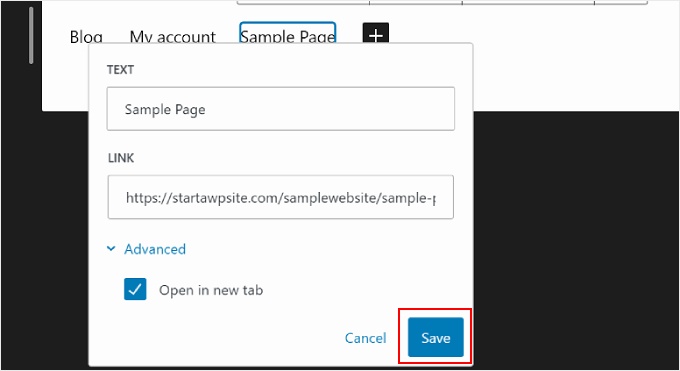
Now, you’ll be able to change the page’s link and make the link open in a new tab.
Once done, just hit ‘Save.’
You can also add new navigation menu elements here besides page links.
All you need to do is click the ‘+’ add block button. After that, you will find some navigation block options that are available for you to use, like the Site Logo or Site Tagline.
Sometimes, you may have to scroll down to find these blocks. You can also choose ‘Browse all’ to see the complete list of the block choices.
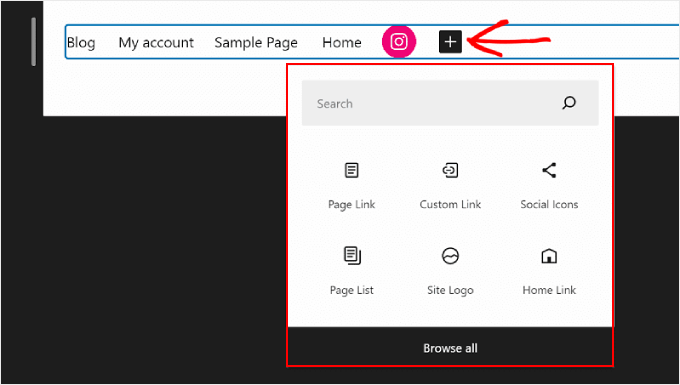
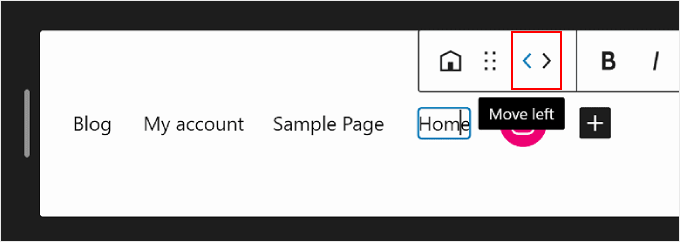
At one point, you may also want to rearrange the menu elements.
To do that, select a block and choose one of the arrow icons to move the block to the left or right.
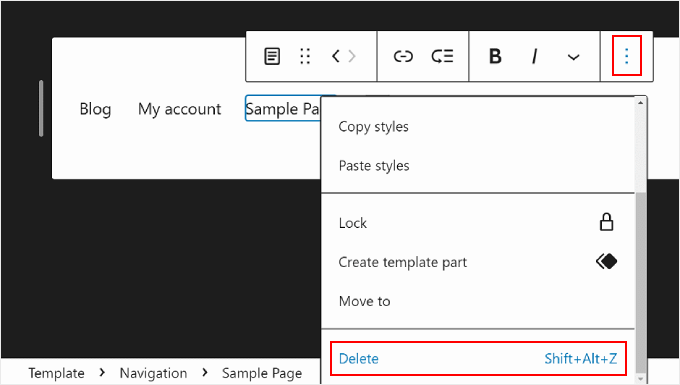
Now, if you want to remove a page link or other menu elements, you can select the element you want to delete.
Then, click the three-dot menu on the block toolbar and choose ‘Delete.’
Creating a Submenu
If you have a lot of web pages, like if you run an online store, then you may want to create a dropdown submenu. This way, your navigation menu won’t be cluttered with many links and will look much more organized.
The first step to creating a submenu is clicking the ‘+’ add block button and selecting the ‘Submenu’ block.
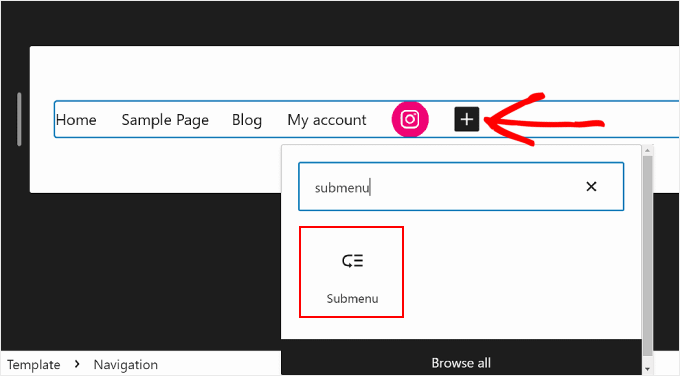
Next, you will select a page or URL that functions as the submenu’s parent menu.
For instance, if you run a blog, then you may use your blog page as the parent menu. Within the submenu, there will be links to the individual category pages of your blog content.
In this example, we will select ‘Blog.’
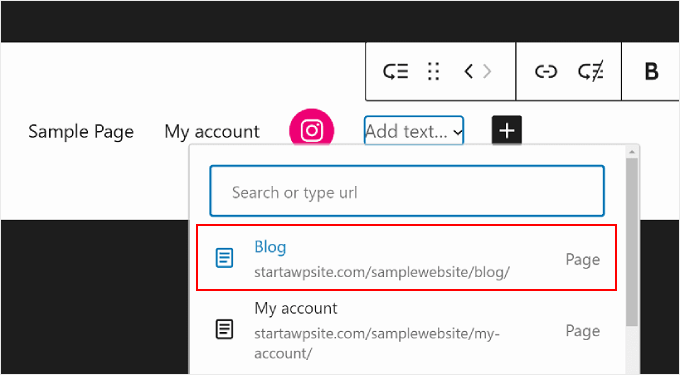
After you’ve done that, simply click the ‘+’ add block button.
It should be below the parent menu.
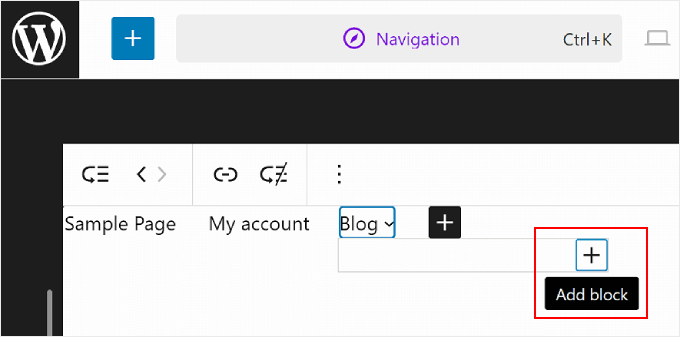
At this point, you can type in the name of the page link you want to insert and select that. Feel free to repeat this step to add as many submenu links as needed.
Once you are done with the navigation menu, don’t forget to save your changes by clicking the ‘Save’ button in the top right corner.

How to Change Your Website’s Global Styles With FSE
The next setting below Navigation is Styles. This feature lets you change the design of your entire website.
Once you are inside the Styles page, you will see some predefined style options, each with different colors, typography, and layout choices. Note that these predefined options will look different from one block theme to another.
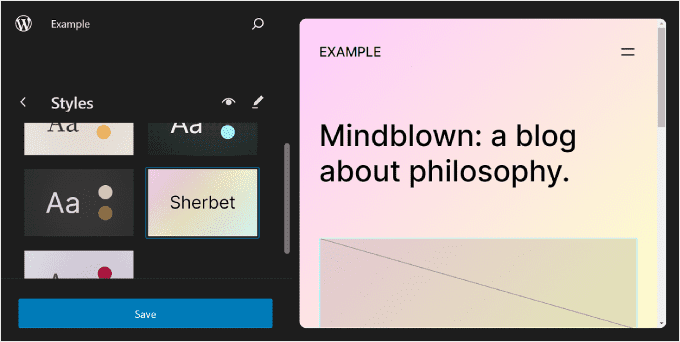
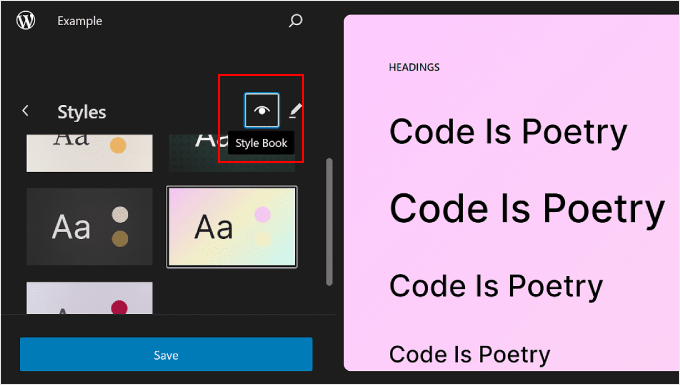
You can also click on the eye icon next to ‘Styles,’ which represents the Style Book.
With this, you’ll be able to see the style options’ typography and what the text blocks will look like using this style, like the headings, paragraphs, lists, and so on.
Similar to the previous section, the pencil button on this page will bring you to the editing interface.
Here, you will mainly use the right-hand panel to change the typography, colors, and layout to your exact needs.
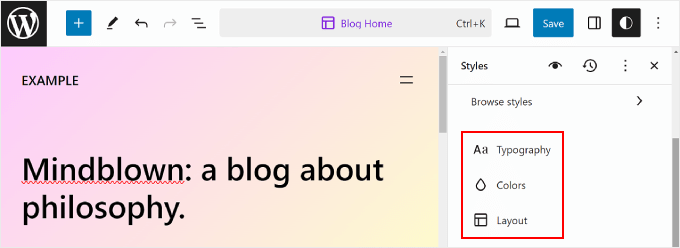
Typically, you will see your homepage in the editor. However, the changes you make here will also be reflected in the other web pages.
Editing Your Website’s Typography
To change your website’s fonts, navigate to the Styles sidebar on the right and select ‘Typography.’
Now, you’ll see several Text elements you can edit: Text, Links, Headings, Captions, and Buttons.
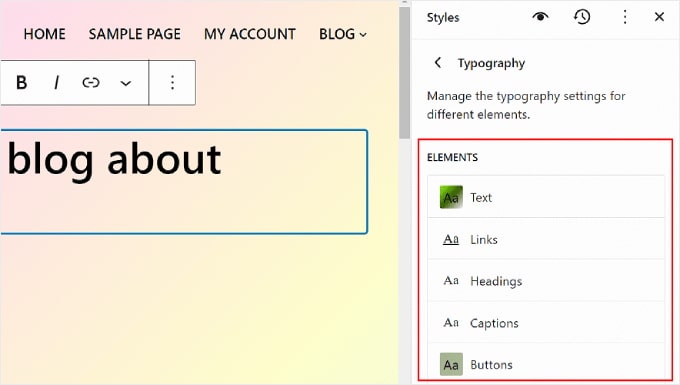
The settings in the Text element determine what the fonts across your entire site will look like. That means if you make changes to this element, they will be reflected in all the blocks that use text on your website.
That said, you can click on the Links, Headings, Captions, or Buttons element to edit the style of these specific blocks so that they look different from the rest of the text.
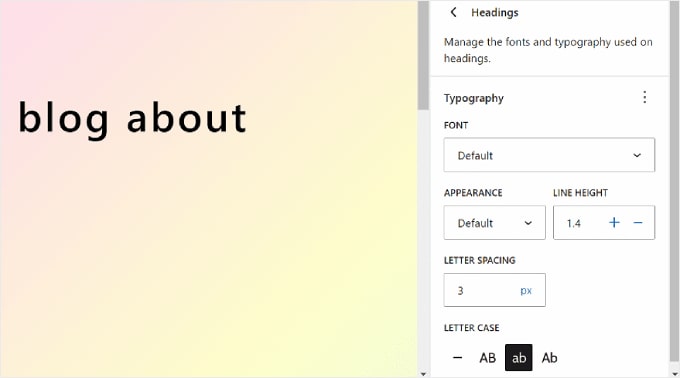
For instance, if you want your headings to have a different font from the paragraph block to stand out more, then you can configure the settings in the Headings element.
Generally, you can modify each element’s Font, Size, Appearance, and Line Height.
The font choices depend on the theme you are using. Meanwhile, Appearance controls whether you want to use a regular, bolded, or italic version of the font.
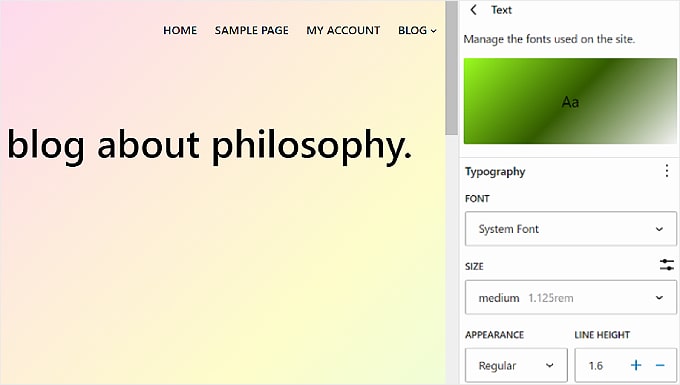
Some elements may have specific settings, so be sure to explore them one by one.
For instance, the Headings element has options to customize the letter spacing and letter case.
Customizing Your Website’s Color Palette
Let’s move on to setting the color scheme for your website. To do that, simply click on ‘Colors’ in the Styles panel. You’ll see two sections: Palette and Color.
Choose the colors within ‘Palette.’
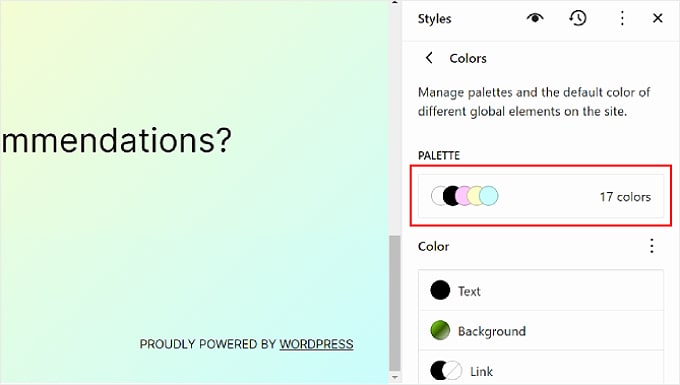
In the Palette’s Solid tab, you’ll see the Theme, Default, and Custom sections.
Theme includes colors that can be used to customize the color palette of your entire website.
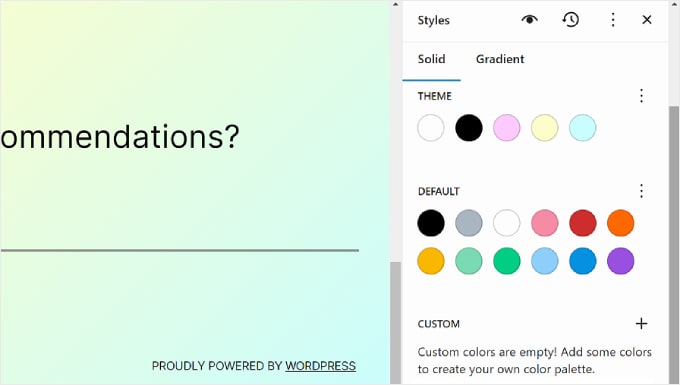
Meanwhile, the Default colors can modify blocks with color settings. Note that some themes may not include this feature, so you might not see this in your editor.
Lastly, Custom colors are colors that you can add to the theme. You can use this setting if neither the Theme or Default color options are suitable for you.
To add a new Custom color, just click the ‘+ Add color’ button and use the color picker tool.
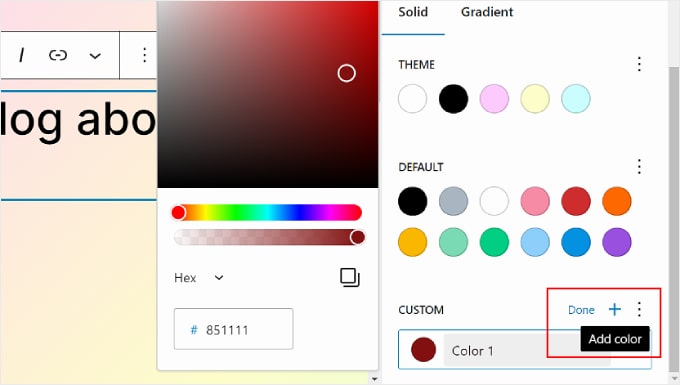
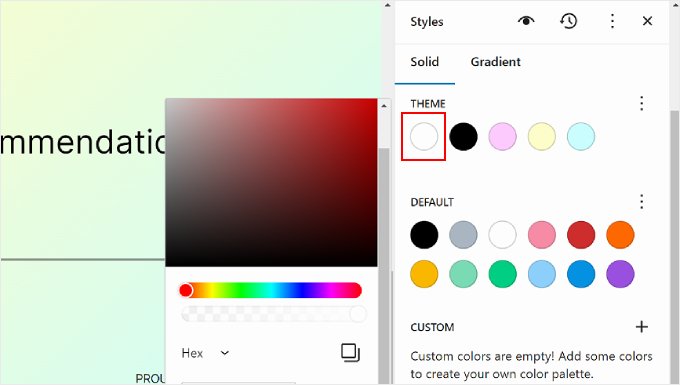
If you want to change a Theme, Default, or Custom color, simply select a color and use the color picker tool to switch to a different option.
Remember that blocks that use these colors will also be affected.
Let’s switch to the ‘Gradient’ tab. It’s similar to the Solid tab, but the color options are in the form of gradients, which are a mix of two or more colors.
The Theme options include some gradient options using the theme’s solid colors. On the other hand, the Default settings are color gradients that you can use to customize blocks.
Duotone colors are filters you can add to blocks with images. You can only view which duotones are available, but you can’t edit them here.
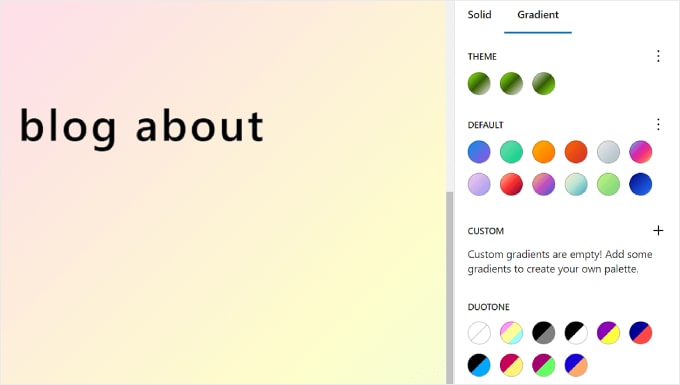
You can also create custom gradients if needed.
To do that, simply click the ‘+ Add color’ button. Then, you can select the Linear or Radial gradient type and customize the direction of the gradient by changing the Angle.
Additionally, feel free to select more colors into the gradient mix by clicking on a spot in the slider. A color picker will show up for you to choose a color.
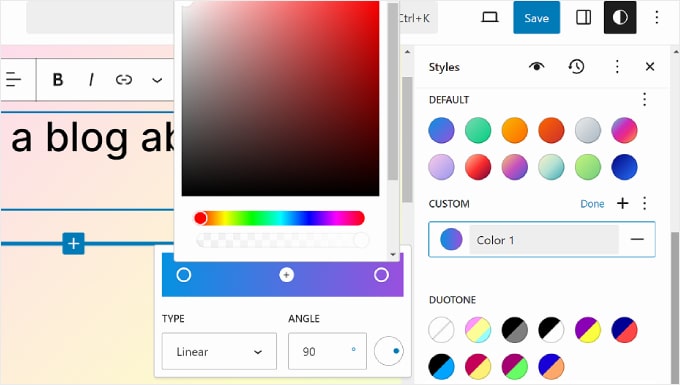
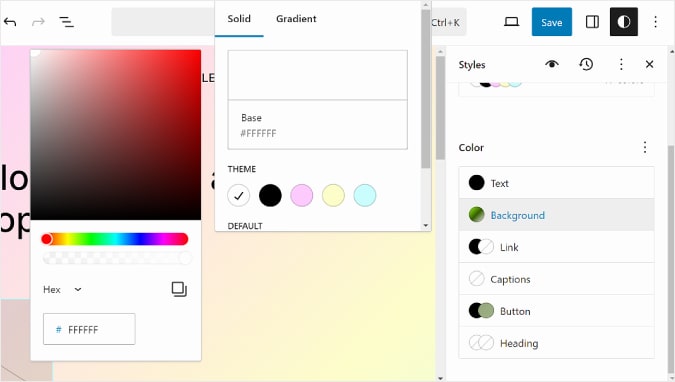
Going back to the Colors tab, you can customize the specific color settings of your Text, Background, Link, Captions, Button, and Heading.
Simply click on an element and select a Solid or Gradient color to change the element’s color. You can also select the preview section to access the color picker.
Adjusting Your Website’s Layout
The last option in the Styles tab is Layout. This is where you can modify the space between your web page elements.
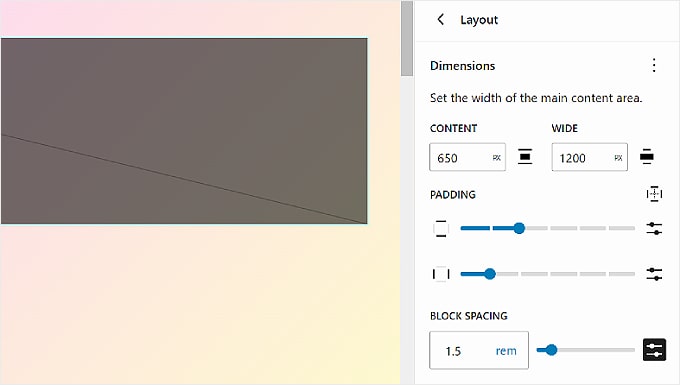
At the top of the Layout panel, you will find settings to change your page’s Content and Wide width. The Content width determines the default width for an individual block when their alignment setting is None in the block toolbar.
On the other hand, the Wide width decides the default width for blocks when they are set to Wide width alignment.
Below that is Padding, which controls the outer spaces around your web page content.
Using the available sliders, you can set the top, bottom, left, and right padding. If you want to be more specific with the padding size, then you can click on the slider icon to insert a pixel size, like in the screenshot below.
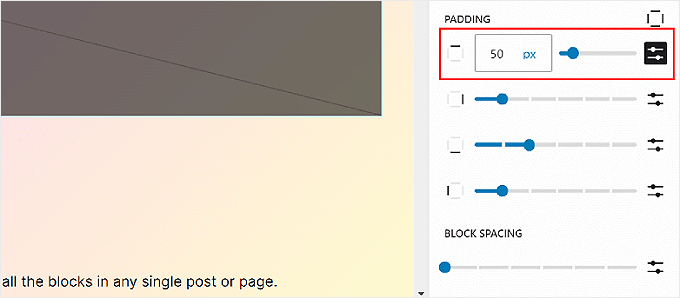
Toward the bottom, you will see the Block Spacing settings. This option determines the spaces between individual blocks so that they are not too close or far from each other. You can edit this the same way as you edit the Padding.
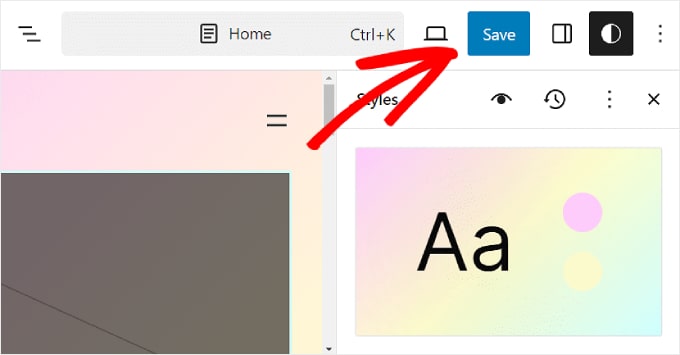
Remember to click the ‘Save’ button at the top right corner to make your changes official.
How to Customize WordPress Pages With FSE
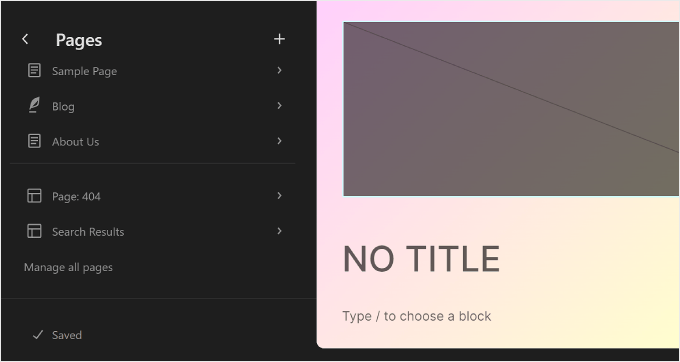
So far, we’ve covered Navigation and Styles. Let’s now move on to Pages. In this tab, you will see a list of your existing pages. We will talk more about editing them later.
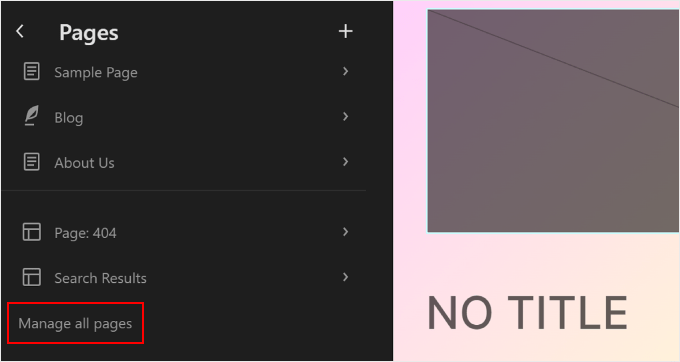
If you want to manage multiple pages at once, then you can click the ‘Manage all pages’ button at the bottom.
This will bring you to the All Pages section in the WordPress dashboard.
You can also create a new page right in the Full Site Editor.
To do that, simply click the ‘+’ Draft a new page button in the left side panel. After that, give your new page a name and hit ‘Create draft.’
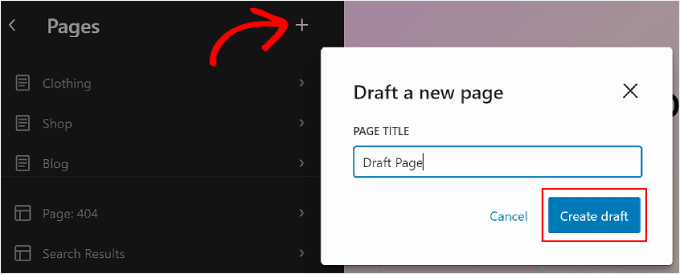
From there, you can start customizing the page.
To edit an existing page, select a page that you want to modify. In this case, it’s ‘Page: 404.’
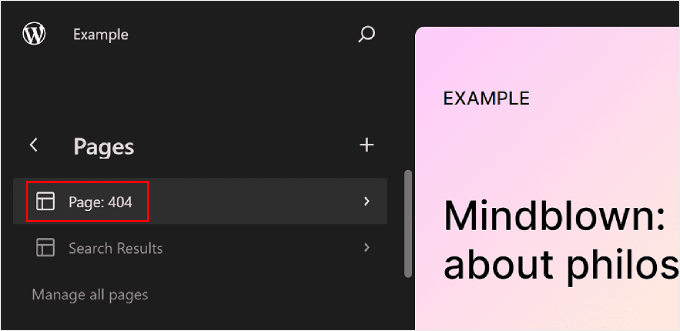
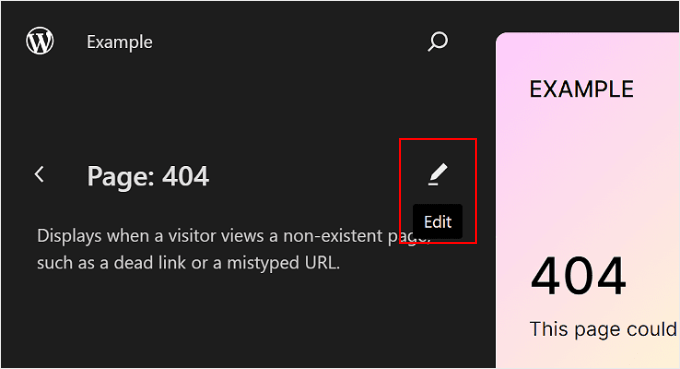
After that, click the pencil ‘Edit’ button.
You will then see the editing interface for that specific page.
Editing pages using the Full Site Editor is essentially the same as using the block editor.
For more information about this, we have several guides for you to read. You can start with these:
How to Edit WordPress Templates With FSE
On the Templates page in the WordPress Full Site Editor, you’ll see a list of the templates provided by your theme.
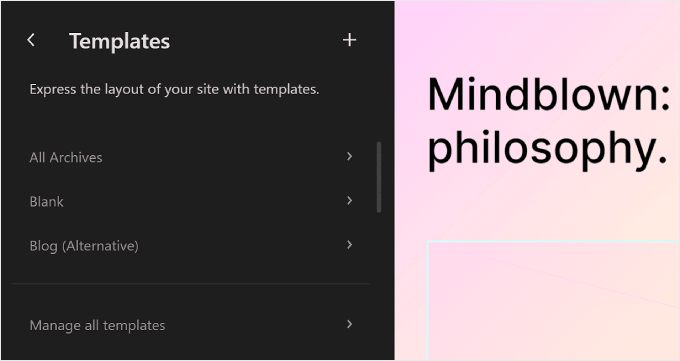
In WordPress Full Site Editing, Templates are predefined structures that you can use to design a specific type of page on your website.
For instance, many WordPress block themes will come with a Single Post template. This page template defines the layout of a blog post page, which means that every blog post on that website will use that template.
This feature can be helpful if you have multiple pages on your WordPress blog and many of them use the same layout.
If you need to change the same element on those pages but don’t want to edit each one individually, then you can simply modify the template. Then, the changes will apply to all the pages using that template.
To edit a template, you can click on it. After that, you will see details about the specific template, its patterns, and when it was last modified. We will talk more about patterns in the next section.
Now, just click the pencil ‘Edit’ button.
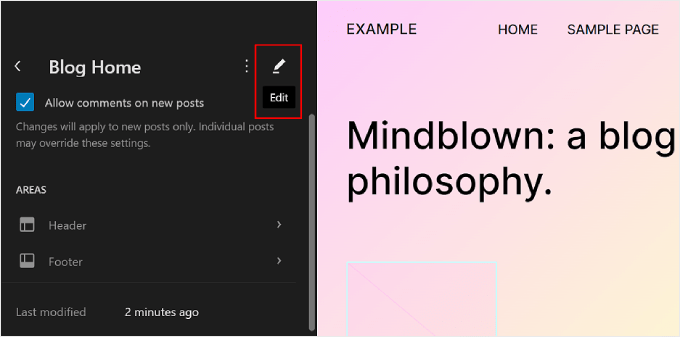
Now, you can edit the page template like you edit other elements using the block editor. You can add new blocks and customize the block or page settings.
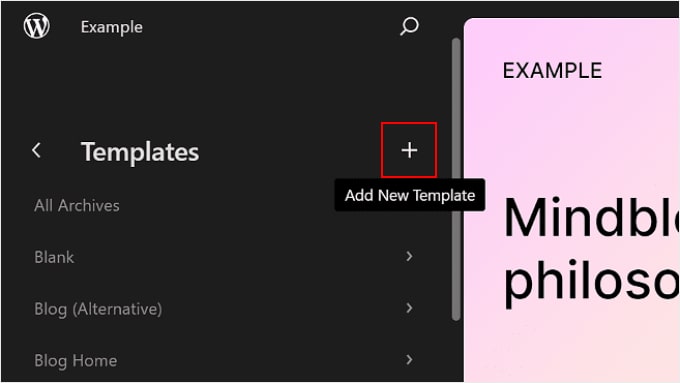
If you want to create a custom template, select the ‘+ Add New Template’ button in the left panel.
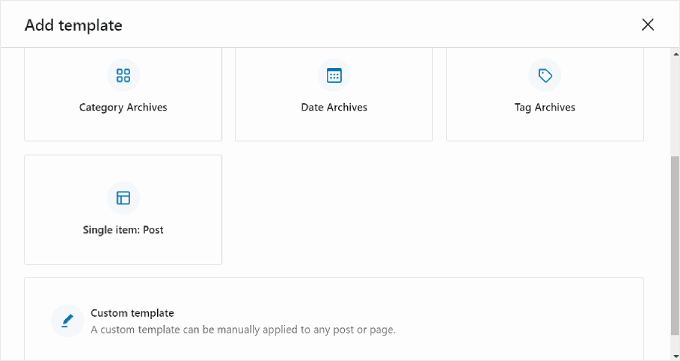
From here, just select which page the new template should apply to.
Alternatively, you can scroll down to the bottom and choose ‘Custom template.’
At this stage, you will see the editing interface with a blank page that you can start adding blocks to. For a step-by-step example, check out our guide on how to create a custom homepage template using the block editor.
To manage all of the templates at once, you can go back to the Templates page and click the ‘Manage all templates’ button.
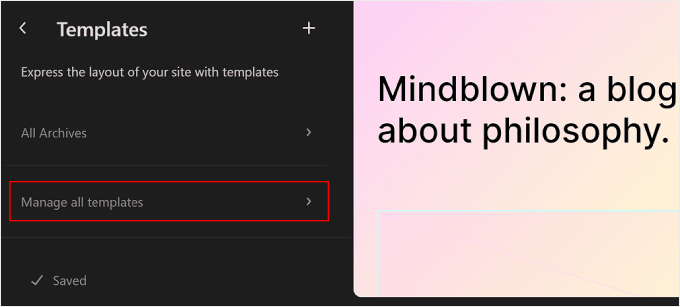
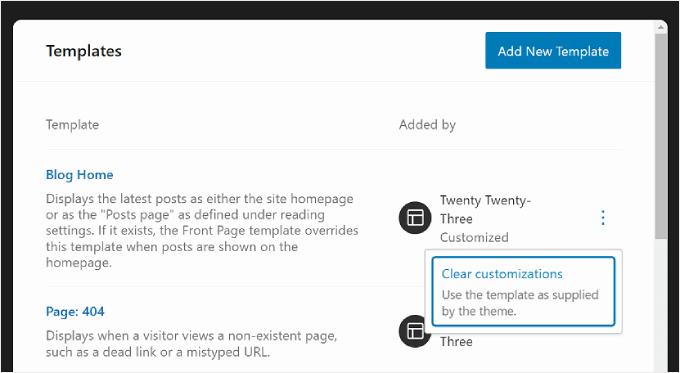
On this page, you can view all your template descriptions, add a new template, or clear the customizations you’ve made on the template to restore its default settings.
Here’s what it looks like:
If you are editing a page or post using the block editor and want to change its template without going to Full Site Editing mode, then you can also do that.
Simply go to the page or post and open the Page or Post Settings sidebar. Then, find the ‘Template’ section within ‘Summary’ and click on it.

You can use the dropdown menu to change the page template or click ‘Edit template’ to access the template editor right away. Alternatively, feel free to click the ‘Add template’ button to create a new custom template from scratch.
How to Modify WordPress Patterns With FSE
In WordPress Full Site Editing, Patterns are ready-to-use sets of blocks that you can insert into a page or post. When you create a pattern, it will be added to your block directory, and you can easily add it to any post or page on your website.
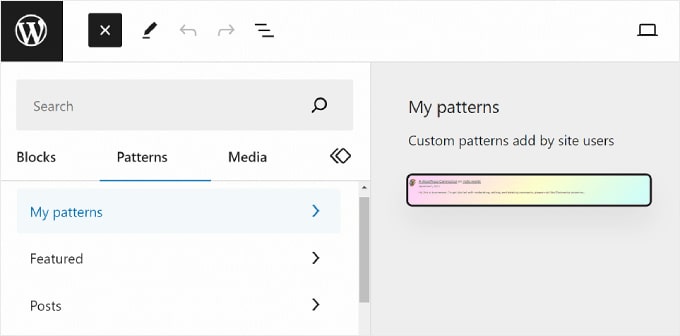
Patterns are useful when you need to use the same set of blocks for multiple pages or posts. Many people have used it to design custom call-to-action banners or image galleries in their blog posts.
Plus, you have the option to make these patterns ‘synced.’ This means that if a pattern is used in multiple posts or pages, then any modifications you make will automatically apply to all instances where the pattern is used.
On the Patterns page in WordPress Full Site Editor, you will see a collection of patterns.
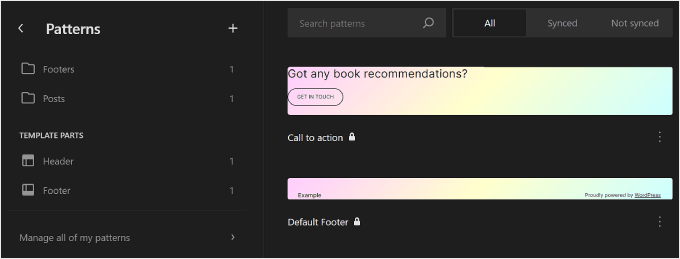
The menus marked with a folder icon contain a list of default patterns offered by your chosen theme. These are locked and cannot be edited.
Below that, you’ll find ‘Template Parts,’ which are a special type of pattern used in your website structure and not necessarily a part of your page content. Examples include your website’s header, footer, comment section, and so on. These are all customizable.
To add a new pattern, click the ‘+ Create pattern’ button in the left panel and choose between creating a new pattern or a template part.
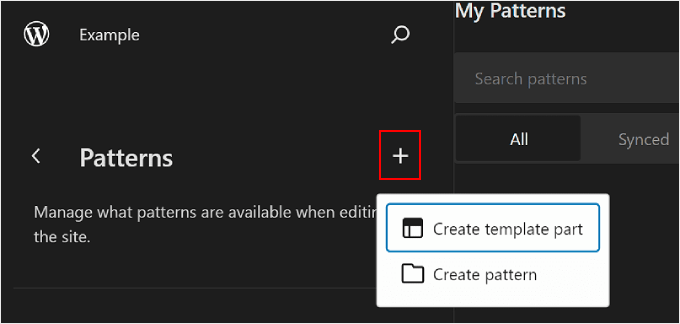
If you are confused about which one you should pick, then a pattern is similar to a reusable block you can add to your page or post content. Meanwhile, a template part is more like a set of blocks that are a part of your template structure, like a header, footer, or sidebar.
A template part will automatically have a syncing ability, so all the changes made to it will apply across your website. On the other hand, a pattern can be synced or unsynced.
After that, you must name the template part or pattern and choose whether to make it synced. Once you’ve done that, simply hit ‘Create,’ and you’ll be redirected to the editing interface.
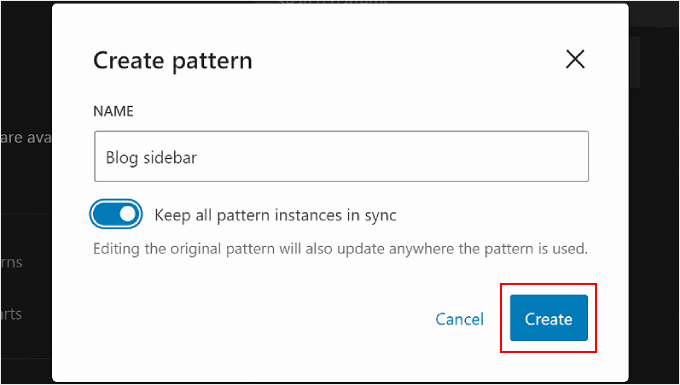
For more information about creating and using patterns, you can check out our beginner’s guide on how to use WordPress block patterns.
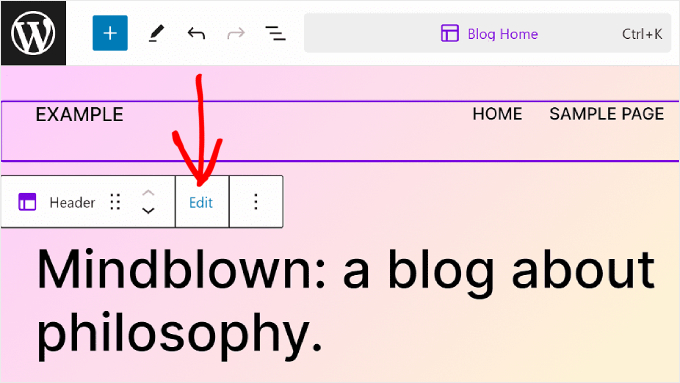
When editing a page or template, you may want to adjust a block pattern or template part, too. You can do that right in the editor without going to the Patterns menu.
Simply hover over the pattern or template part. After that, click ‘Edit.’ You will then be redirected to the Full Site Editor for that element.
Tips to Make the Most Out of WordPress Full Site Editing
Now that you are familiar with the basics of Full Site Editing, let’s discuss some tips and tricks to make the most out of it.
Use the Command Search Bar
With the command search bar, you can navigate quickly to a certain part of your website or perform actions to edit your web design.
This feature can be helpful if you want to find a specific setting in the Full Site Editor immediately instead of going through different buttons and menus.
If you are in the main menu of the Full Site Editor, then you can click on the magnifying glass icon to use it.
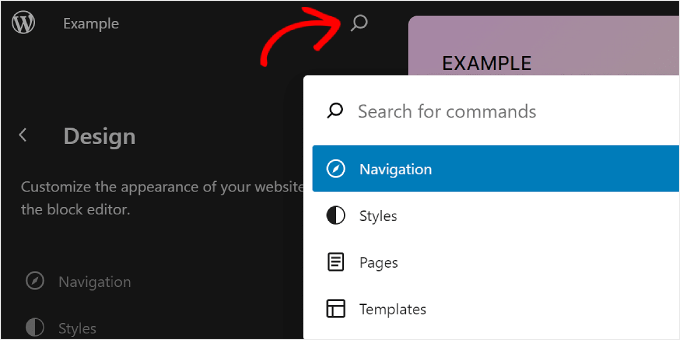
Alternatively, you can press Ctrl/Command+K on your keyboard while in the editing interface.
Then, simply type in what you want to find or do. For instance, you can add a new post or page without returning to the WordPress dashboard.

Manage Blocks With List View
When you are editing a page, template, or pattern, you may find yourself adding so many blocks that it’s hard to keep track of them all.
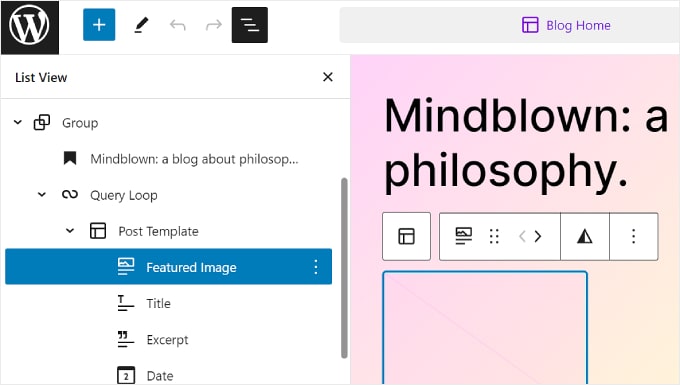
This is where the List View can come in handy. With this feature, you can see every block added to the page, template, or pattern, including the ones nested in another parent block.
To activate the List View feature, all you have to do is hit the three-line button at the top left side of the editor’s menu bar. You will then see all the blocks used in that page, post, template, or pattern.
If you want to configure a specific block that’s inside a group, row, column, or similar, just click on that block from the List View. From there, the block will be selected, and the toolbar will appear.
Get Familiar With Keyboard Shortcuts
If you want to get faster at editing your website, consider learning keyboard shortcuts. With shortcuts, you can navigate through different buttons and settings using your keyboard instead of going back and forth by moving your mouse.
The shortcuts used in the block content editor will also work in Full Site Editing. You can check out our list of WordPress keyboard shortcuts for more information.
Limitations of WordPress Full Site Editing
WordPress Full Site Editing has definitely made it easier for new WordPress users to customize their websites. Still, this feature has some shortcomings.
For one, you will need a block theme to use it. There are many new block themes available, but there are not as many as regular WordPress themes. If you use WooCommerce, then your theme choices may be even more limited.
Plus, switching themes can be a hassle, as you will have to set up the theme again and check if there are compatibility issues with your WordPress plugins.
Furthermore, a lot of your customization relies on the options offered by your WordPress theme. This can limit your creativity when building your site.
How to Use a Full Site Editing Alternative
If you are looking for a WordPress Full Site Editing alternative, then you can check out SeedProd. It’s a powerful page builder plugin and theme builder with 300+ mobile-friendly templates to create any kind of website.
The drag-and-drop builder is easy to use, and there are 90+ page blocks available for content elements. There are also dozens of pre-built sections, like calls to action, that are optimized for conversions, so you won’t need to design these elements from scratch.
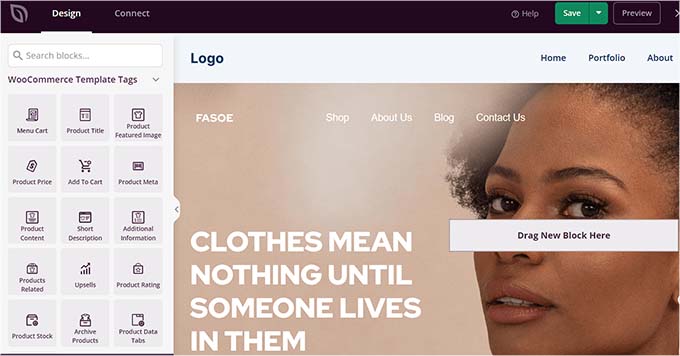
You can read our SeedProd review and our article on how to create a custom WordPress theme for more information.
We hope this beginner’s guide has helped you learn how to use WordPress Full Site Editing (FSE). You may also want to check out our list of the best WordPress page builder plugins and our article on common WordPress block editor problems.
If you liked this article, then please subscribe to our YouTube Channel for WordPress video tutorials. You can also find us on Twitter and Facebook.
Leave A Comment
You must be logged in to post a comment.