Google is shutting down more than 21.7 million websites created with Google My Business.
These were free small business websites that Google offered to users when they created a Google Business Profile.
All of these websites will be turned off in March 2024, and users visiting those sites will be redirected to the Google Business Profiles associated with those accounts.
Let’s talk about how this change may affect your business and what you can do to not lose valuable online traffic.
Here is a list of topics we will cover in this article:
What Is a Google Business Profile Site?
A Google Business Profile helps businesses appear in Google’s local search results with detailed information, including directions, business hours, phone numbers, and a link to visit the business’s website.
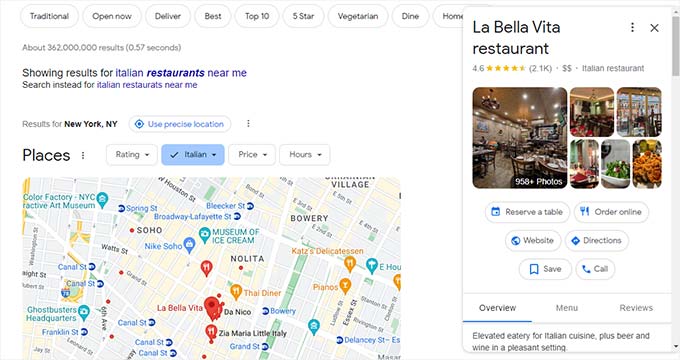
Local searches have increased almost 500% over the past few years. According to Google, almost 78% of searches for a local business end up in a physical visit within a week. (Source: ThinkwithGoogle)
This makes it essential for businesses to appear in local search results, and the easiest way to do this is by creating a Google Business Profile.
When you create a Google Business Profile, Google gives you the option to add your website. Previously, businesses that didn’t have a website were offered to create a free one instantly using the information in their Google Business Profile.
Many small businesses took advantage of this option and created these free websites. This drove them traffic, leads, and in-store visits from local searches.
Why Migrate Your Google Business Profile Site?
Google Business Profile sites will be shut down in March 2024. These were small, single-page sites that Google offered free to users when they created a Google Business Profile.
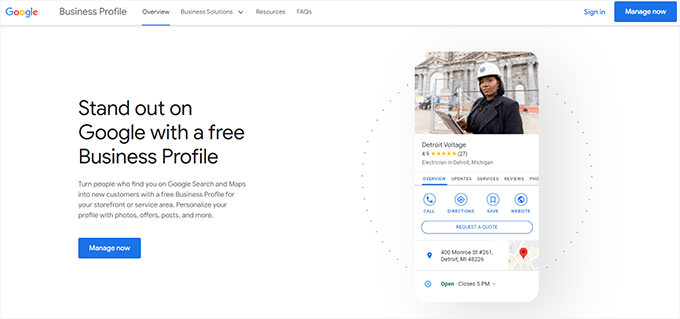
Once this service is closed, users will be redirected to the Business Profile page until June 10, 2024. After that, users visiting your site will see a page not found error. This will make your business look less professional and legitimate.
More importantly, it will affect the conversions you get from local searches. If you don’t have another website to replace the Business Profile site, then potential customers may not be able to learn everything they want to know about your company before visiting it. Unfortunately, this could lead to them choosing a competitor instead.
What to Do Before Google Business Profile Site Shutdown
If you are among the millions of businesses who used the option to create a Google Business Profile site, then here is what you need to do before Google shuts down the service.
Step 1: Make a Website You Own and Control
Google has a long history of shutting down services and products. Remember Orkut, Google+, and, more recently, Google Domains? There is a long list of products and services that have been shut down, and you can see Google Graveyard for a full list.
That’s why you need to make a website for your business that you own and control.
You will be able to display your website content in local search results. And since you have full control, you can drive even more traffic to your business.
The best way to do this is by using WordPress. It is the world’s most popular website builder, used by over 43% of all websites.
Note: When we say WordPress, we are talking about WordPress.org, also known as self-hosted WordPress. This is not to be confused with WordPress.com, which is a web hosting service. To understand the difference, just see our guide on WordPress.org vs. WordPress.com.
Why Use WordPress for Your Business Website?
WordPress is the most powerful yet easy-to-use website builder on the market. Here are some of the reasons for choosing WordPress:
- It is free and open-source and has been around for 20+ years.
- Websites you create using WordPress are fully controlled and owned by you.
- It is infinitely extendible. You can use it to make a 1-page website, or you can use it to create a full-fledged online store.
- It has thousands of design templates, tools, and plugins to choose from.
- Lastly, it is very SEO-friendly and you can use it to get even more traffic from Google search results.
Need more convincing? Take a look at our explainer on why you should use WordPress.
Getting Started With WordPress
WordPress itself is free to download and use, but you’ll need a domain name and web hosting to run it.
These things used to be quite technical for average users, but luckily, they are not anymore.
You simply need to sign up for a web hosting account and purchase a domain name, and they will have a 1-click WordPress installer ready for you.
Web hosting typically costs around $7.99 per month (paid annually), and domain names start at ($16.99/year).
This is a significant investment, especially considering you didn’t pay anything to create your Google Business Profile site.
Luckily, the folks at Bluehost are offering a generous discount on hosting with a free domain name. This deal will help you get started at just $1.99 per month.
Bluehost is one of the biggest hosting companies in the world. They are also one of the officially recommended WordPress hosting providers.
Simply go to the Bluehost website and click on the green ‘Get Started Now’ button.

Next, you’ll be asked to choose a hosting plan.
Basic and Choice Plus plans should be quite enough for a small business website.
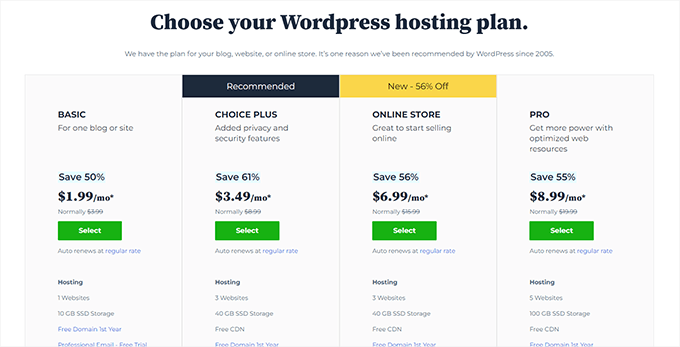
Click ‘Select’ to choose your plan and continue.
After that, you will need to pick your domain name, or if you have a domain name already, then you can use that.
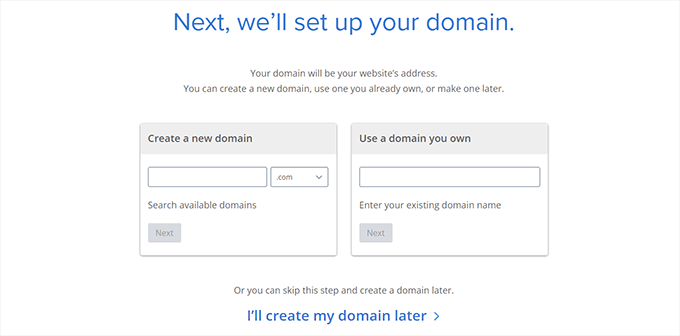
A domain name is your website’s name and the address that users will enter in their browser to visit it (e.g. wpbeginner.com or google.com).
💡Tip: Try our free business name generator tool. It will help you quickly generate dozens of ideas for your domain name.
After choosing your domain, you will be asked to fill in your account information and finalize the package.
You will see some additional options on the screen under Package Extras. You can uncheck all of them as they will increase your costs. You can always add them later if needed.
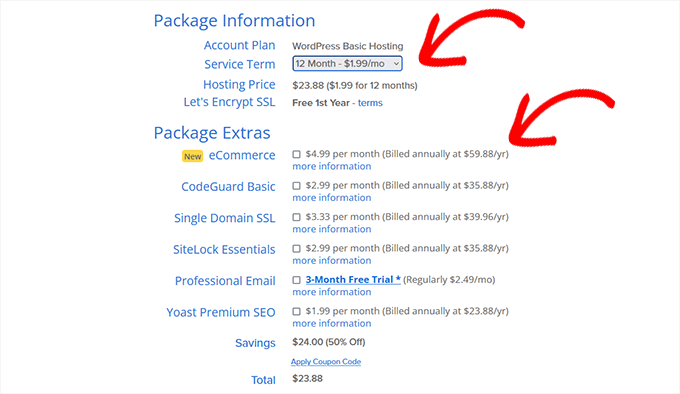
After that, enter your payment information to complete the purchase.
Bluehost will now create your hosting account and send you an email with login details.
Once you log in to your Bluehost hosting account, they will automatically install WordPress for you.
You can just click on the ‘Edit Site’ button to log in to WordPress and start working on your website.
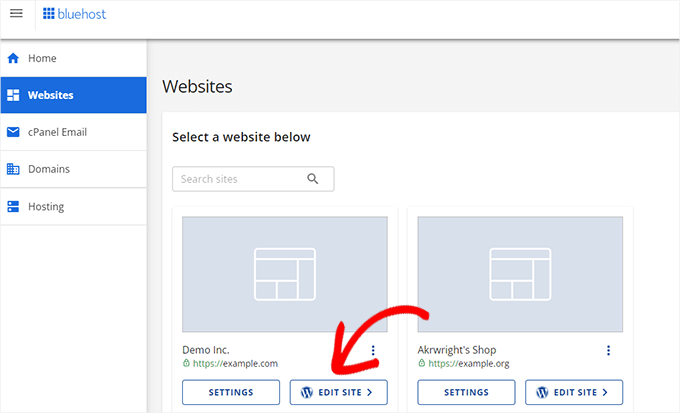
Bluehost will walk you through the initial setup, and you can follow the on-screen instructions to create your website.
For more details, you can see our complete WordPress installation tutorial.
Step 2: Set Up Local SEO for Your Business Site
Local SEO is a set of techniques used to improve a business website’s visibility in local search results.
It sounds a bit technical, but it isn’t. Let us explain a bit.
Basically, you just need to add your business information to your website using Schema.org markup.
This markup is added to your website’s code in a special format, and search engines like Google can then find and use this data. This allows search engines to show your company in the search results to people who are looking for businesses like yours.
Luckily, you don’t even need to write this markup code. There are excellent tools that help you add that data to your website and optimize it for local SEO.
We recommend using All in One SEO for WordPress. It is the best WordPress SEO plugin on the market that allows you to easily optimize your website for local SEO easily.
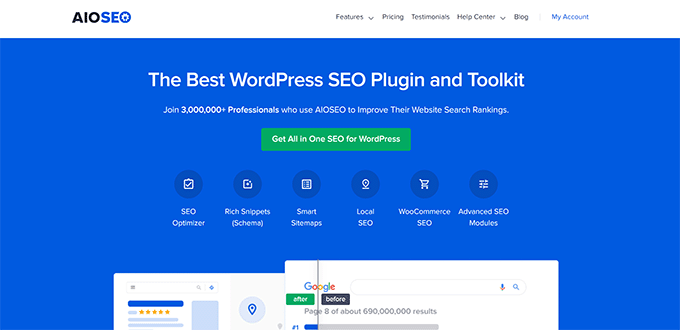
Note: You’ll need at least the Plus plan of the plugin to unlock the Local SEO features.
First, you need to install and activate the All in One SEO Plugin. For more details, see our tutorial on how to install a WordPress plugin.
Upon activation, the plugin will show you a setup wizard. Simply follow the on-screen instructions to complete the setup.
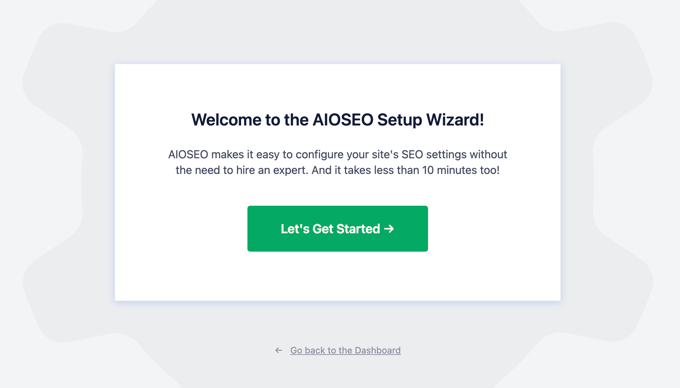
After finishing the setup, head over to the All in One SEO » Local SEO page in your WordPress dashboard.
You will be asked to ‘Activate Local SEO’ by clicking on the button.
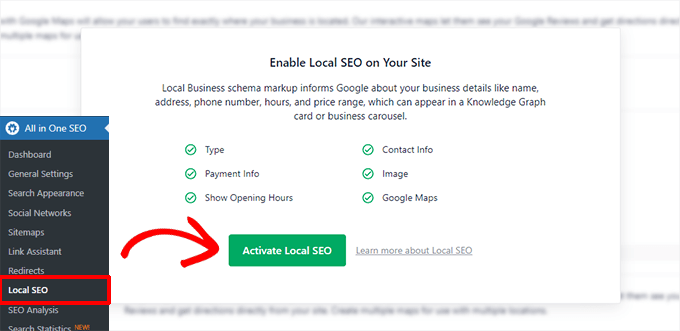
All in One SEO will now download and activate the Local SEO addon.
After that, you will end up in the Locations tab.
Now, if your business has multiple locations, then you can turn the ‘Multiple Location’ toggle to ‘Yes’.
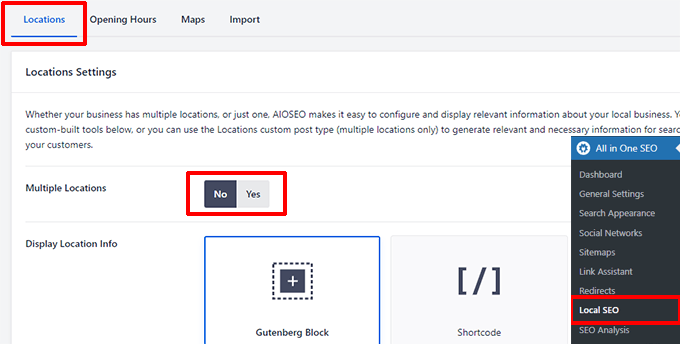
For more details, see our tutorial on how to add multiple locations schema in WordPress.
Scroll down a little to the Business Info section.
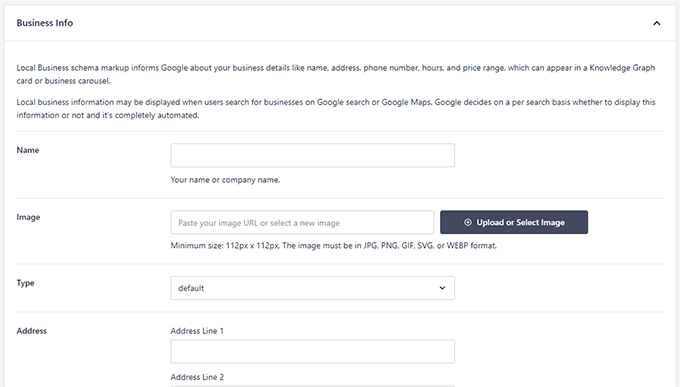
Here, you will need to provide general information for your business, including its name, logo image, type of business, complete address, phone number, and more.
Next, switch to the ‘Opening Hours’ tab to enter your business hours.
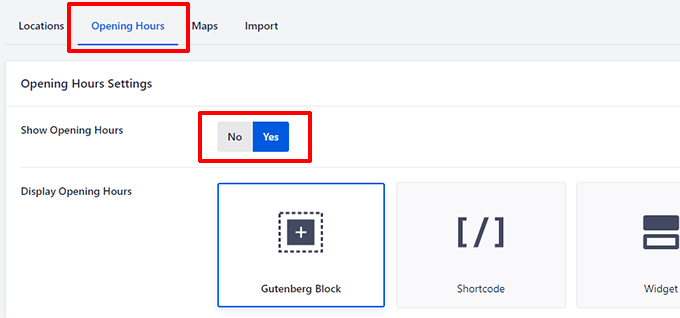
Ensure that the ‘Show Opening Hours’ toggle is set to ‘Yes’ if you want to display business hours on your website.
Scroll down a little and then add your business hours.
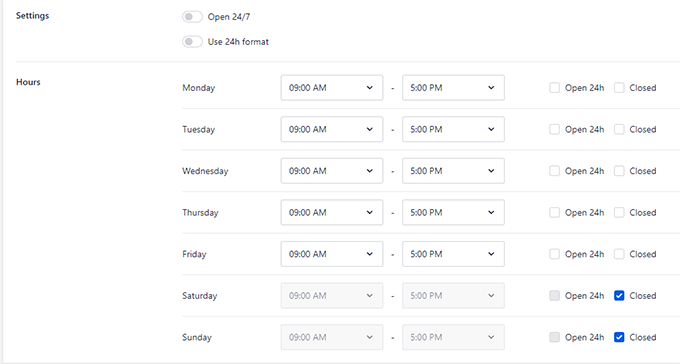
After that, you can switch to the ‘Google Maps’ tab.
You’ll need a Google Maps API key if you want to display your business location in Google Maps on your website.
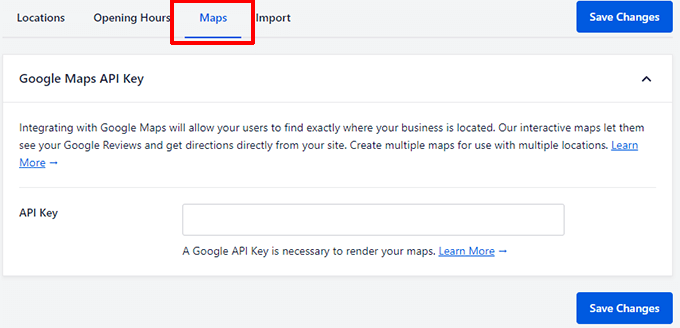
Just click the ‘Learn More’ link for instructions on how to get the API key.
Finally, click on the ‘Save Changes’ button to save your settings.
Displaying Your Business Information on Your Website
All in One SEO will automatically add the schema markup to your website’s code, making it discoverable by search engines.
You can also display your business information on your website to make it visible to visitors and customers.
Simply edit the page where you want to display it and then click on the [+] add block button on the edit screen.
Search for AIOSEO Local and then add the local SEO blocks to your page.
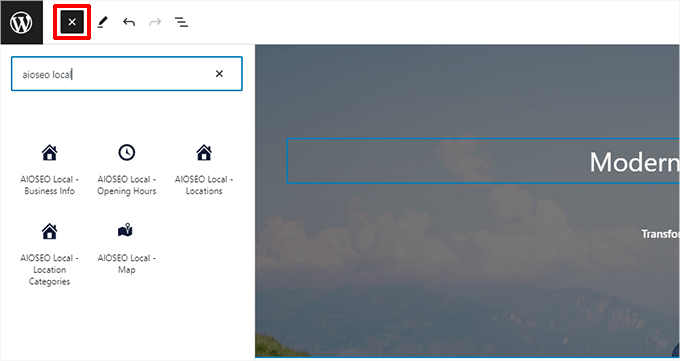
You can then use the WordPress block editor to style or rearrange those items.
Don’t forget to update your page and preview your changes.
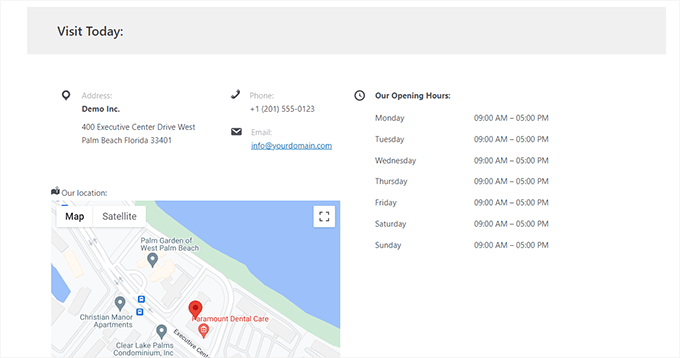
For more details, see our guide on how to use the WordPress block editor.
Step 3: Add Your New Website to Google Business Profile
Once you have created your new website, you can add it to your Google Business Profile.
To do that, you need to visit the Google Business Profile website or search Google with your exact business name.
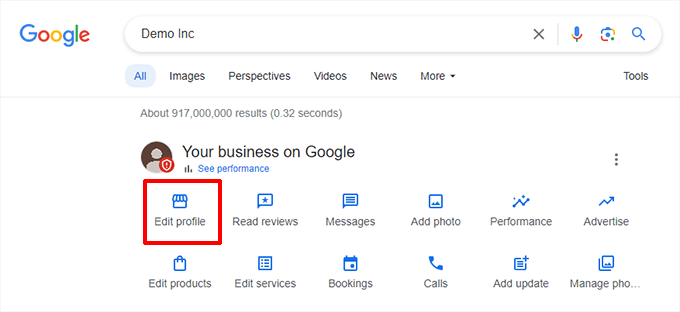
This will bring up a popup with your business information.
Scroll down to the Website section and replace your old website address with the new one.
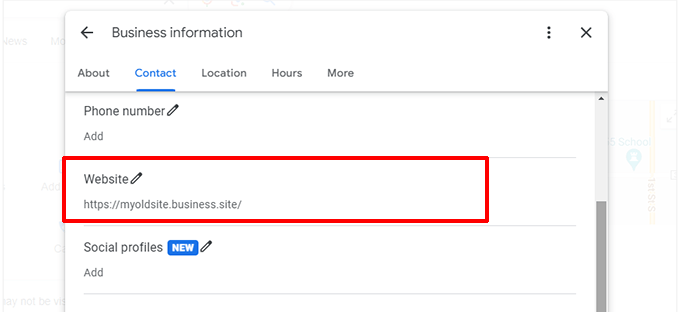
Now, visitors who click on the ‘Website’ link in your Google Business Profile will be directed to your new WordPress website instead of the old Business Profile website.
Step 4: Create Landing Pages for Your Google Ads (Optional)
Google previously offered free ad credits to businesses when they added their sites to Google Business Profile.
If your ads were bringing users to your old Google Business Profile site, then you may want to send them to your new WordPress website.
Now that you are using an actual website builder, you can also create attractive landing pages for your Google Ads campaigns.
The easiest way to create professional-looking landing pages is by using SeedProd. It is an easy-to-use drag-and-drop page builder for WordPress.
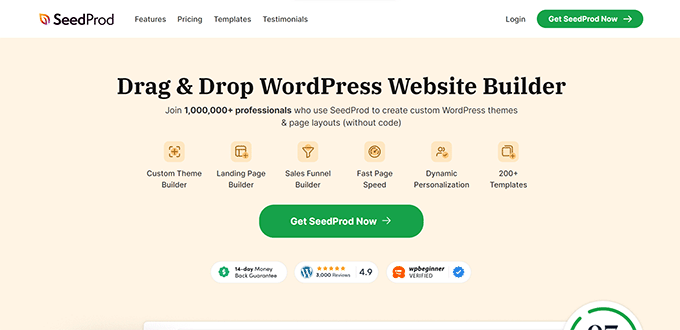
Note: There is also a free version of SeedProd. However, we recommend upgrading to the paid version to unlock more features.
SeedProd comes with 300+ page templates to use as a starting point. After that, you can use its drag-and-drop interface to design your ad landing page.

For more details, you can see our guide on how to make a Google ad landing page in WordPress.
Step 5: Redirect Your Custom Domain
By default, Google hosted Google Business Profile sites on URLs like:
https://example.business.site
Some businesses started using their own custom domains and simply redirected them to their Google Business Profile sites.
Depending on where you registered your domain name, you will need to sign in to your domain registrar website, undo that redirect, and point it to your new WordPress site.
On the other hand, if you want to start using that domain as the primary domain for your new WordPress site, then you need to point it to your hosting provider’s nameservers.
Simply log in to the domain management area and look for ‘DNS & Nameservers’. We are showing the Domain.com settings in screenshots, but it looks pretty much the same across all domain providers.
Here, you will see nameservers pointing to your domain registrar. You need to remove those entries.
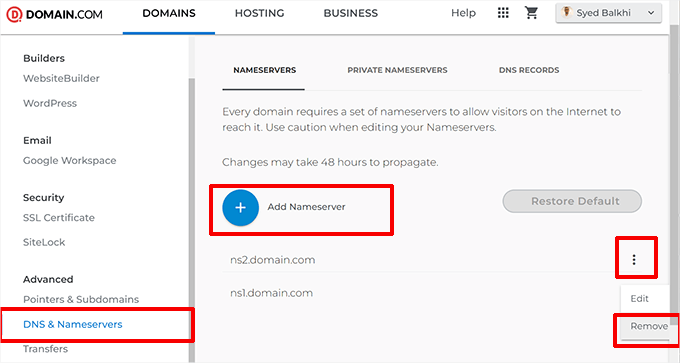
After that, click on the ‘Add Nameserver’ button and add your new hosting provider’s nameservers.
For instance, if your WordPress site is hosted on Bluehost, then your nameserver information will look like this:
ns1.bluehost.com
ns2.bluehost.com
For more details, please see our guide on how to change domain nameservers and point it to a new host.
Once you have changed the nameserver information, it may take some time (between a few hours to two days) for those changes to propagate across the internet.
Bonus: Make the Most Out of Your New WordPress Site
Now that you have set up your WordPress website and added it to your Google Business profile, you can start customizing your site.
Here are some tips to help you get started.
1. Choose a WordPress Theme
WordPress gives you access to thousands of themes (website templates). Many of them are free, and you can install one of them to instantly transform the appearance of your website.
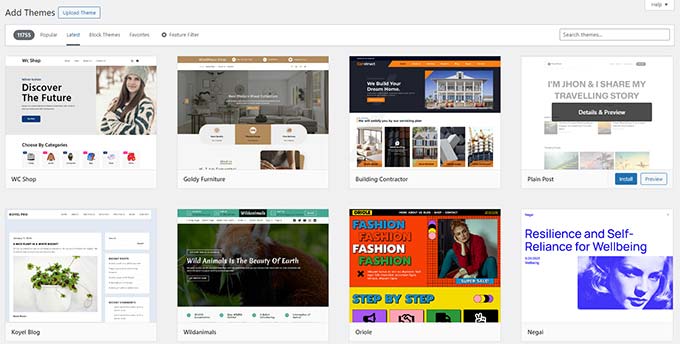
See our article on how to choose the perfect theme for your website for more details.
However, it may get quite confusing when you have this much choice. To avoid this, you can take a look at our curated lists of WordPress themes that are hand-picked by our WordPress experts:
Once you’ve picked one, simply follow our step-by-step tutorial on how to install a WordPress theme.
2. Create Important WordPress Pages
WordPress comes with two default content types, posts and pages. While posts belong to a blog, pages are used to create a site’s structure and layout.
You can start adding pages by going to Pages » Add New Page in the WordPress admin area.

For instance, if you run a small plumbing services business, then you may want to add an About page, a Services Page, and a Contact page.
For more information, see our list of essential pages to create on a WordPress website.
We also recommend adding blog posts so that you can get more traffic to your business website. You can see our guide on how to start a WordPress blog for more information.
3. Install Necessary Plugins
Plugins are like apps for your WordPress website. They allow you to add extra functionality and new features to WordPress.
For a small business website, here are some must-have plugins:
- WPForms – You will need it to create forms that users can submit on your website. These include a contact form, booking forms, appointments, and more. Plus, you can also use WPForms to accept online payments.
- All in One SEO – We have already mentioned it above, but it’s worth repeating here. This SEO plugin allows you to optimize your website and get free traffic from search engines.
- MonsterInsights – It helps you see how many users are coming to your site, where they are visiting from, and what they do on your site. It connects WordPress to Google Analytics and unlocks a treasure trove of data that you can use to make informed decisions for your business’s growth.
- Duplicator – It is a powerful WordPress backup plugin that allows you to create automatic backups and store them on the cloud. Most importantly, it helps you easily restore your website from backups.
- For more plugin recommendations, just take a look at our list of essential WordPress plugins for business websites.
We hope this article helped you learn what you need to do to protect your business when Google Business Profile sites shut down. Next, you may want to see our guide on how to grow your business online or take a look at our complete WordPress SEO handbook to get more traffic to your new website.
If you liked this article, then please subscribe to our YouTube Channel for WordPress video tutorials. You can also find us on Twitter and Facebook.
Leave A Comment
You must be logged in to post a comment.