Are you looking for the best way to host and manage a virtual event?
Maybe you’d like to hold your next conference online or run a webinar about your products and services. You may be worried that it will be too expensive, or you won’t have the technical knowledge to pull it off.
In this article, we’ll list all of the equipment on online services you’ll need, and teach you everything you need to host a virtual event in WordPress. Plus, if your business doesn’t have a website, then we will cover that too.
Why Host Virtual Events?
Are you looking to host a conference to build your authority in your niche, or invite users to a webinar where you can demonstrate your products and services? You can use your WordPress website as a launchpad for virtual events.
A virtual event is an online gathering where people connect using computers and mobile devices instead of meeting in the same physical location. These events can range from small gatherings to full-scale conferences with thousands of attendees.
They are a good way to generate leads, boost user engagement, and even make money through sponsorship opportunities, selling premium tickets, and offering paid membership.
There are many benefits to running these events online. You won’t need to worry about paying for a venue, and your users won’t have to worry about transport. You also won’t be so affected by time zone differences.
These benefits mean that you’ll likely have a larger attendance at the event. However, virtual events are also more prone to technical problems and difficulties. Organizing an event will always require effort, planning, and the right resources, even when you hold it online.
Are you ready to learn how to host a virtual event using your WordPress website? We’ll walk you through each step.
Here’s a quick outline that you can use to easily browse the article:
Setting Up Your Event Website
If you already have a WordPress website set up, then you can click skip this section. If you like, you can simply use your business website. For big events, you might like to create a landing page on a separate website.
You can watch this video tutorial, or read our step-by-step guide on how to create a WordPress website to get started.
If you are on a budget, then you’ll find some ideas on how to keep the cost down in our guide on how much it really costs to build a WordPress website, such as free alternatives to popular plugins.
If you’re just getting started, we highly recommend using Bluehost to host your website.
They are offering WPBeginner readers a free domain name and a 60% discount on web hosting. Basically, you can get started for $2.75 per month.
You might also want to see our roundup of the best WordPress themes for events and conferences so you can customize your site design.
Once your website is set up, the next step is to choose and install an event plugin.
Choosing and Installing a WordPress Event Plugin
You can add the features you need to host an event to your WordPress site by installing a WordPress event plugin. The plugin you choose will depend on your needs, such as whether your users need to purchase a ticket or simply register or RSVP to attend the event.
You should start by deciding whether you want to display an RSVP form, event calendar, or event registration page on your website.
Create an RSVP Form in WordPress
If you simply want your users to RSVP to your event, you can use the free plugin WPForms Lite to create a simple RSVP form on your website.
This will let you keep track of who will be attending and give you an idea of the number of participants you will have.
We show you how to use WPForms to create the form, add it to your website, and check for responses in our guide on how to create an RSVP form in WordPress.
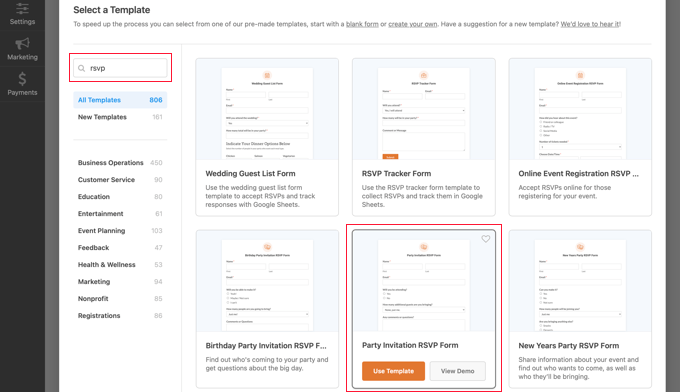
For other options, see our list of the best WordPress RSVP plugins for your website.
Create a Simple Event Calendar in WordPress
An event calendar is an easy way to let your users know about the events you are running. Depending on the plugin you choose, you will be able to display your events, let users RSVP to events, sell tickets, add and manage venues, and much more.
For example, The Events Calendar is a feature-rich event management system that makes it easy to add all your event details, including a separate page for venues and organizers.
You have multiple different views for displaying your event calendar on the front end, including day, week, or month. You can even spotlight events to increase engagement on the events you want the most attention on.
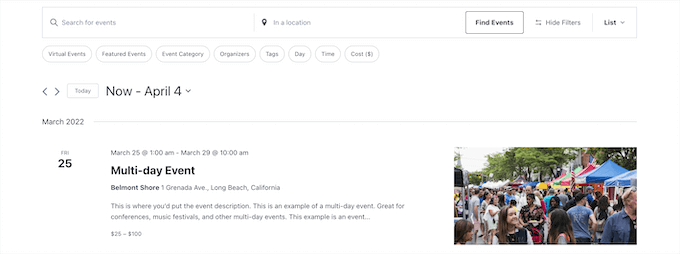
Plus, you can add filtering, so your users can find the exact events they’re looking for, and they offer several addons for selling tickets.
Create an Event Registration Page in WordPress
If you decide to sell tickets to your event, you will quickly discover that many third-party event registration and ticketing services will charge a small fee for each ticket you sell.
You can avoid some of these issues by creating your own event registration page in WordPress. This will allow you to collect online payments directly, store attendee information on your website, and use your own brand name when promoting the event.
You can easily create an event registration page using WPForms.
The free Lite version supports Stripe credit card payments, and you can unlock additional payment methods such as PayPal, Square, and Authorize.net by upgrading to the Pro plan.
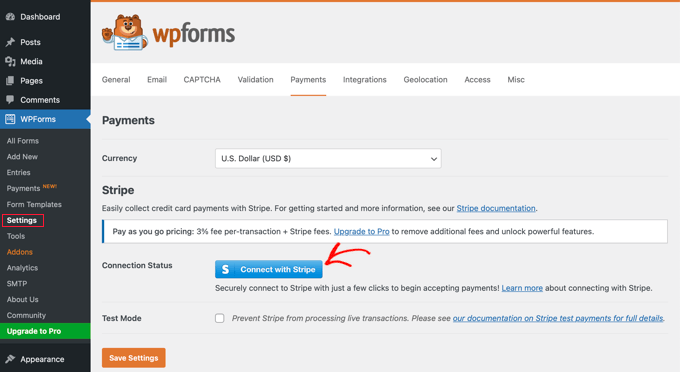
To get started, see our guide on how to create an event registration page in WordPress.
Creating a Landing Page for Your Event
Now that you have a way that users can let you know they will attend your event, you should create a landing page. This is a carefully designed page that lets your visitors know about your event and encourages them to sign up.
It should contain a clear call to action that is linked to the RSVP form, event calendar, or event registration page that you created.
There are many WordPress landing page plugins available. If you are looking for a free option, then we recommend the free version of SeedProd. As your needs grow, you can upgrade to the much more powerful SeedProd Pro to have many more options.

In our guide on how to create a landing page with WordPress, we show you how to use the top three solutions for creating landing pages in WordPress. These landing page builders are easy to use, optimized for speed, and affordable for small businesses. You can pick the solution that best fits your needs.
You’ll also find helpful tips on making your landing page more effective in our guide on how to increase your landing page conversions by 300%.
Once you have a landing page for your event, you can start to promote it. You can start by linking to your event landing page in your email newsletter and social media.
Getting the Right Audio and Video Equipment
Unless you’re getting started on a really tight budget, you and the speakers at the event shouldn’t use the built-in webcam and microphone on your computer. Your users will instantly notice the low audio and video quality and may decide not to attend future events.
Your most important choice of equipment will be your microphone. We recommend you choose a USB mic so you can plug it straight into your computer without the need for extra gear. Here are three popular microphone choices:
- The Samson C01U is a good entry-level USB microphone.
- The Rode NT-USB is a high-quality USB microphone that comes with a desktop mount and pop filter.
- The Heil PR-40 is what the pros use. It has the standard XLR connection instead of USB, so you’ll need to buy a 3.5mm to XLR Cable, audio interface, or mixer as well.
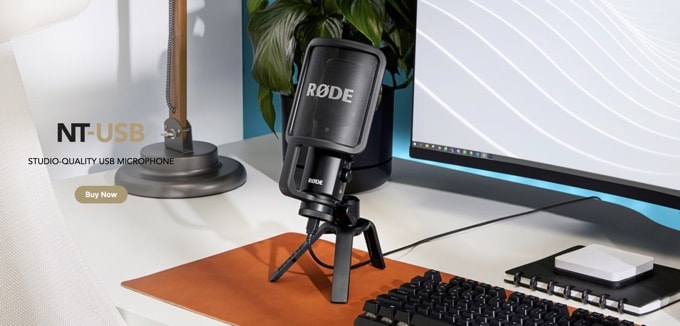
Your microphone will sound best if you purchase a few more items, such as a microphone arm, shock mount, and pop filter. For example, if you are using the Rode NT-USB microphone, you will need the Rode SM6 shock mount with a built-in pop filter and Rode PSA1 boom arm.
The Rode Podcaster kit is good value and comes with a mic arm and shock mount, and we use this at WPBeginner.

If you don’t want to buy all of your equipment at once, then you could use your built-in webcam while you get started, but you will likely get better video quality out of your smartphone’s camera.
You will need to mount your phone on a tripod, and the GripTight GorillaPod Stand PRO is a good option for any type of phone. It has adjustable legs that can be attached to any surface.
Eventually, you can upgrade to a 4K webcam like the Logitech BRIO Webcam. This camera is perfect for video conferencing and easily clips onto any computer. It has excellent video quality even in low light.
You’ll also need decent headphones so that the audio from your speakers isn’t picked up by your microphone. Headphones that plug in are more reliable than Bluetooth headphones. A good option is the Sony MDR7506.
Choosing and Integrating a Video Conferencing Service
You will need to choose an online service that allows you to run virtual events. You can check our list of the best webinar software platforms and compare their features so you can choose the best webinar platform to fit your needs and budget.
We believe that GoToWebinar, LiveStorm, and EasyWebinar are good options because they offer all the powerful webinar features that you need with high-quality video streaming and affordable pricing plans.
If you’re just starting out, then we recommend Zoom because it is easy to use, well-known, and mobile-friendly. Zoom lets you schedule meetings in advance and provides a unique link for each event that you can share with the participants and include on your website.

It is also easy to integrate Zoom with WordPress but to do that you need at least the Pro version of Zoom and the Zoom webinar addon. There is a free version, but you’ll need to have a paid account in order to set up the integration.
You will need to set up Zoom correctly and then connect your account with your WordPress website. Once you’ve done that, you can set up a workflow using Uncanny Automator to automatically register your users with Zoom once they sign up or purchase a ticket.
To learn how to connect Zoom with your website step by step, see our detailed guide on how to easily integrate Zoom meetings and webinars in WordPress.
Running the Event
Before you know it, the time will arrive to run your event. If you’ve chosen the right webinar software platform, you will have all of the features you need, along with reliable, high-quality video and audio.
You will be able to feature multiple presenters and hosts and share your screen with the participants for demonstrations.
We recommend that you mute everyone by default. However, using your platform’s built-in chat feature, participants will be able to interact with you and one another during the event.
They will also be able to ask and answer questions, and you can have them fill in polls to provide you with feedback. We recommend UserFeedback by MonsterInsights for this sort of interaction.
Event Follow Up
After the event is finished, you should follow up with your participants as soon as possible, while they are most interested and the event is still fresh in their minds.
Because you have their contact details from when they registered, you can send them a follow-up email. In that email, you can ask for their feedback. You might like to follow our guide on how to create a survey form in WordPress.
You can follow up with further emails to let them know about the events you have coming up and to gauge their interest in different topics by creating an interactive poll.
Most webinar services will allow you to record the event, and some can even create transcripts. This will allow users who couldn’t attend the live event to see the content.
Finally, most webinar services include actionable analytics so you can see what’s working and what’s not. They will show you who attended, gauge the audience’s interest, list the questions that were asked, and more. This will allow you to fine-tune your event in the future for maximum conversions.
We hope this tutorial helped you learn how to host a virtual event in WordPress. You may also want to see our guide on how to add keywords and meta descriptions, or our expert pick of the best social media plugins for WordPress.
If you liked this article, then please subscribe to our YouTube Channel for WordPress video tutorials. You can also find us on Twitter and Facebook.
Leave A Comment
You must be logged in to post a comment.