Recently one of our readers asked if it was possible to stop WordPress from overwriting the custom code in your .htaccess file?
WordPress along with several plugins add custom settings to the .htaccess configuration file. If you have added your own custom code to .htaccess, then you may be worried that it will be overwritten or deleted.
In this article, we’ll show you how to stop WordPress from overwriting the .htaccess file.
Why Does WordPress Overwrite the .htaccess File?
Your .htaccess file is a powerful configuration file that stores important settings about your WordPress website. It contains rules that tell your hosting server how to handle your site.
WordPress uses the .htaccess file to store its permalink settings. Whenever you change or regenerate your permalinks, WordPress will automatically overwrite the old settings in .htaccess with the new settings.
Some WordPress plugins also save their settings in .htaccess. For example, the W3 Total Cache plugin will modify your .htaccess file in order to configure the caching and optimization tools that are part of the plugin.
Lastly, you can make your own custom changes to .htacess to control how your website works. For example, you can add custom rules to the file that protect your admin area, keep your site safe from hackers, set up redirects, ban suspicious IP addresses, and more.
Some users are concerned that if they add their own custom rules to .htaccess, then they may be deleted when WordPress overwrites the file with new settings. Other users prefer to manually configure .htaccess and not let WordPress write to it at all.
With that being said, let’s take a look at how to stop WordPress from overwriting your .htaccess file. Simply use the quick links below to jump to the section you are interested in.
How to Stop WordPress From Overwriting Your .htaccess Rules
The good news is that if you understand how the .htaccess file works, then you can be confident that your custom rules will not be overwritten.
That’s because the areas of the file that will be changed by WordPress or your plugins are clearly marked. Simply make sure that you don’t add code to those areas.
Don’t Modify Code Inside the WordPress Markers
As we said earlier, WordPress uses .htaccess to store the settings for an SEO-friendly URL structure. The code it saves to the file will be automatically overwritten and updated whenever you change your permalink settings.
As you can see in the screenshot below, WordPress saves this information between two markers, # BEGIN WordPress and # END WordPress.
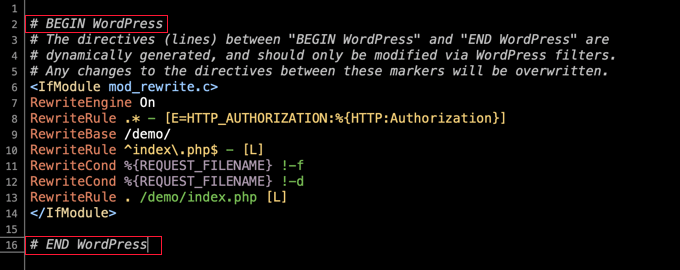
Notice the warning inside those markers:
The directives (lines) between “BEGIN WordPress” and “END WordPress” are dynamically generated, and should only be modified via WordPress filters. Any changes to the directives between these markers will be overwritten.
This means that WordPress will not overwrite or modify any code that you add outside these markers. Users typically add their custom code to the top of the file, above the # BEGIN WordPress marker.
Don’t Modify Code Inside Your Plugins’ Markers
When a plugin saves its settings to .htaccess, it also places it between markers that look like # BEGIN Plugin and # END Plugin.
For example, if you install and set up the W3 Total Cache plugin to improve your website speed and performance, then it will add rules to .htaccess between # BEGIN W3TC Browser Cache and # END W3TC Browser Cache markers.
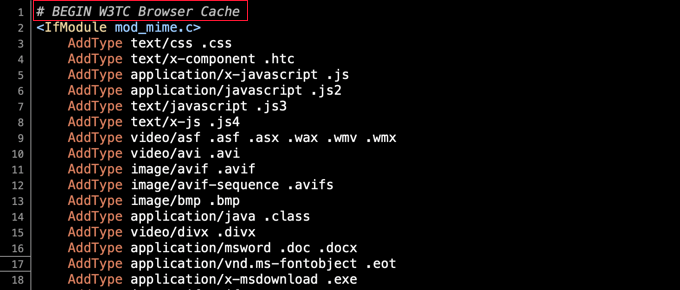
These rules will be overwritten whenever you change the plugin’s settings, so you need to be careful not to add your own custom .htaccess rules between those markers.
Creating Markers for Your Custom Code
In rare cases, a badly behaved plugin may modify code outside of its # BEGIN and # END markers. However, it will normally not modify code found between the markers used by WordPress or other plugins.
If you are concerned about a badly behaved plugin overwriting your code, then you can add your own markers to the .htaccess file.
For example, you can type # BEGIN MyCustomCode and # END MyCustomCode markers at the top of the .htaccess file, and then add your own custom rules between those markers.
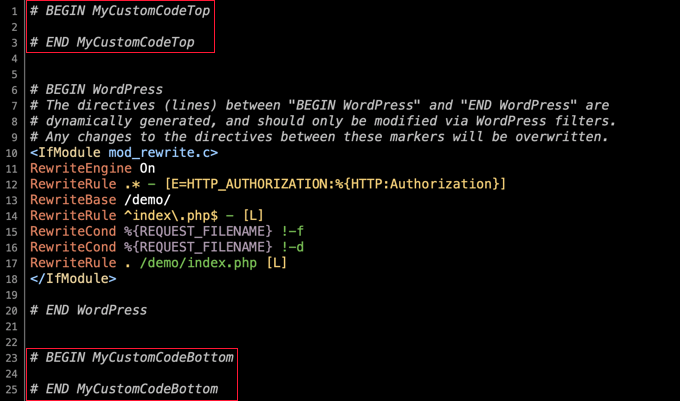
If you also need to add code to the end of .htaccess, then you can add a different set of markers there. Just be sure to give them different names. For example, you could use ‘MyCustomCodeTop’ and ‘MyCustomCodeBottom’.
How to Stop WordPress From Modifying .htaccess
Now that you understand how .htaccess works, you can be confident that your custom code will not be overwritten by WordPress or your plugins.
However, some developers and advanced users want to stop WordPress from making any changes to .htaccess.
For example, they may want to create permalinks by typing the settings manually into .htaccess. In this case, they will want to avoid conflicts by stopping WordPress from saving its own permalink settings to the file.
We don’t recommend this unless you know what you’re doing, because it can lead to unexpected consequences. However, it can be done by changing the file’s permissions or using code.
Stopping WordPress From Changing .htaccess Using File Permissions
One way to stop WordPress from modifying .htaccess is to make the file read-only. To do this, you need to change the file permissions using an FTP client or the file manager provided by your WordPress hosting provider.
You will find the .htaccess file in the root directory of your WordPress installation. Next, you should right-click the file and select ‘File permissions’.
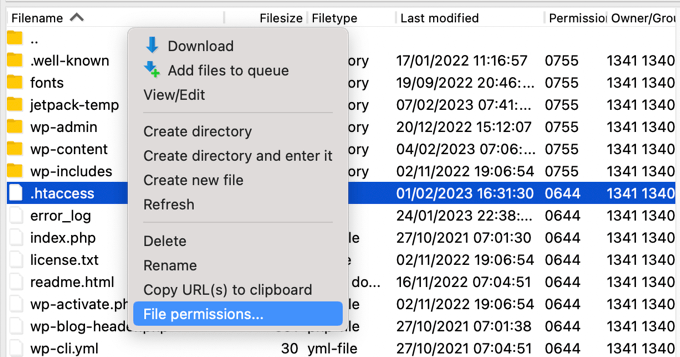
This will display a pop-up where you can change the file’s attributes.
The default setting will be 644, but you can change this to 444 by typing directly into the ‘Numeric value’ field or making sure that only the ‘Read’ boxes are checked.
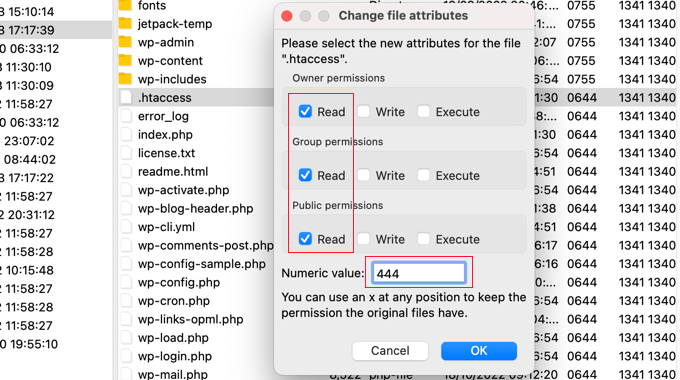
Once you click the ‘OK’ button, the file will be read-only and cannot be modified.
Of course, this will mean that you are unable to write to the file as well. When you wish to make changes, you will need to temporarily set the file permissions back to 644.
Stopping WordPress From Changing .htaccess Using Code
Another solution is to use a code snippet that lets WordPress know not to write to the .htaccess file. This is useful if you want to stop WordPress from modifying .htaccess without blocking your plugins.
Note: Editing any core WordPress files can be dangerous. Even a small mistake can cause major errors on your site. That’s why we only recommend this method for advanced users.
Simply add the following code snippet at the end of your wp-config.php file. If you need help, then please refer to our guide on how to edit the wp-config.php file in WordPress.
add_filter('got_rewrite', '__return_false');
Once you’ve done that, WordPress will no longer write to the .htaccess file.
Error Message Displayed When WordPress Can’t Change .htaccess
If you try to change your permalink settings when .htaccess is set to read-only, then an error message will be displayed.
At the top of the Settings » Permalinks page, you will see the message ‘You should update your .htaccess file now.’

This lets you know that WordPress was unable to modify the .htaccess file.
Normally, this is what you intended. However, if you do wish to add the WordPress permalink settings to .htaccess, then you will need to do it manually.
At the bottom of the Settings ≫ Permalinks page, you will see another error message saying that your .htaccess file is not writable. Underneath that, you will see the rules that need to be added to .htaccess.

If you wish to add those settings, then you will need to temporarily change the .htaccess file permissions back to 644 so that it can be edited. After that, you should paste the rules between the file’s WordPress BEGIN and END markers, replacing the code already there.
When you’re finished, simply set the value back to 444 and save the file. It will once again be unwritable.
We hope this tutorial helped you learn how to stop WordPress from overwriting the .htaccess file. You may also want to learn how to add push notification in WordPress and check out our expert list of the best WordPress SEO plugins and tools.
If you liked this article, then please subscribe to our YouTube Channel for WordPress video tutorials. You can also find us on Twitter and Facebook.
Leave A Comment
You must be logged in to post a comment.