Jesse Hollington / Digital Trends
The second wave of Apple Intelligence features are coming later this year in iOS 18.2, and with the first developer betas now available, they’re ready for early adopters to try out. While iOS 18.1 brought mostly text-based AI tools, the iOS 18.2 betas unveil the more fun and visually creative elements of Image Playground and Genmoji, as well as unlock ChatGPT integration, Visual Intelligence for the iPhone 16 lineup, and the expansion of Apple Intelligence to more English languages.
We’ll dig into how to use Image Playground and Genmoji in a moment, but a word of caution before we go. We know lots of folks are champing at the bit to try out these new features, but we’d be remiss if we didn’t remind everyone that these are only available in a developer beta right now — and a first release version at that.
This means you should exercise caution before jumping in. Early developer betas are likely to wreak havoc on your iPhone’s battery life, present compatibility problems with apps, and in a worst-case scenario, they could even brick your iPhone. Apple explicitly states that developer betas should only be installed on devices used by developers for testing apps. That doesn’t mean you can’t install it on your primary iPhone, but you really shouldn’t unless you understand what you’re getting yourself into and you’re willing to take those risks.
Lastly, like other Apple Intelligence features, Image Playground and Genmoji are only available on the iPhone 15 Pro, iPhone 15 Pro Max, and all iPhone 16 models. Apple hasn’t yet released any iOS 18.2 betas for older iPhones, but even when it does, that won’t unlock any Apple Intelligence features for those models.

Nadeem Sarwar / Digital Trends
How to install the iOS 18.2 Beta
Apple’s new Genmoji and Image Playground features are coming in iOS 18.2, which is in beta right now. If you want to play with these features early, you’ll need to install the iOS 18.2 developer beta or a corresponding public beta when one arrives. We don’t recommend doing this on your primary iPhone, especially at this early stage unless you’re willing to live with potential instability, app incompatibilities, and reduced battery life. If that doesn’t deter you, here’s how you can grab the developer beta if you’re willing to take the risk or you have a spare iPhone 15 Pro or later model available.
Step 1: Back up your iPhone. This is a good idea before installing any iOS update, and it’s especially true with a first developer beta. Remember that developer updates aren’t intended to be used on devices that have data on them, so there’s a greater chance for things to go wrong. You can find step-by-step instructions in our guide on How to back up an iPhone using Mac, iCloud or PC.
Step 2: Sign up for Apple’s Developer Program by visiting developer.apple.com. Sign in with the same Apple ID you use on your iPhone, and agree to the terms. Note that you don’t need to enroll or pay anything to access the iOS 18.2 developer beta; signing up and accepting the terms of the developer agreement is sufficient.
Step 3: On your iPhone, go to Settings > General > Software update. A new “Beta updates” section should appear directly below Automatic updates.
Step 4: Select Beta updates and choose iOS 18 developer beta.
Step 5: Select Back in the top-left corner.
Step 6: After a few seconds, the iOS 18.2 beta should appear. Select it and follow the instructions to install the update.
Jesse Hollington / Digital Trends
How to request Early Access
Unfortunately, even after you’ve installed the iOS 18.2 beta, you may have to wait a bit before you can play with the new image-creation features. Apple is treating these as “Early Access” features, and appears to be granting access on a first-come, first-served basis. That’s likely so it can manage the load on its Private Cloud Compute servers that are needed to deliver extra power for AI image generation.
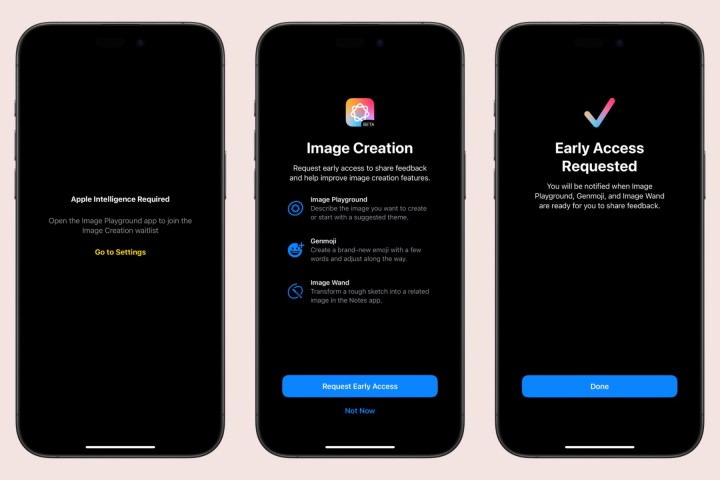
The wait list isn’t automatic; you won’t be on it merely because you’ve installed iOS 18.2. You’ll have to specifically request early access. Here’s how.
Step 1: Locate and open the Image Playground app on your iPhone. This should appear in the first open app slot once iOS 18.2 is installed.
Step 2: Choose Request early access on the welcome screen.
Step 3: Wait. The next screen suggests you’ll be notified when the Image Playground, Genmoji, and Image Wand features are ready for you, but we suggest checking back from time to time.
Note that there’s no definite timeline for how long this will take. Many who installed the iOS 18.2 developer beta immediately after it was released got access within hours, but we’ve seen reports of others waiting for 24 hours or more. There’s nothing you can do to speed this process up as it seems that Apple is just letting more people in as it has the capacity to support more users.
Jesse Hollington / Digital Trends
How to create a basic image using Image Playground
Once the image-creation features are available, you can start creating fun images using Apple Intelligence. Here’s how to create a basic, generic image using just a text description.
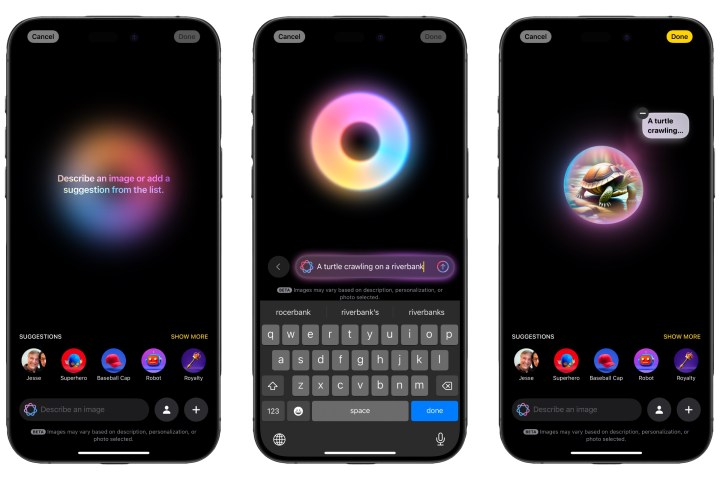
Step 1: Open Image Playground.
Step 2: Select the Describe an image box at the bottom, type something you’d like Image Playground to create, and select Done or tap the send button to the right of the text field.
Jesse Hollington / Digital Trends
Step 3: Image Playground will return to the main screen with your description shown near a glowing bubble as it generates the requested image.
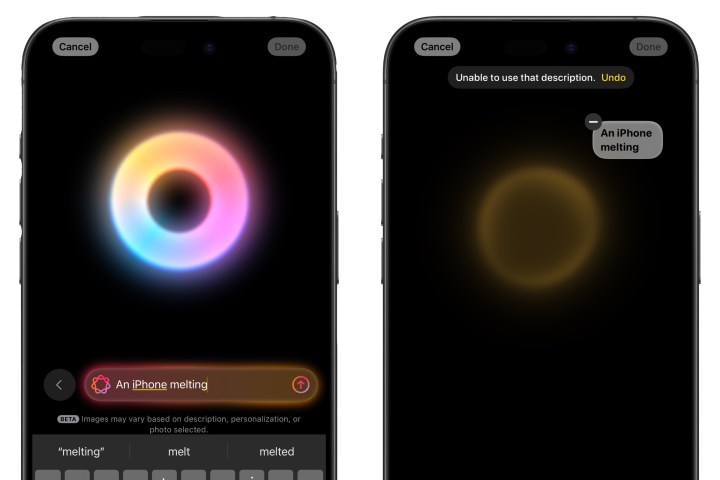
Step 4: Note that not all descriptions will result in viable images, so you may see a banner at the top that says Image Playground is unable to use your description. In that case. you’ll need to remove it and try again by either selecting Undo or choosing the (-) minus sign by the text block.
Jesse Hollington / Digital Trends
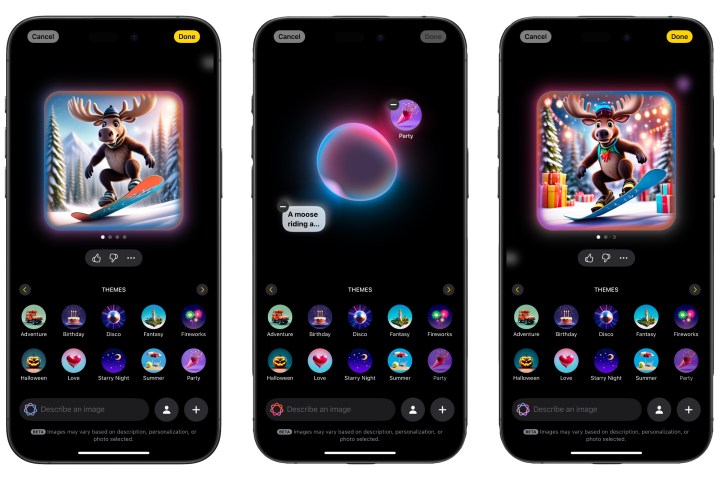
Step 5: Image Playground will generate four images based on your selections. You can swipe left and right to view them. Additional variations will be generated as you continue to swipe to the right.
Step 6: Once the initial images have been generated, you can change the style by selecting the (+) plus button in the bottom-right corner and selecting Animation (the default) or Illustration.

Jesse Hollington / Digital Trends
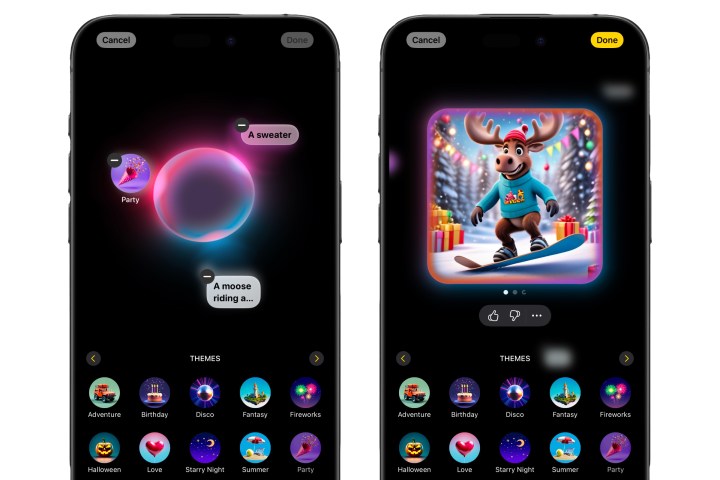
Step 7: To further customize your image, select Describe an image and enter more text.
Note that descriptions used here should be as simple as possible; for example, instead of typing “wearing a sweater,” you only need to type “sweater.” Apple Intelligence can figure out where the sweater is supposed to go.
Jesse Hollington / Digital Trends
Step 8: Instead of typing, you can use any of the suggestions that appear near the bottom. Swiping to the right will show categories of themes, costumes, accessories, and places to choose from.
Note that any of these elements can also be described by typing; the suggestions are merely shortcuts to provide some ideas to get your creative juices flowing.
Step 9: If you change your mind, you can remove a descriptive element by tapping on the photo to return to the generation screen and then selecting the (-) minus sign beside the description you want to take out.
Jesse Hollington / Digital Trends
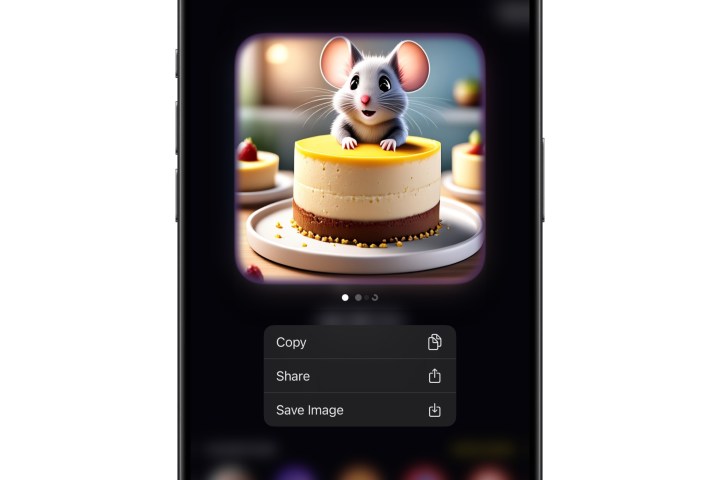
Step 10: When you’re satisfied with the result, you can save it to the Image Playground library by selecting Done in the top-right corner. You can also copy it, share it, or save it directly to your iPhone photo library by long-pressing on the image and choosing the appropriate option from the pop-up menu.

Jesse Hollington / Digital Trends
How to create an avatar of a person using Image Playground
What makes Image Playground even more whimsical is that you can select any face from your photo library to use as a basis for a new image, effectively creating AI avatars of all your friends and family.
Note that Apple has wisely put a few guardrails here. Images will have a cartoony, Pixar-like appearance and you can only do headshots, so there’s no ability to create realistic-looking images of people or do strange things with their bodies. However, you can still have a lot of fun putting yourself or other people you know in a variety of different settings and outfits. Here’s how to get started.
Step 1: Open the Image Playground app.
Step 2: If you’ve already saved one or more images from a prior session, choose the (+) plus button at the bottom to create a new image.
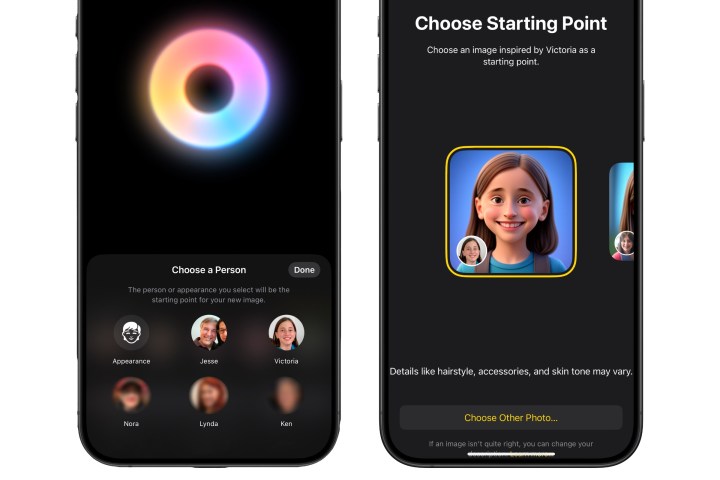
Step 3: Select the person icon to the right of the “Describe an image” box. This will open a list of people from your photo library, complete with their names if you’ve entered them in the Photos app.
Jesse Hollington / Digital Trends
Step 4: Choose the person you’d like to base your new image on. Note that you can only choose one person here; Image Playground doesn’t support group shots yet.
Step 5: The first time you select a new person, you’ll be asked to choose a starting point. You’ll be shown several renderings based on different photos of the person that you have stored in your library.
Swipe left or right to choose the one you like best and then select Done in the top-right corner. This will be used for all future images generated using this person, but don’t worry, you can return to this screen to choose a new look if you change your mind by selecting the Edit button underneath the person’s image in the “Choose a Person” view.
Step 6: Once you’ve selected a person, you can then continue customizing your image as described in the previous section by adding suggested themes, costumes, accessories, or places, or using the “Describe an image” box to type in anything else you want to add or change.
You also don’t need to start with a person. You can begin by creating your image and then select a person at the end, which will swap the main subject for the chosen individual.
The selected person also acts like any other descriptive element, so you can remove them in the same way — by tapping on the image and then selecting the (-) minus sign beside the person bubble.

Jesse Hollington / Digital Trends
How to create an AI image of a photo using Image Playground
Image Playground can also create an image based on a photo, The description suggests it’s limited to pets, nature, and food right now, but your mileage may vary. We’ve successfully generated images from clothing, footwear, TV remotes, coffee mugs, and other household objects. As with using people, you can only select a single photo; choosing a new one will replace whatever you’ve previously selected. You also can’t combine a person and a photo.
Step 1: Open the Image Playground app. If you’ve already saved one or more images from a prior session, choose the (+) plus button at the bottom to create a new image.
Step 2: Tap the (+) plus button in the bottom-right corner.
Step 3: Choose Animation or Illustration for your preferred style.
Step 4: Select Choose photo to choose an existing image from your photo library, or Take photo to capture a new photo with your camera.
Step 5: After a few seconds, four AI-generated renders of the selected image will appear. Swipe to choose your preferred version or generate additional renders, and then customize it further as described in the previous sections by typing in descriptions or adding new elements from the suggestions. When finished, tap Done to save it to your Image Playground library.

Jesse Hollington / Digital Trends
How to use Image Playground images in other apps
While Image Playground seems like a great way to generate new images for things like contact profile photos and Apple Music playlists, Apple has yet to build an Image Playground shortcut into those apps.
By default, images created in Image Playground are saved into a dedicated library in the Playground app. These are saved along with the elements that were used to create them, letting you reopen them and edit them at any time. There’s no way to access the Image Playground library from other apps (yet), but the good news is that you can save anything from there into your photo library or share it directly into other apps.
Step 1: Open Image Playground. If you’ve saved at least one photo from a previous session, you’ll see a library of your images.
Step 2: Select an image that you’d like to save to your photo library or share to another app. It will open in a full-screen view.
Step 3: Select the Share button in the bottom-left corner. The standard iOS Share Sheet will appear.
Step 4: Select Save image to save to your photo library or choose one of the other sharing options to share it via Messages, Mail, or any other app of your choice. Images are saved to photos as 1024 x 1024 HEIF files. Sharing in other apps will use a resolution and format appropriate for that app.
Step 5: Once the image is in your photo library, you can use it like any other image, including setting it as a contact photo or contact poster, setting it as artwork for your favorite Apple Music playlists, using it as an avatar on social media, and more.
Jesse Hollington / Digital Trends
How to make a Genmoji in Apple Messages
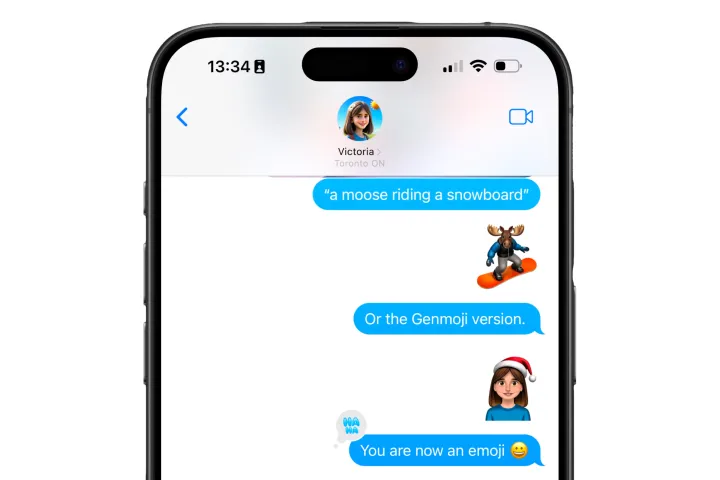
The other exciting part of the new image-creation tools in Apple Intelligence is Genmoji, which lets you create a custom emoji using any description you can think of. The process for this is very similar to Image Playground, as it lets you describe a photo and even add a person to your Genmoji. The primary difference is you can’t mix and match several elements — you get one description and one person.
There’s no dedicated app for Genmojis. Instead, they’re created from the same place you’d add a normal emoji in the Messages app.
Step 1: Open Messages and start a new conversation or select an existing one.
Step 2: Open the emoji picker by tapping the emoji symbol on the on-screen keyboard.
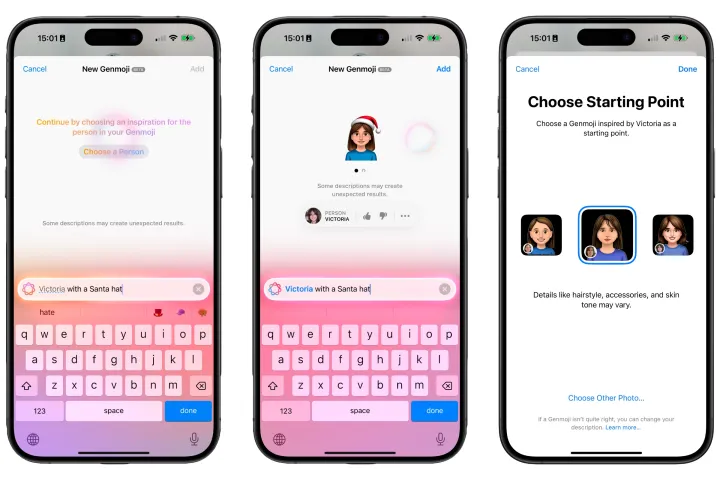
Step 3: Select the Describe an emoji text entry box and type a description of the Genmoji you would like to create.
Step 4: As usual, the list of emojis will filter to match your description. If nothing is found, you’ll see an option to Create new emoji. However, even if this doesn’t appear, you can select the smiling emoji with a (=) plus button to the right of the text entry field at any time to open the New Genmoji screen.

Jesse Hollington / Digital Trends
Step 5: Four previews of your described Genmojis will appear. You can use the text box to further refine the image.
Step 6: To base your Genmoji on a person, type their name anywhere in the text box. Use the name you’ve assigned to the person in the Photos app, and select it from the suggestion bar if necessary. If you’re having trouble getting the right person, you can tap on the name below the Genmoji preview to select a different person.
Jesse Hollington / Digital Trends
Step 7: Swipe left or right to choose the Genmoji version you’d like. As with Image Playground, continuing to swipe to the right will generate new versions.
Step 8: When you find the Genmoji you like, select Add to insert it into the current conversation.
The Genmoji will also be saved to your personal emoji/sticker library so you can reuse it again later.
How to use Genmoji in other apps
The normal emoji characters we use everyday are part of a broader standard, so Genmoji won’t work quite like normal emoji. Apple’s Messages app renders them like normal emoji, but other apps won’t see them that way. They’re more like the iMessage stickers that Apple introduced in iOS 17. When using other messaging apps, they’ll simply be sent as individual graphics, the same way stickers and Memoji have always worked.
The good news is that they’re still available in most messaging apps, but not all. As a rule, if an app lets you use stickers and Memoji, you’ll be able to create and use Genmoji there also. If not, you’ll be limited to the standard emoji. For example, Facebook Messenger, WhatsApp, and Slack are all cool with Genmoji (although, as we said, they’re sent as stickers), whereas Microsoft Teams is confined to the emoji spec.
Leave A Comment
You must be logged in to post a comment.